Zumen User Guide
Zumen is an iPhone, iPad, and Mac app that measures lengths, floor areas, and wall areas on PDF and image drawings. Match one dimension printed on the drawing, and the drawing becomes a ruler. Your drawings and measurements stay on your device and are never uploaded.
Key Features of Zumen
Open a drawing, set its scale, and choose what to measure with the buttons on the cards. The cards are ① scale, ② length, ③ floor area, ④ wall area, ⑤ furniture, and ⑥ notes.
Set the scale from one dimension
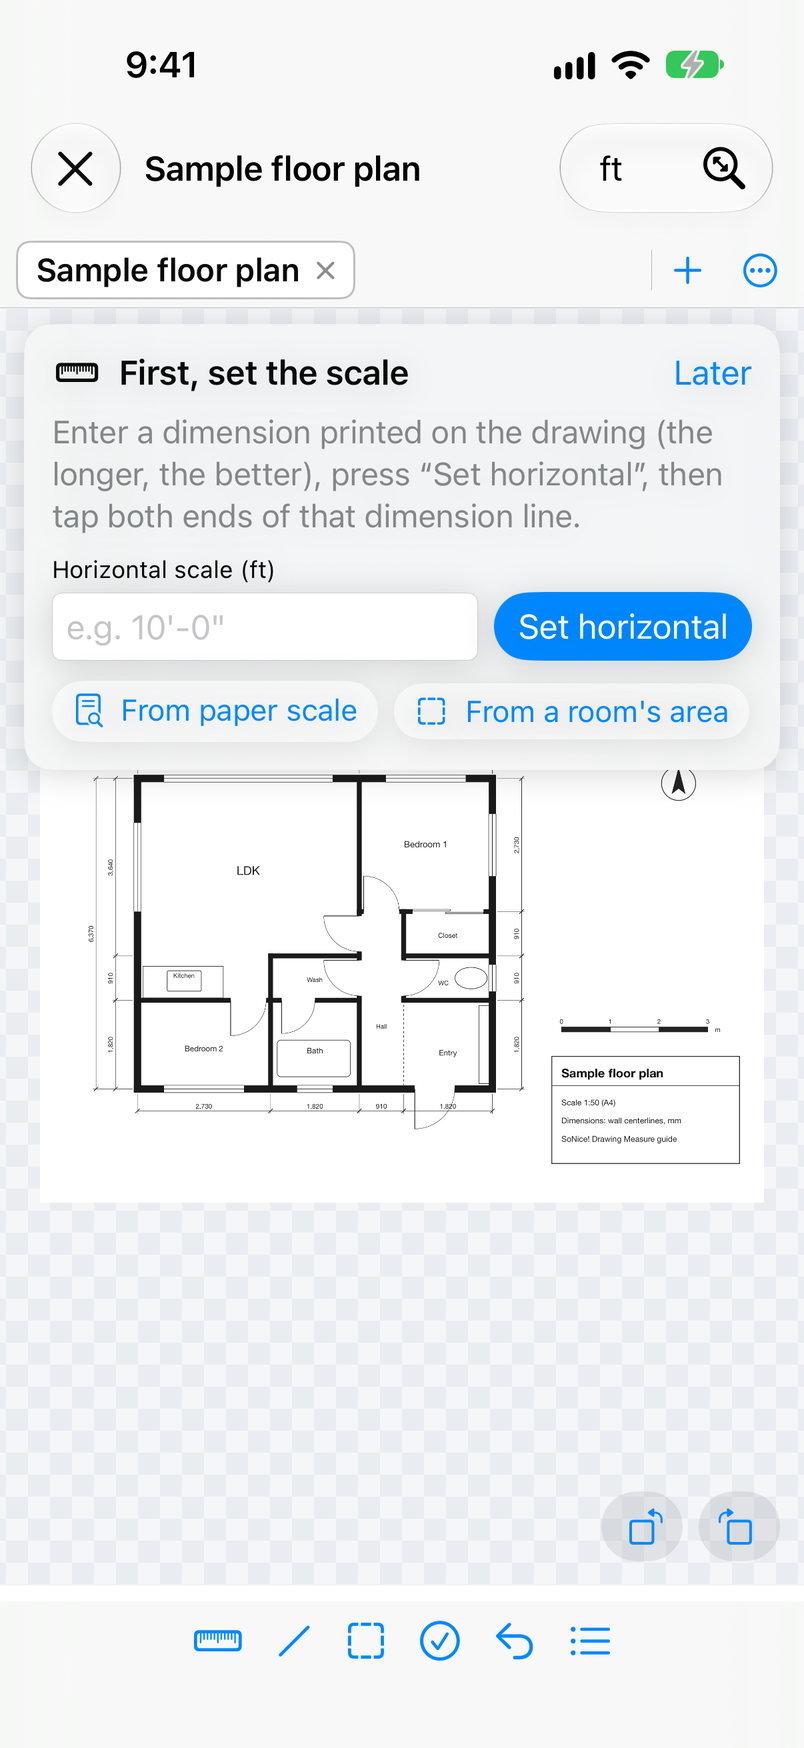
Enter a dimension printed on the drawing and tap (click on the Mac) both ends of its dimension line. You can set the horizontal and vertical scales separately, which helps with faxed or scanned drawings that are slightly stretched.
Length, floor area, and wall area
Place points along a line to measure its length, outline a room's corners to get its floor area, and multiply lengths by a height to get wall area.
Loupe and Apple Pencil
Touch and hold to bring up a magnifier, so you can see the spot under your finger as you place a point. With Apple Pencil, tap with the tip to place points and double-tap to finish.
Furniture and notes
Place rectangles (furniture) at the drawing's scale, then move and rotate them. You can also write notes on the drawing.
PDF, quantity tables, and work files
Export a PDF with your measurements, a list of lengths and areas (CSV or Excel), or a work file (.data) to continue later. Work files are shared with the Zumen web tool.
Tabs and projectsIn Development
Open several drawings as tabs in one window and save them together as a project (.zumen) (see Tabs and Projects).
Quick Start (Basic Usage)
Here is how to set the scale and measure a length on the sample floor plan that comes with the app. The steps are the same for your own drawings.
Open a drawing
On the first screen, tap “Open sample” to open a practice floor plan (A4, 1:50). To open your own drawing, use “Open drawing (PDF / image)”.
Enter a dimension
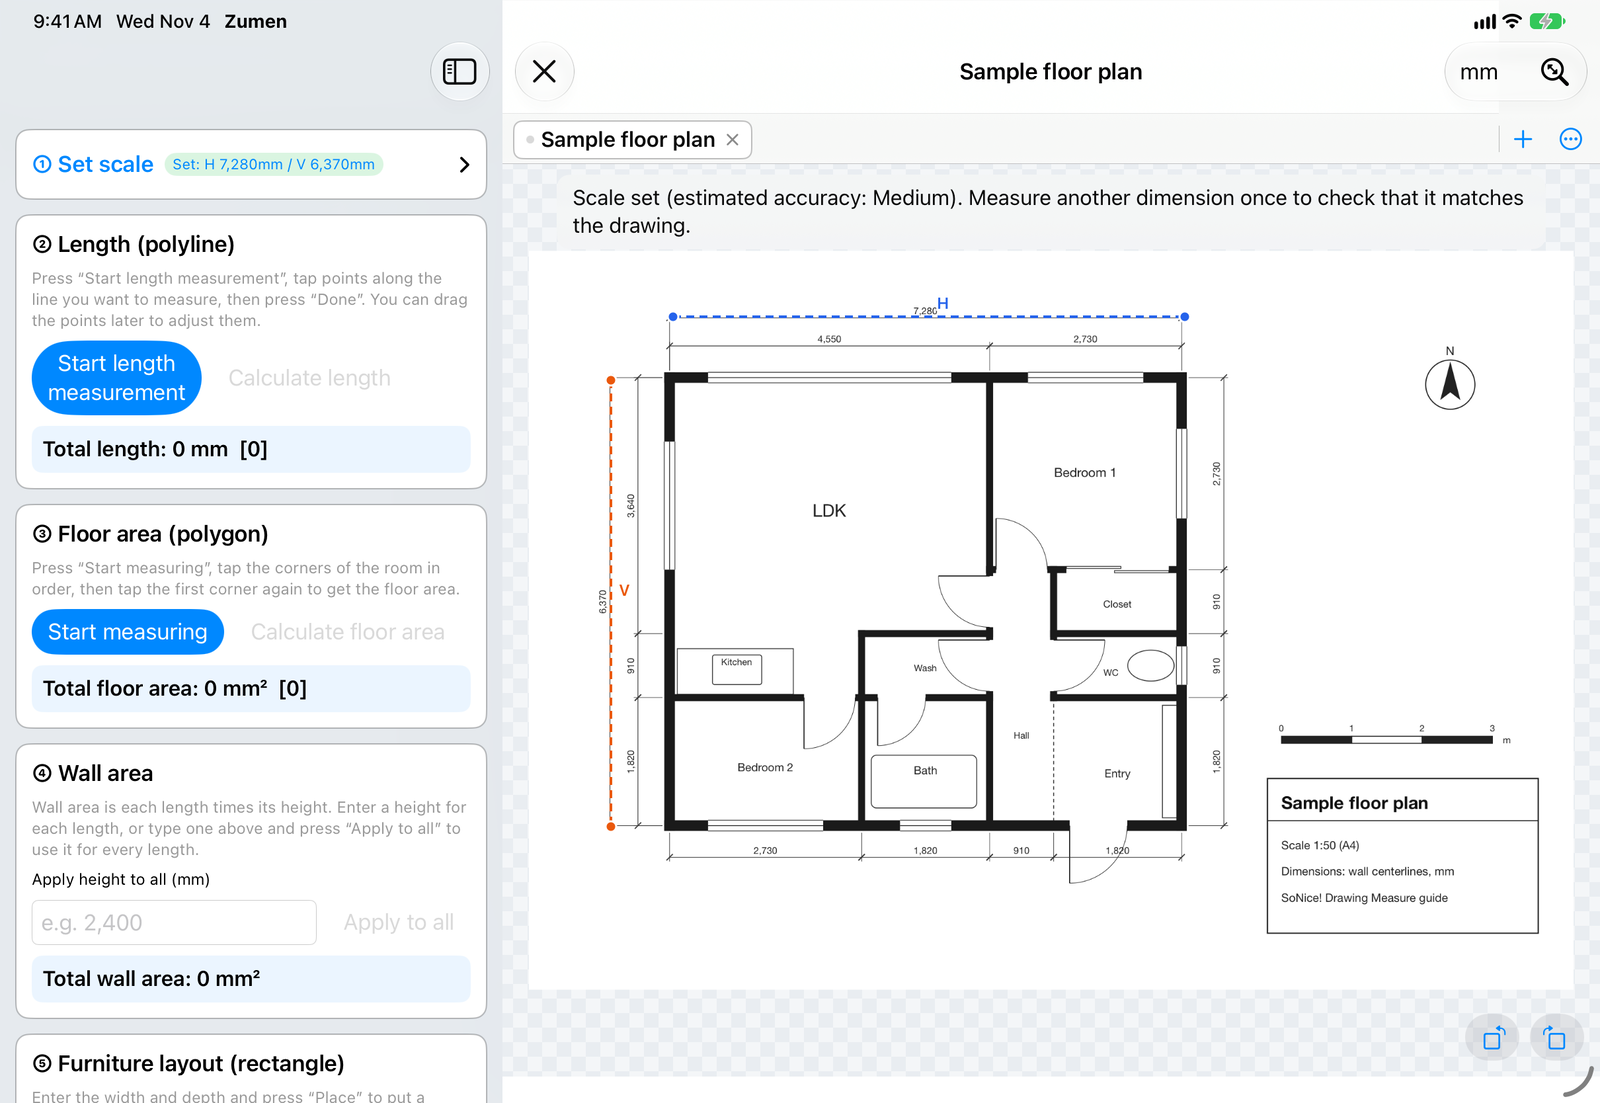
“First, set the scale” appears over the drawing. Enter a dimension printed on the drawing, the longer the better (7,280 at the top of the sample), in “Horizontal scale”, then tap “Set horizontal”.
Tap both ends of the dimension line
Pinch to zoom in, then tap both ends of the dimension line you entered. The scale is set and its estimated accuracy is shown (see Setting the Scale).
Measure a length
On “② Length (polyline)”, tap “Start length measurement”, tap points along the line you want to measure, then tap “Done” below the drawing (see Measuring Lengths).
Read the result
“Total length” on the card shows the total, and the list below it shows each line. On iPhone, tap “Results” at the bottom to bring up the cards.
The Main Screen
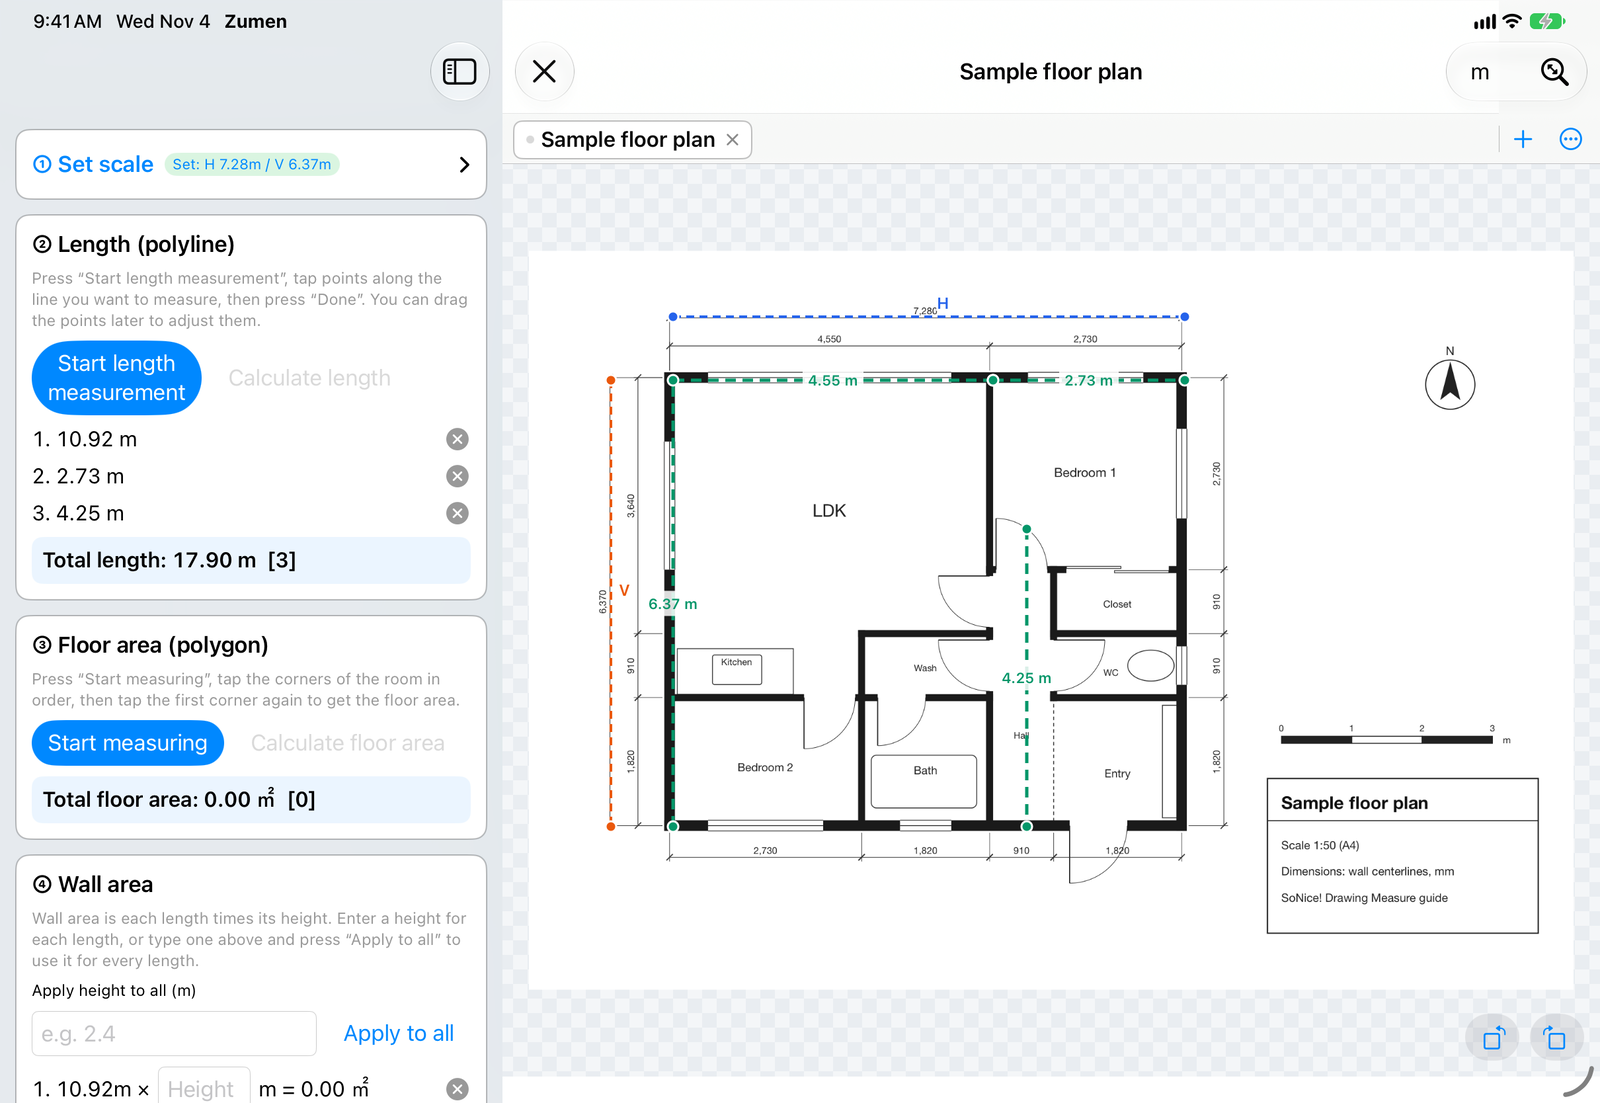
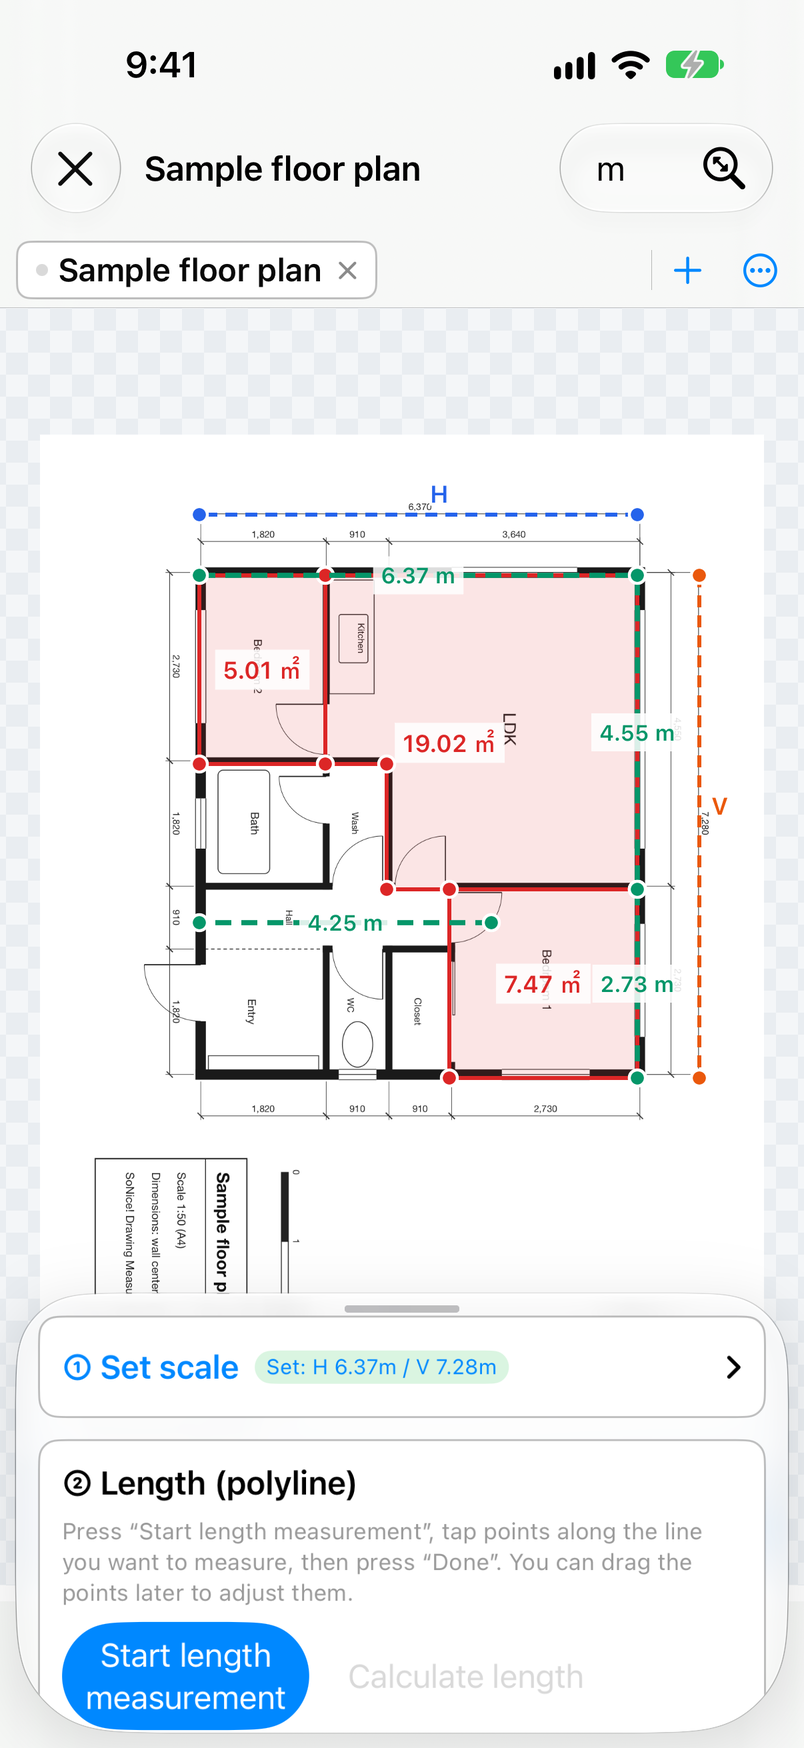
On iPad and Mac, the sidebar with the cards is on the left and the drawing is on the right. On iPhone, the drawing fills the screen and the cards slide up from the bottom.
| Button / item | What it does |
|---|---|
| × (top left) | Closes the drawing. If you have unsaved changes, the app asks first (see How Saving Works). |
| ‹ 1 / 2 › | Switches pages in a multi-page PDF. The scale and measurements are kept per page. |
| Unit (ft, mm, …) | Chooses the unit: mm, cm, m, ft, or in. When you change it, input fields, results, and the numbers on the drawing all switch to that unit. |
| Fit (magnifying glass) | Zooms so the whole drawing fits on the screen. |
| Pro | Opens the Pro screen. During the trial, it shows the days left. It disappears once you buy Pro. |
| Rotate buttons (bottom right) | Rotate the drawing 90° left or right, for example to see a wide drawing larger on a tall screen. |
| Tab bar (above the drawing)In Development | The tabs of your open drawings, with “+” (open another drawing) and “…” (projects) (see Tabs and Projects). |
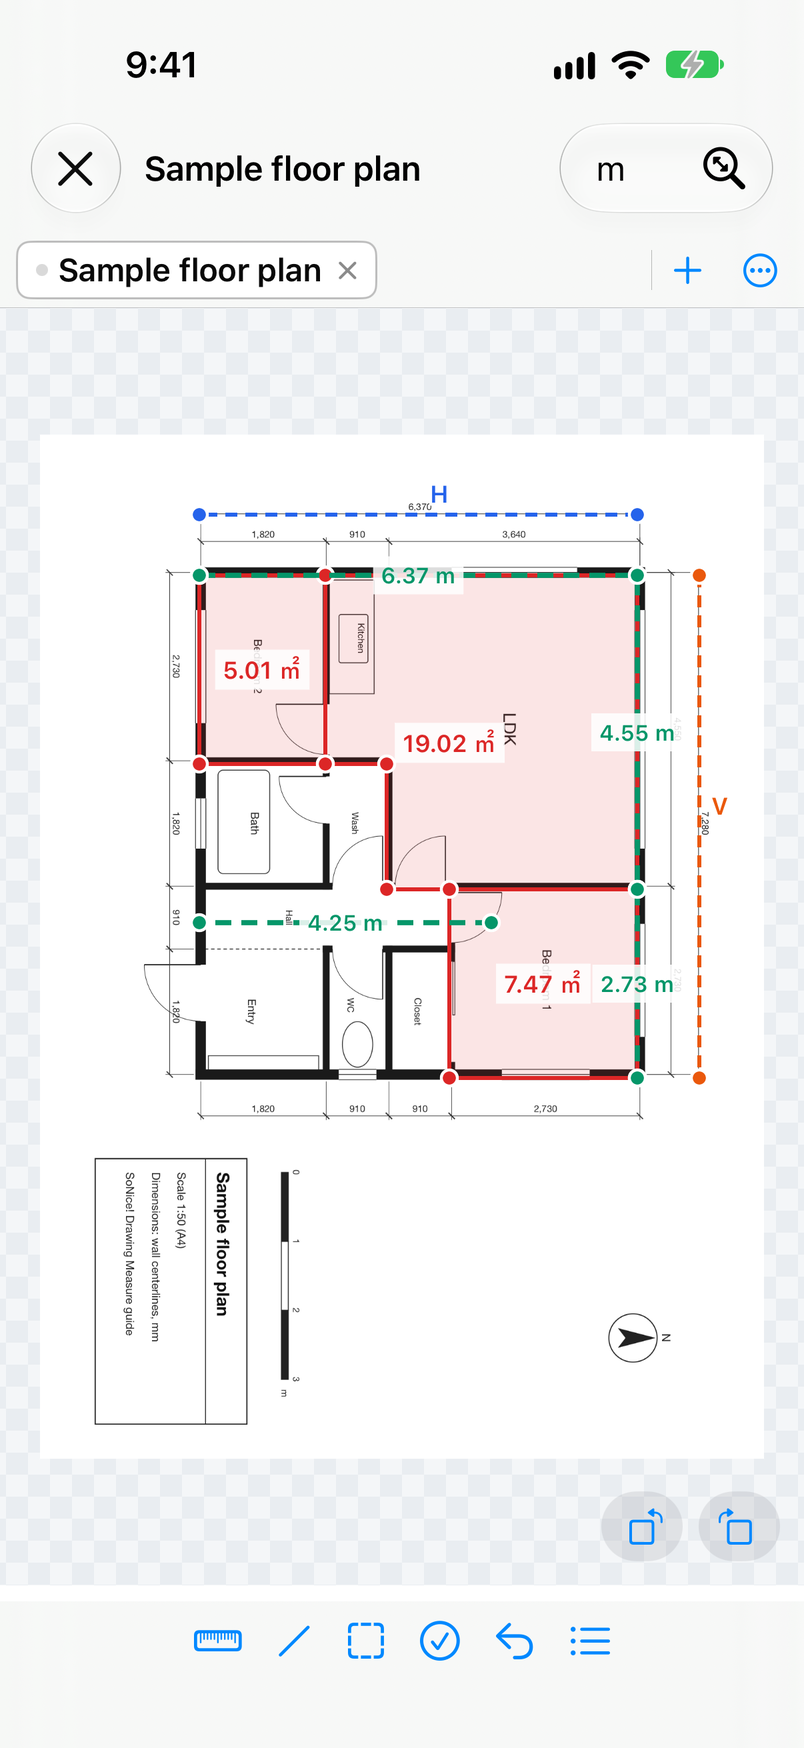
The iPhone screen
On iPhone, tool buttons (icons only) sit below the drawing. From the left: set the horizontal scale, length, floor area, done, undo, and results. Tap “Results” (the list icon) to bring up the cards from the bottom (three heights: small, medium, and large). When you start measuring, the cards shrink automatically so you can see the drawing. In landscape, or on wider iPhones, the layout can switch to the iPad layout.
Working on the drawing
| Action | iPhone / iPad | Mac |
|---|---|---|
| Place a point | Tap (also with Apple Pencil). Touch and hold for the loupe; the point goes where you lift your finger | Click |
| Move the drawing | Drag | Drag, or scroll with two fingers on the trackpad |
| Zoom | Pinch | Pinch on the trackpad, the mouse wheel, or ⌘ + + / ⌘ + − |
| Finish a length | “Done” below the drawing, double-tap, or double-tap on Apple Pencil | “Done”, double-click, or Return |
| Move points, furniture, and notes | Drag | Drag |
| Snap to 15° steps | Hold Shift on a hardware keyboard | Hold Shift |
Setting the Scale
Before measuring, set the drawing's scale. The “① Set scale” card offers four ways to do it. Once set, the card shows “Set” at the bottom.
| Method | How to use it |
|---|---|
| Enter a dimension and tap both ends | Enter a dimension from the drawing in “Horizontal scale”, tap “Set horizontal”, then tap both ends of that dimension line. For the vertical scale, do the same with “Vertical scale” and “Set vertical”. If you don't set the vertical scale, the horizontal scale is used for both. You can also type feet-inches such as 12'-6". |
| From the paper scale | Choose the scale printed on the drawing (1:50, 1:100, …) with “Choose a scale”. This works for PDFs exported from CAD at paper size. It can't be used with images or scanned drawings. |
| From a room's area (Pro) | For plans without a scale (such as real estate listings). Tap “Outline a room”, tap the corners of a room whose area you know, then enter that area (m² or ft²). |
| Straighten (Pro) | For photos taken at an angle and faxed images, before you set the scale. Tap “Straighten”, drag the circles to the paper's four corners, and tap “Apply” to rebuild the drawing straight. |
📏 Use a long dimension
Setting the scale with a long dimension, such as an overall dimension, makes small misplacements of your points matter less. The estimated accuracy shown after you set the scale (High, Medium, or Low, with ± % for lengths and areas) tells you roughly how far off results could be.
✅ Check with one measurement
After setting the scale, measure one other dimension and check that it matches the number on the drawing. This matters most when you set the scale from the paper scale or a room's area.
🏠 Listed areas use wall centerlines
Listed room areas are often measured to the wall centerlines, so outlining the inside of the walls makes the scale slightly small.
📷 Scanning paper drawings (Pro)
On an iPhone or iPad with a camera, use “Scan a paper drawing” on the first screen to photograph a paper drawing and open it. Matching the paper's corners in the scanner straightens it.
⏭️ Closing the guide
You can close “First, set the scale” with “Later”. It also goes away once you start setting the scale.
Measuring Lengths (Polyline)
“② Length (polyline)” measures the length of the line through the points you place. Bent lines, such as walls with corners or pipe runs, count as one line. This is free.
Start measuring
Tap “Start length measurement” (on iPhone, you can also use the length tool below the drawing).
Place points in order
Tap points along the line, starting from one end. “Undo” removes the last point.
Finish
Tap “Done” below the drawing (available after two points). You can also double-tap, double-tap on Apple Pencil, or press Return on the Mac.
✋ Adjust points later
Drag the points of a finished line to move them. The length is recalculated.
📋 Check the list
The card lists each line's length, and “Total length” shows the total. Tap × in the list to delete a line.
📐 Changing the scale later
If you set the scale again after measuring, all lengths and areas are recalculated with the new scale.
Measuring Floor Area (Pro)
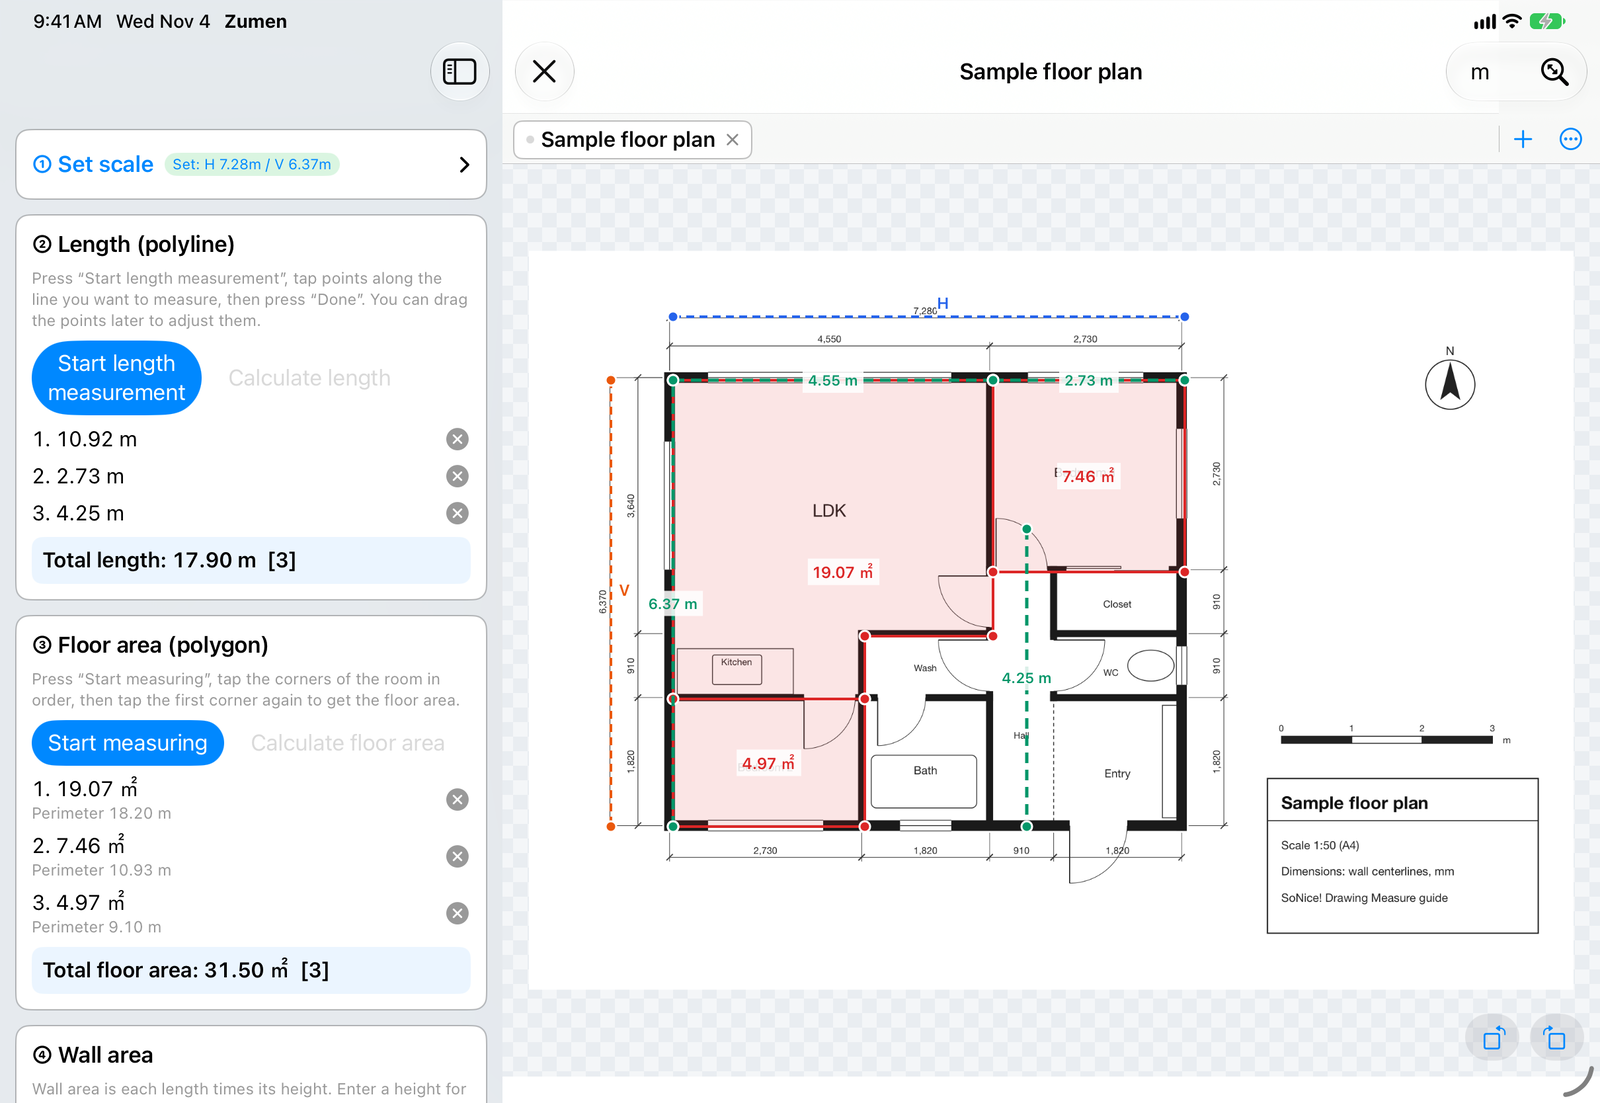
“③ Floor area (polygon)” measures the area inside the corners you outline. L-shaped rooms work too: just place the corners in order.
🔁 Outlining a room
Tap “Start measuring”, tap the corners of the room in order, then tap the first corner again to get the floor area. “Calculate floor area”, “Done” on iPhone, and Return on the Mac also close the outline.
📏 Perimeter
Each room also shows its perimeter in the current unit.
📋 List by room
The card lists each room's area, and “Total floor area” shows the total. Tap × in the list to delete a room.
Calculating Wall Area (Pro)
“④ Wall area” multiplies the lengths you measured by a height to get wall areas, for example to estimate wallpaper or paint.
📏 A height per length
You can enter a height for each length in the list, for rooms with different ceiling heights.
⚡️ The same height for all
Enter a height in “Apply height to all” and tap “Apply to all” to use it for every length.
🧮 Total
“Total wall area” shows the sum of length × height. Windows and doors are not subtracted, so subtract them as needed.
Placing Furniture (Pro)
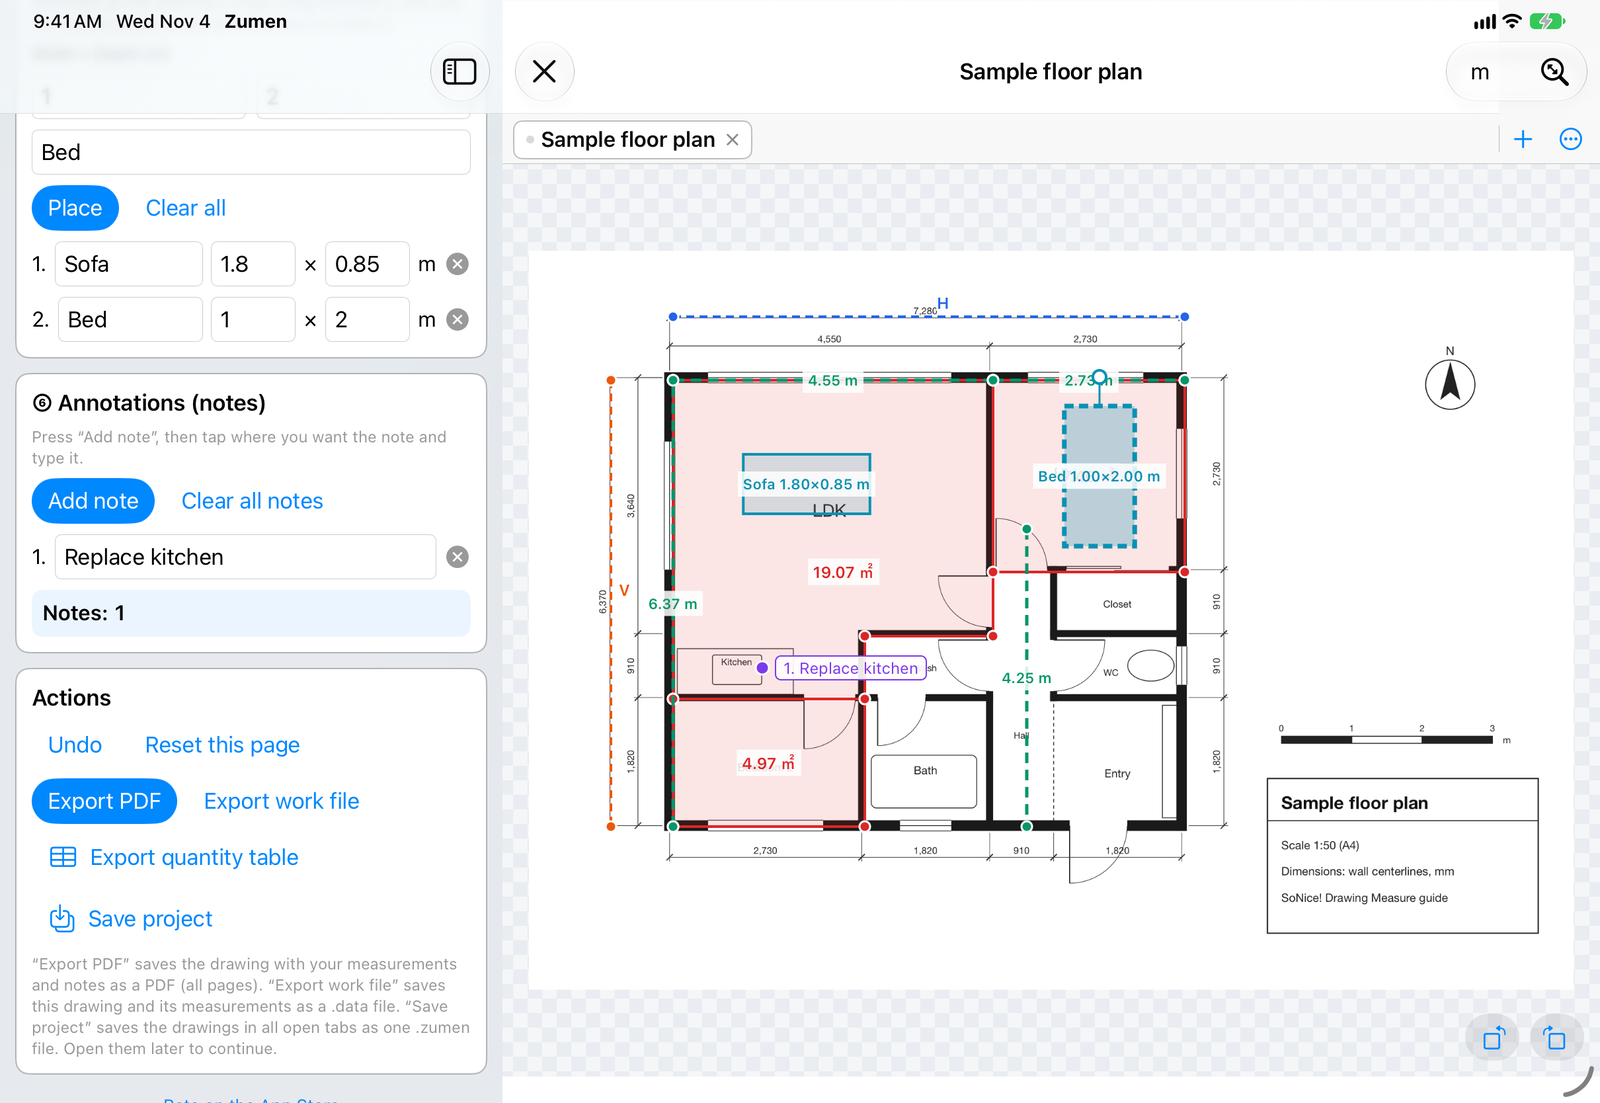
“⑤ Furniture layout (rectangle)” places rectangles at the drawing's scale, so you can see whether furniture or equipment fits in a room.
➕ Placing
Enter the width and depth, add a name if you like (e.g. Sofa), and tap “Place”. The rectangle appears in the middle of the view; drag it into the room.
🔄 Rotating
Select a rectangle to show its round handle, and drag the handle to rotate it. On the Mac, hold Shift to rotate in 15° steps.
🧹 Deleting
Tap × in the list to delete one, or “Clear all” to delete all. On the Mac, you can also select one and press Delete.
Notes (Pro)
“⑥ Annotations (notes)” lets you write text anywhere on the drawing. Notes are included when you export a PDF.
✏️ Adding a note
Tap “Add note”, tap where you want the note, and type it (up to 120 characters). You can keep placing notes in other spots.
✋ Editing and moving
Tap a note to edit it, or drag it to move it. You can also edit notes in the card's list.
🧹 Deleting
Tap × in the list to delete one, or “Clear all notes” to delete all.
Loupe and Apple Pencil
When you place a point with your finger, your finger hides the spot. On iPhone and iPad, the loupe and Apple Pencil let you place points exactly where you aim. Both are free.
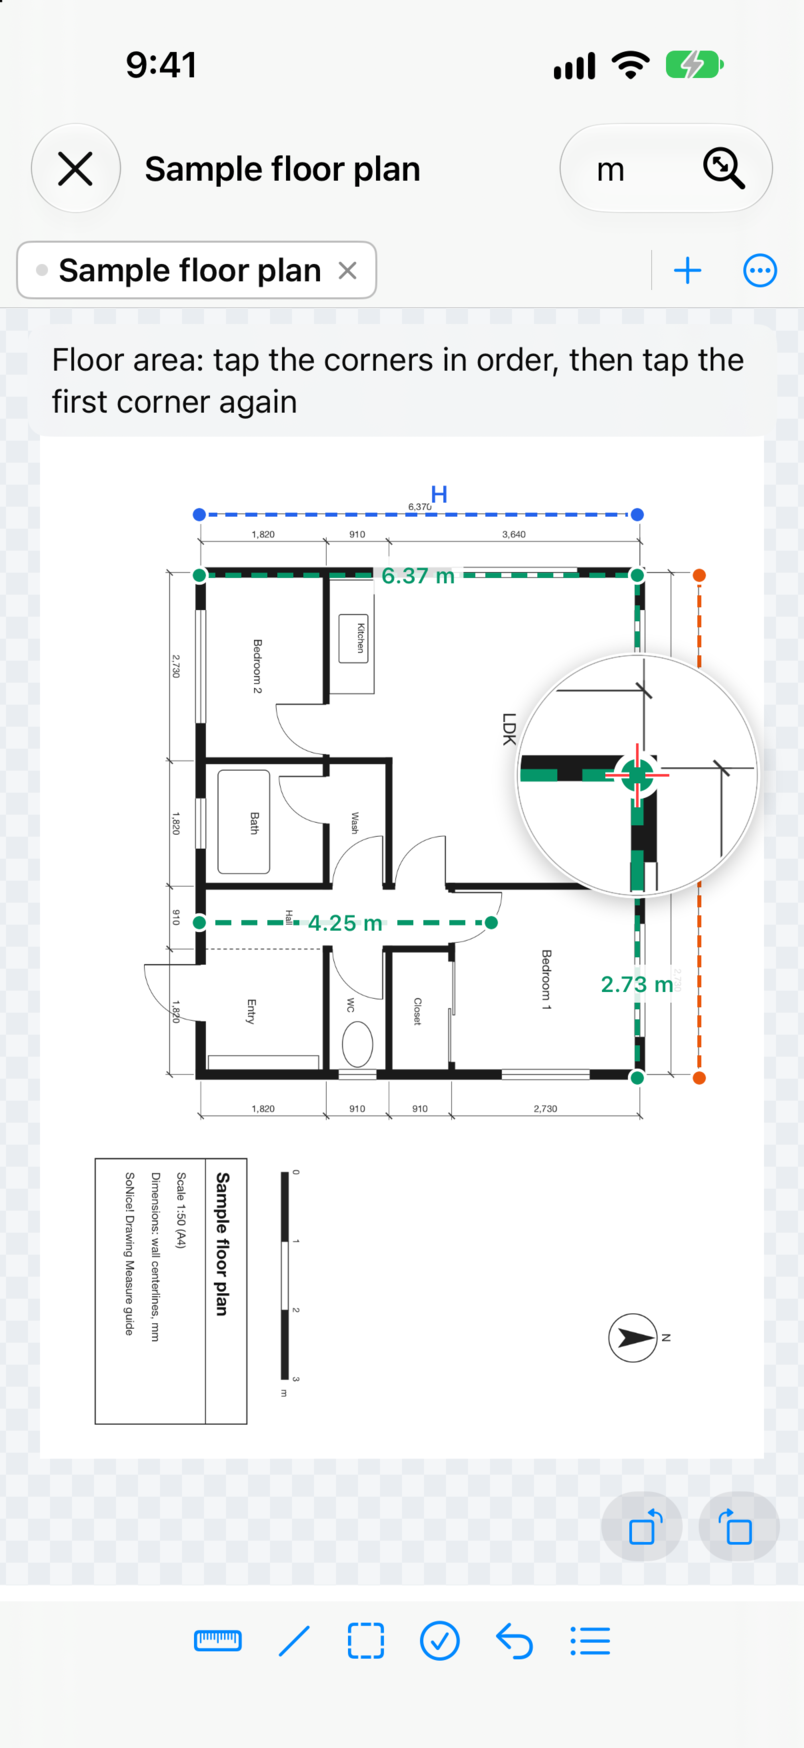
🔍 Loupe
Touch and hold the drawing to show a magnifier with crosshairs just above your finger. Move your finger to aim, and the point goes where you lift it. It works when setting the scale, measuring lengths and floor areas, and moving points.
✏️ Apple Pencil
Points go where the tip touches. On an iPad that supports hover, the end of the line you are drawing follows the tip as it approaches. Double-tap on Apple Pencil finishes the measurement (unless set to Ignore in Settings).
🖱️ Mac and trackpads
On the Mac, and on iPad with a trackpad or mouse, points go at the pointer, so there is no loupe. The end of the line follows the pointer.
Export (PDF, Quantity Table, Work File)
Export from “Actions” at the bottom of the cards. Exporting is a Pro feature. You choose where to save in the Files app (Finder on the Mac).
| Button | What it exports |
|---|---|
| Export PDF | The drawing with measurements, scale lines, notes, and furniture (all pages). The original PDF stays vector, so it stays sharp when zoomed. Pages keep the original PDF's size, so printing on the same paper keeps the scale. The name is “original name_measured.pdf”. |
| Export quantity table | A list of floor areas, lengths, and furniture on every page (page, type, name, length, area, height, wall area) with totals by type, as CSV or Excel (.xlsx), in the unit shown on screen. On iPhone and iPad, choose CSV or Excel from the menu. In Development On the Mac, “CSV” and “Excel (.xlsx)” buttons sit side by side. |
| Export work file | A work file (.data) with the drawing and your measurements. Open it later with “Open work file (.data)” to continue. |
🌐 Works with the web tool
Work files (.data) use the same format as the free Zumen web tool that runs in your browser. Files saved on the web open in the app, and files exported from the app open on the web. Drawings in formats such as HEIC are converted to a format the web tool can show.
📁 Where files go on iPhone and iPad
You can save anywhere in the Files app, including the Zumen folder under “On My iPhone” (“On My iPad”).
🆓 Opening is free
Opening work files (.data) works in the free version too. Floor areas and furniture measured with Pro are still shown and totaled.
How Saving Works
Zumen doesn't save your measurements to files automatically, and it never changes the files you open (PDFs, images, and work files). To keep your measurements as a file, export a work file (.data) (Pro).
⏳ Pick up where you left off
While a drawing is open, the app keeps a working copy inside the app. If the app is closed, it reopens the same drawing and page next time. Closing the drawing deletes the copy.
❓ Before closing
If you close a drawing with unsaved changes, the app asks first. With Pro, “Save and Close” saves a work file, then closes. In the free version, you can try Pro to save, or close without saving.
↩️ Undo and reset
“Undo” removes the last point while measuring, and otherwise undoes the last change (like ⌘ + Z). “Reset this page” deletes all measurements on the page after asking.
Tabs and ProjectsIn Development
You can open several drawings as tabs in one window (one screen on iPhone), and save the drawings in all open tabs together as a project (.zumen).
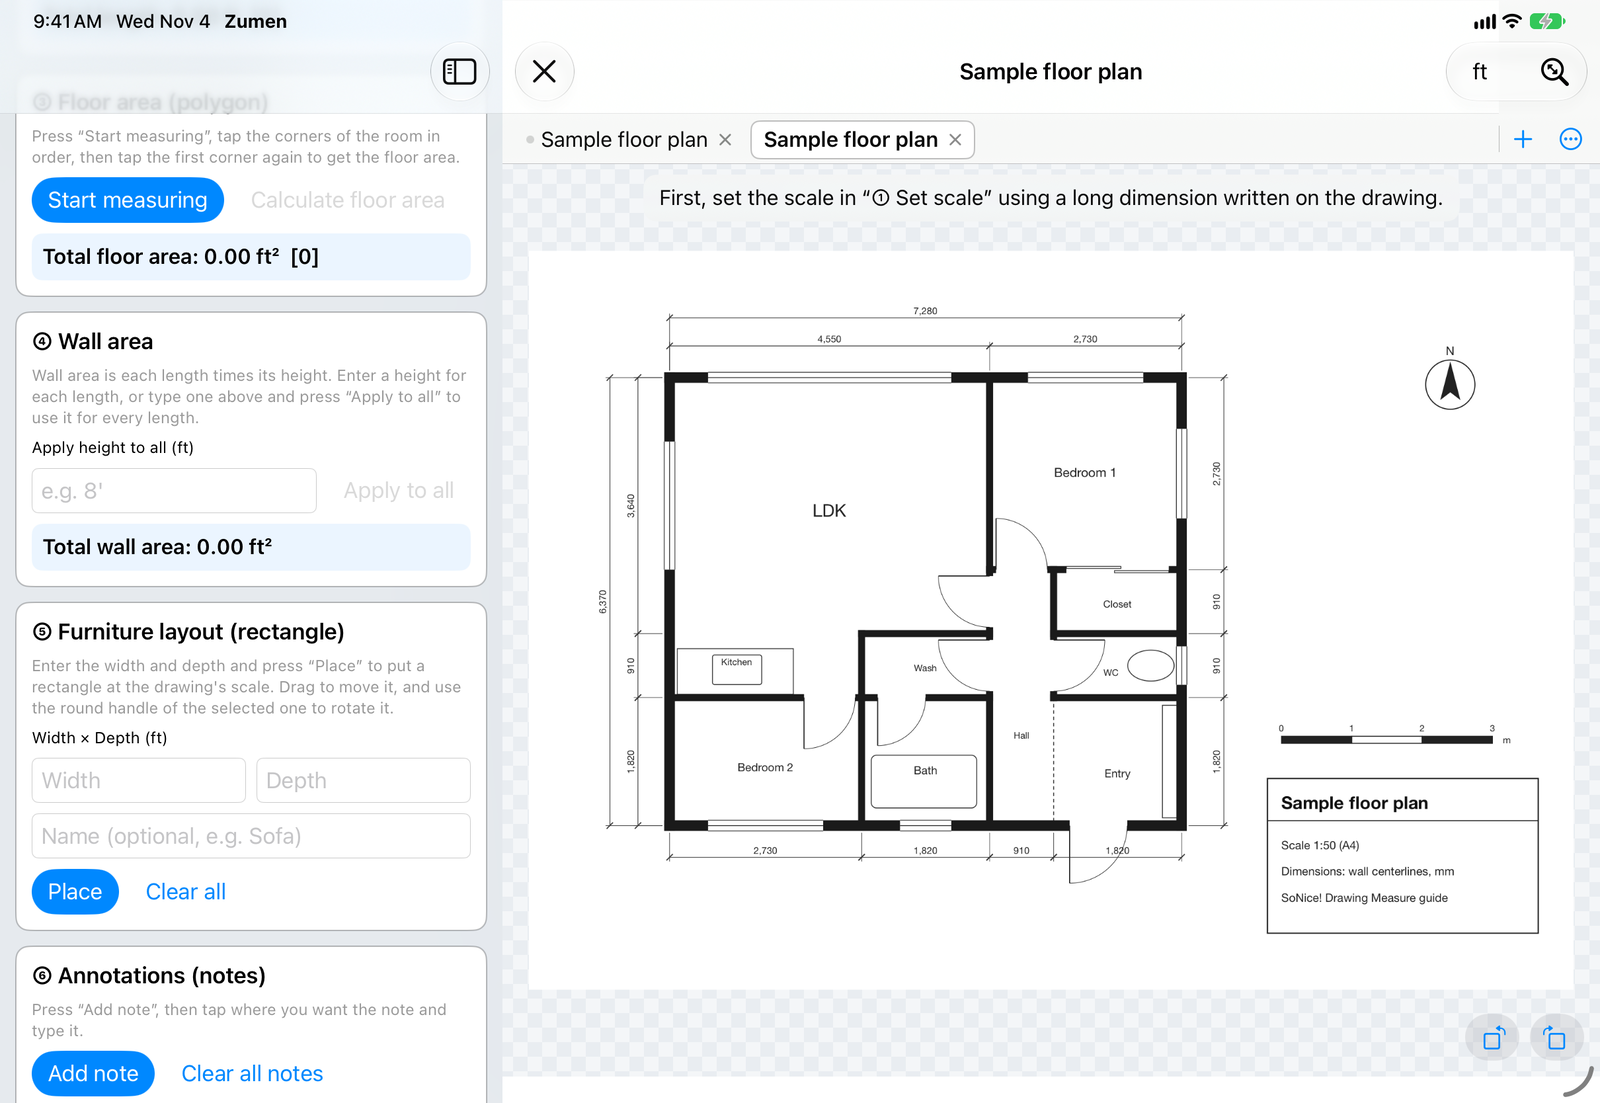
| Action | What it does |
|---|---|
| + | Opens another drawing in a new tab (a drawing, a work file, a scan, or the sample). Drawings opened from the Files app or the Finder also open in a new tab. |
| Tap a tab | Switches to that drawing. The scale, measurements, and page are kept per tab. A dot before the name marks a tab with unsaved changes. |
| × on a tab | Closes the tab. If it has changes, the app asks first (with Pro, “Save and Close” saves that tab as a work file). Closing the last tab returns to the first screen. |
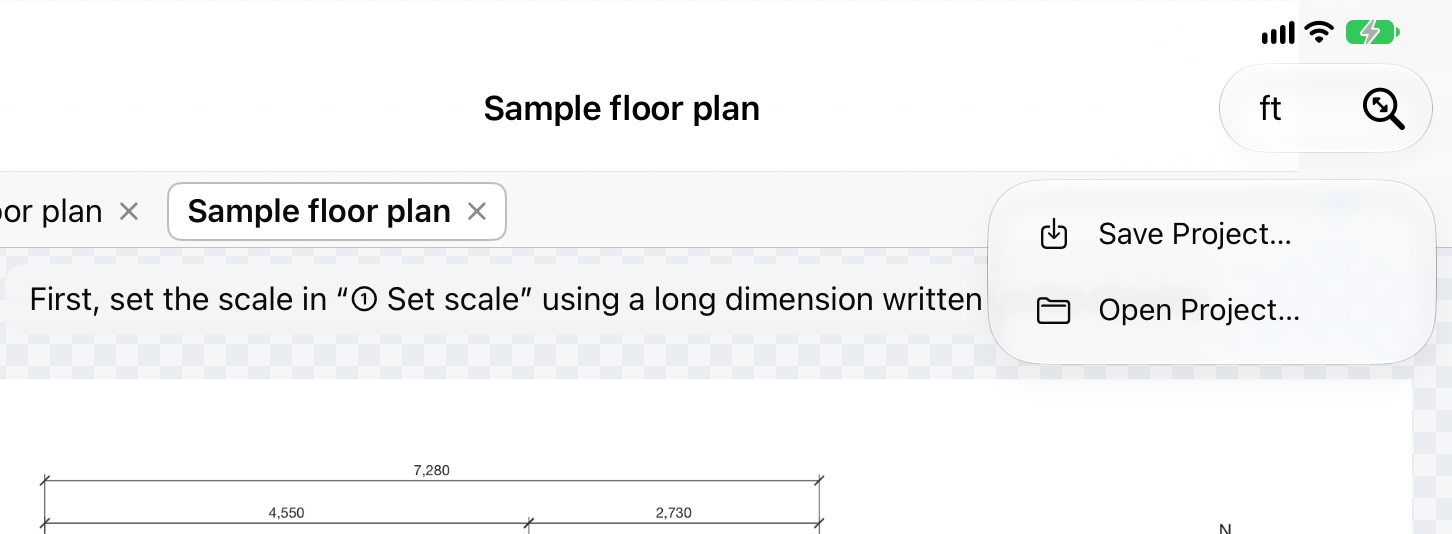
| … → Save Project… | Saves the drawings in all open tabs, in tab order, as one project (.zumen) (Pro). You can also use “Save project” under “Actions” in the sidebar, or ⌘ + S on the Mac. |
| … → Open Project… | Opens a saved project. Its tabs replace the current tabs (if you have unsaved changes, the app asks first). You can also use “Open project (.zumen)” on the first screen. |
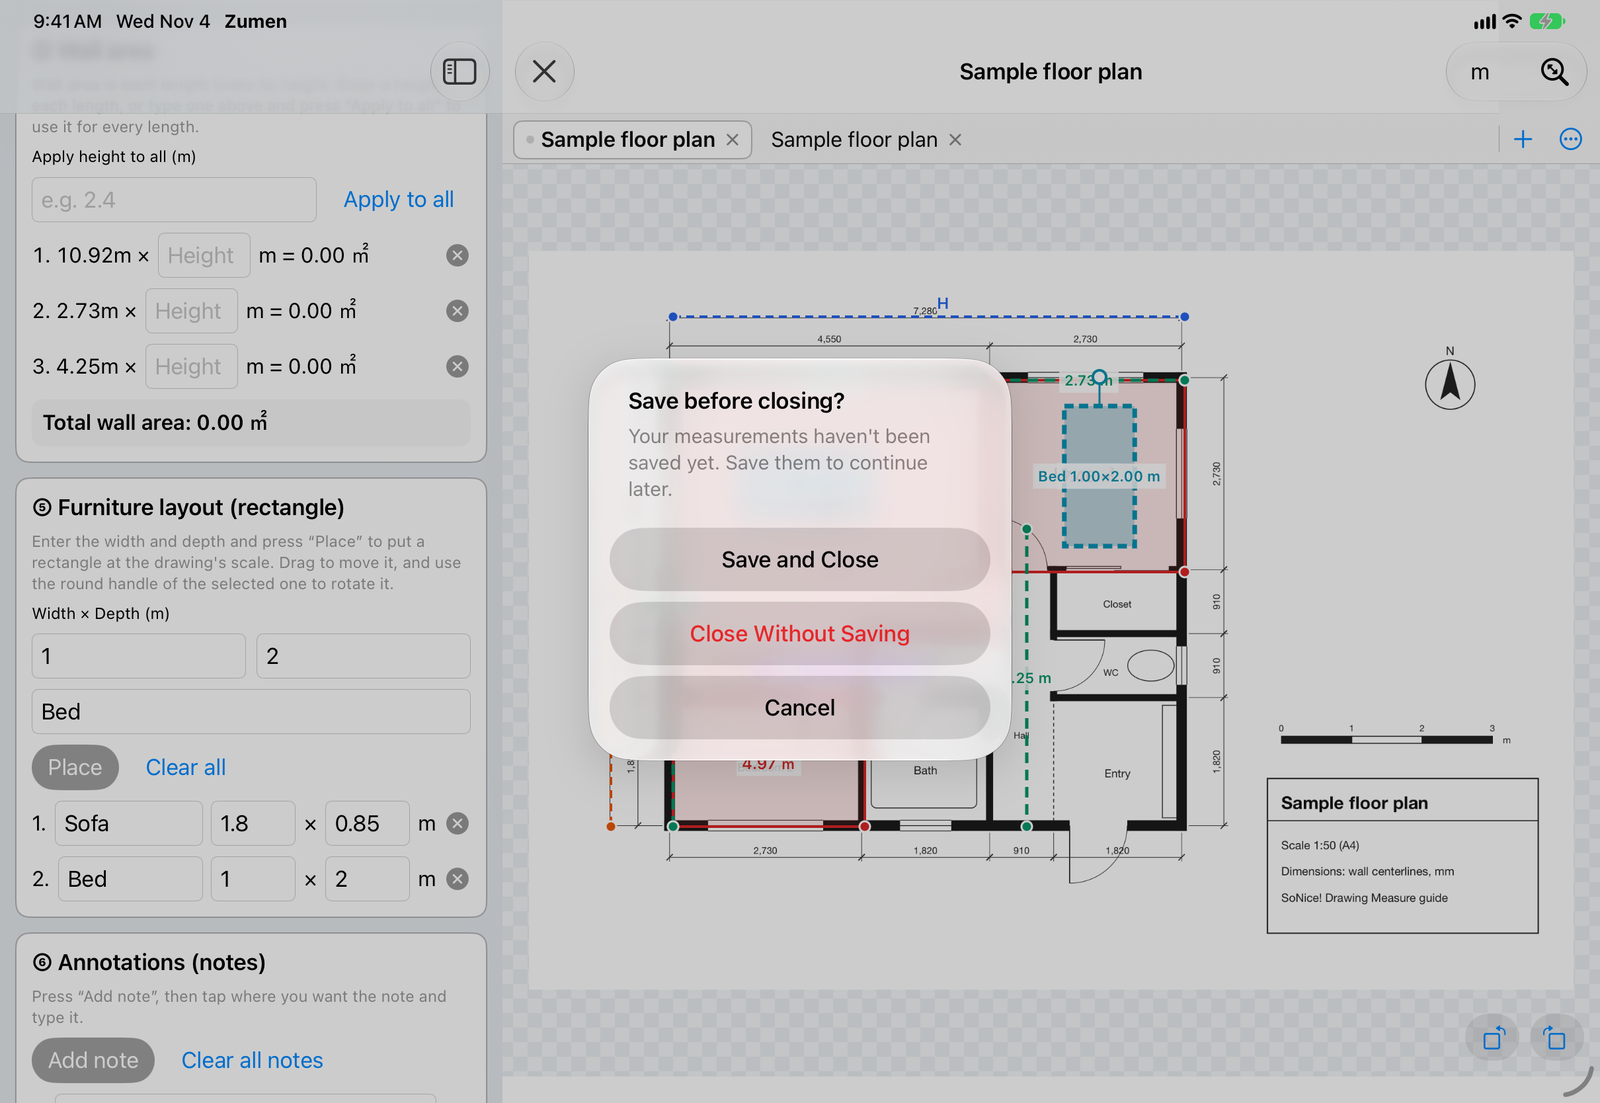
❓ One question for all tabs
When you close a window or quit on the Mac with unsaved tabs, the app asks once for all of them. With two or more tabs, or an open project, Pro users can choose “Save Project and Close”.
↩️ Undo across tabs
When you undo with ⌘ + Z or “Undo”, the app first switches to the tab where the change was made. Hidden tabs never change without you seeing it.
⏳ All tabs come back
If the app is closed, it reopens with the same tabs, in the same order, with the same tab in front.
🌐 Using projects on the web
Projects (.zumen) open only in the app. To open a drawing in the web tool, export each tab as a work file (.data) with “Export work file”.
Free Version and Pro
Setting the scale and measuring lengths are free. Floor area, wall area, furniture, notes, export, and more are Pro features (a one-time purchase). You can try Pro free for 7 days, and you won't be charged when the trial ends.
| Feature | Free | Pro |
|---|---|---|
| Open drawings and work files, pages, rotation, zoom, units | ✓ | ✓ |
| Setting the scale (from a dimension, from the paper scale), estimated accuracy | ✓ | ✓ |
| Lengths, loupe, Apple Pencil, undo | ✓ | ✓ |
| Several drawings in tabsIn Development | ✓ | ✓ |
| Floor area (with perimeter), wall area, furniture, notes | View only | ✓ |
| Scale from a room's area, scanning and straightening paper drawings | — | ✓ |
| Exporting PDF, quantity tables (CSV, Excel), and work files (.data) | — | ✓ |
| Saving projects (.zumen)In Development | — | ✓ |
| Ads | Shown on iPhone and iPad (none on the Mac) | None |
🎁 7-day trial
Start it with “Try free for 7 days” on the Pro screen, which opens when you tap a Pro feature or “Pro” in the toolbar. You won't be charged when it ends. After the trial, Pro features stop working, but you can still view what you measured. The trial is available once per Apple Account.
💳 Buying and restoring
Once you buy Pro, you can use it on your iPhone, iPad, and Mac with the same Apple Account. If Pro goes missing, for example on a new device, tap “Restore purchase” on the Pro screen.
🆓 In the free version
You can open work files made on the web or with Pro and view their floor areas and furniture (you can't move or remeasure them). Ads are shown on iPhone and iPad.
Keyboard Shortcuts
These work on the Mac and on iPad with a hardware keyboard. Menu commands are in the Mac menu bar and in the iPad menu (hold ⌘ to see the list).
Menus
| Keys | Action |
|---|---|
| ⌘ + O | Open Drawing… (opens in a new tabIn Development) |
| ⇧ + ⌘ + O | Open Project…In Development |
| ⌘ + S | Save Project… (Pro)In Development |
| ⌘ + W | Close Tab (Mac)In Development |
| ⇧ + ⌘ + W | Close Window (Mac)In Development |
| ⇧ + ⌘ + ] / [ | Show Next Tab / Show Previous TabIn Development |
| ⌘ + E | Export PDF… (Pro) |
| ⇧ + ⌘ + E | Export Work File (.data)… (Pro) |
| ⌘ + + / ⌘ + − | Zoom In / Zoom Out |
| ⌘ + 0 | Zoom to Fit |
| ⌘ + Z / ⇧ + ⌘ + Z | Undo / Redo |
On the drawing
| Key | Action |
|---|---|
| Shift | While held, snaps line directions and furniture angles to 15° steps |
| Return | Finishes a length, a floor area, or a room outline |
| Esc | Cancels the measurement |
| Delete | Deletes the selected furniture |
| ← / → | Previous page / next page |
Supported Files and Requirements
The files you can open and export, and the system requirements.
| Item | Details |
|---|---|
| Files you can open | PDF (multi-page), images (JPEG, PNG, HEIC, and others your iPhone, iPad, or Mac can show), work files (.data, shared with the Zumen web tool), projects (.zumen)In Development, and scans of paper drawings (iPhone and iPad with a camera) |
| Files you can export | PDF, quantity tables (CSV, Excel .xlsx), work files (.data), projects (.zumen)In Development |
| Units | mm, cm, m, ft, in (areas in m² or ft²) |
| Requirements | iPhone with iOS 17 or later, iPad with iPadOS 17 or later, Mac with macOS 14 or later |
| Languages | English, Japanese, Chinese (Simplified and Traditional), Korean, German, French, Spanish, Italian, and Portuguese (Brazil) |
| Where processing happens | Everything is processed on your device. Drawings and measurements are never sent to a server. |
Frequently Asked Questions
Answers to common questions about setting the scale and saving.
Q. How accurate are the measurements?
They are estimates that depend on the drawing itself and on how the scale was set, and can differ from actual dimensions. Set the scale with a dimension that is as long as possible, then measure one other dimension and check it against the number on the drawing (see Setting the Scale).
Q. Are my drawings uploaded, or my original files changed?
No. Drawings and measurements stay on your device. The PDFs, images, and work files you open are never changed; your measurements are written to a file only when you export.
Q. Are my measurements saved automatically?
Not to a file. While a drawing is open, the app keeps a working copy, so you can pick up where you left off if the app is closed, but closing the drawing deletes it. To keep your work, save a work file (.data) with “Export work file” (Pro) (see How Saving Works).
Q. Can I open files saved in the Zumen web tool?
Yes. Open web work files (.data) with “Open work file (.data)” on the first screen (also in the free version). Work files exported from the app open in the web tool too.
Q. Why can't I use “From the paper scale”?
The paper scale only works with PDFs exported from CAD at paper size. Images and scanned drawings don't have a known paper size, so set the scale by entering a dimension and tapping both ends.
Q. Can I measure a floor plan that has no scale?
Yes, with Pro's “From a room's area”. Outline a room whose area you know and enter that area to set the scale. The result can be slightly off depending on how the area was measured (wall centerlines or inside walls), so check one known dimension if you have one.
Q. Will I be charged after the trial?
No. The 7-day trial starts with a free item, so nothing is charged when it ends. Buy Pro only if you want to keep using Pro features (see Free Version and Pro).
Q. Can I open several drawings at once?
This feature is in development. In the new version now in App Review, “+” above the drawing opens another drawing in a new tab. On the Mac and iPad, you can also open more windows (see Tabs and Projects).