Voice Memories User Guide
Voice Memories is an iPhone and iPad app that keeps the voice messages you receive in LINE and other messaging apps, together with their transcriptions. Saved voices are transcribed automatically, and you can sort them with tags, favorites and search. Everything syncs with iCloud, so the voices that matter come with you to your next iPhone.
Key Features of Voice Memories
Save voices straight from the share menu of your messaging app, then find the one you want to hear with transcriptions, tags and search.
Save voice messages as they are
Long-press a voice message in LINE or another app and choose Voice Memories in the share sheet. You can send up to 10 at a time.
Automatic transcription
Saved voices are turned into text automatically. Recordings longer than a minute are split at pauses and transcribed all the way to the end.
Sort them with tags
Add tags such as “family” or “travel” on the edit screen, and the sidebar lists the voices for each tag. You can also star your favorites.
Search by words
Search the dates, transcriptions and tags. When you wonder “what did she say?”, find the voice by the words in it.
Synced with iCloud
Voices, transcriptions and tags are saved to iCloud, so you can listen on any iPhone or iPad signed in to the same Apple Account.
Ready for your next iPhone
Sign in with the same Apple Account on your new iPhone and your voices come along. If you don't use iCloud, move them with a backup file.
Quick Start (Basic Steps)
From the welcome screen to saving a voice message and listening to it.
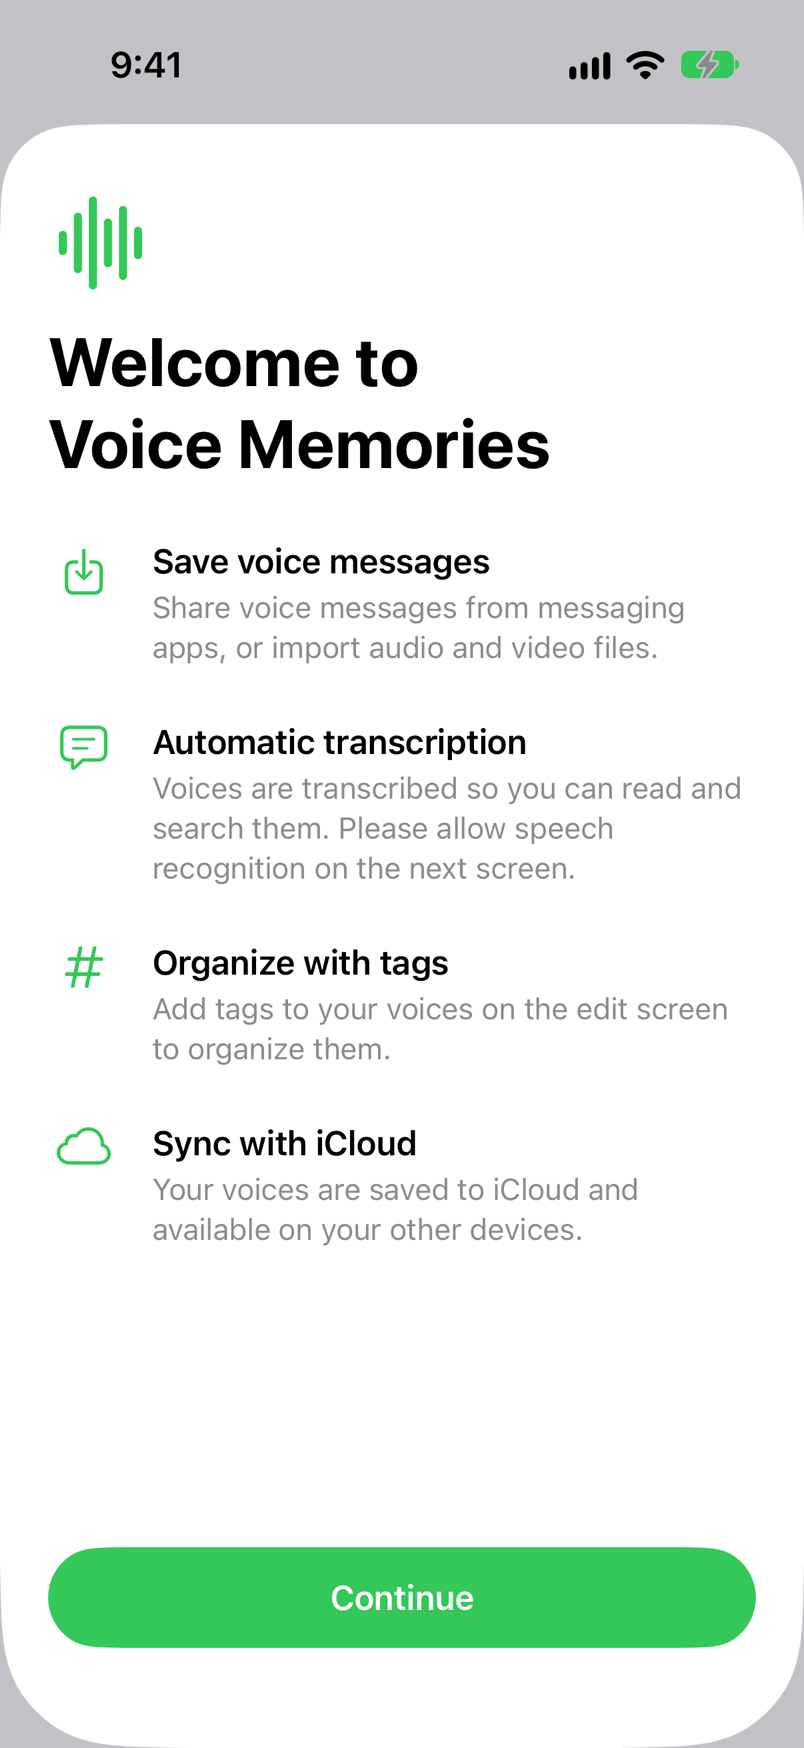
Read the welcome screen and allow speech recognition
The first time you open the app, “Welcome to Voice Memories” appears. Tap Continue, then tap Allow when iOS asks about speech recognition. With it allowed, saved voices are transcribed automatically.
Long-press a voice message in your messaging app
Open a chat in LINE or another app and long-press the voice message you want to keep, then tap Share (see Saving from Messaging Apps).
Choose Voice Memories in the share sheet
In LINE, tap Other apps at the bottom right to open the share sheet. Choose Voice Memories in the row of apps.
Tap Open
When saving finishes, Open appears. Tap it to open Voice Memories; the voice is added to the list and transcription starts.
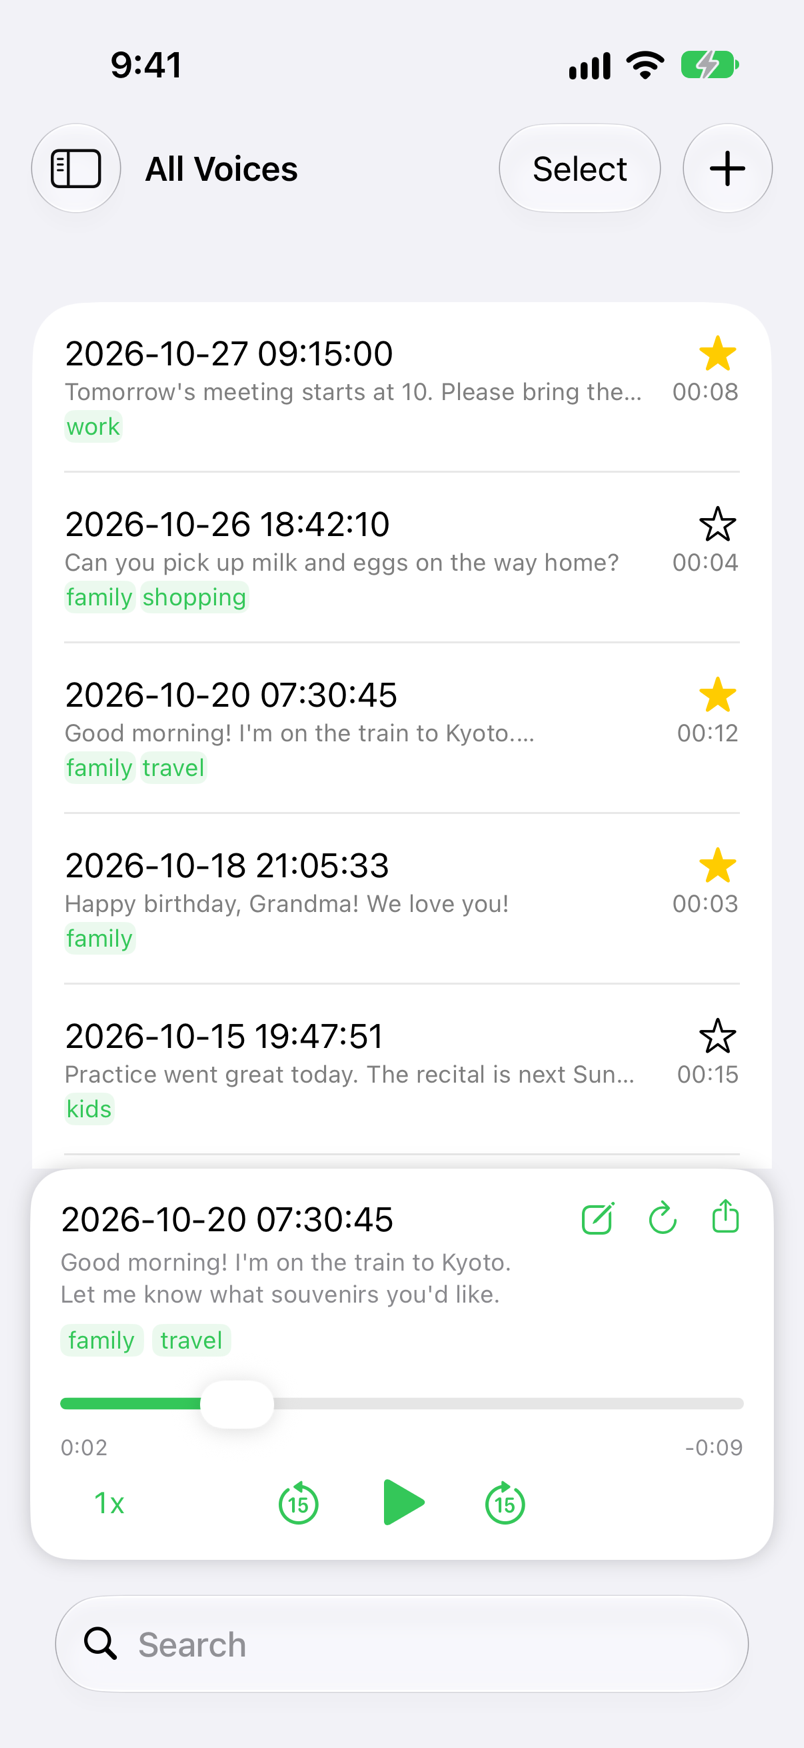
Tap a row to listen
Tap a row and the player opens at the bottom of the screen and starts playing. Tap the pencil button in the player to add a tag such as “family” and sort your voices (see Tags & Favorites).
The Screen
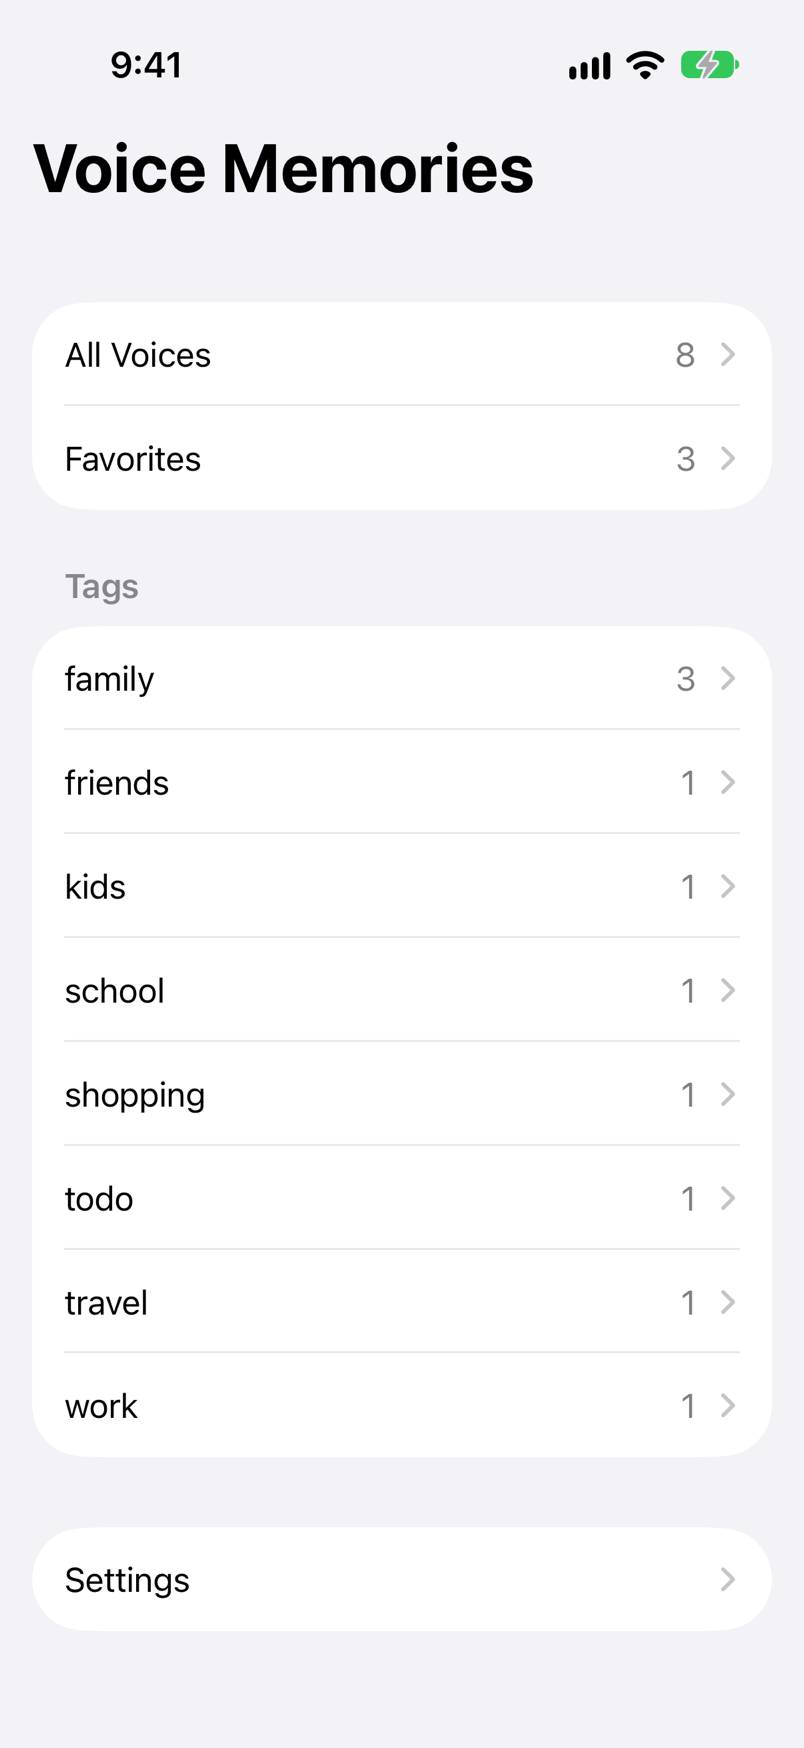
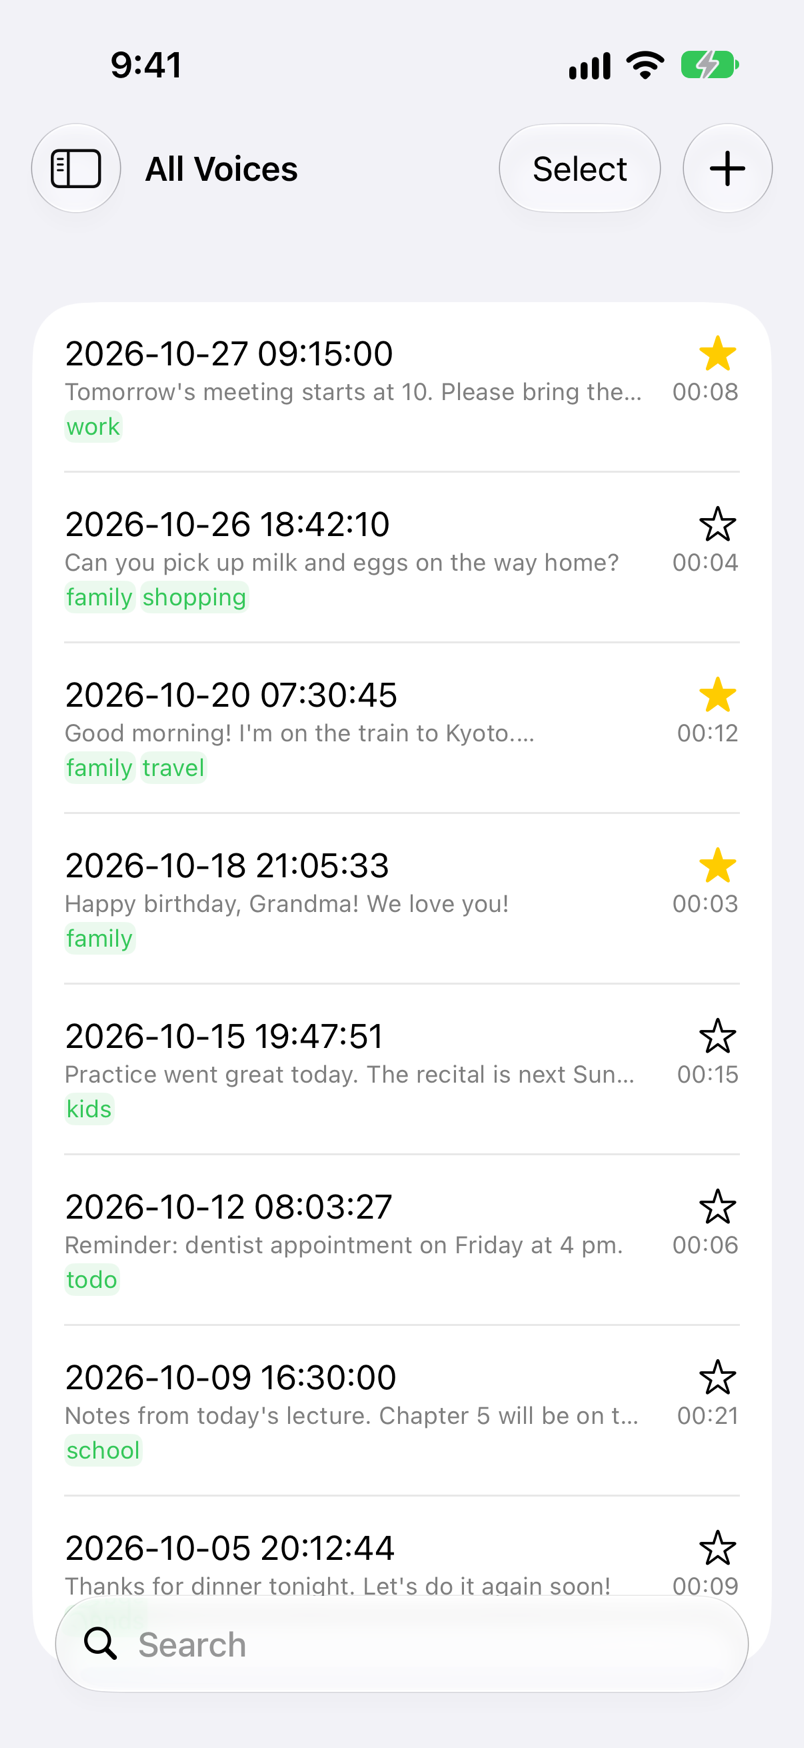
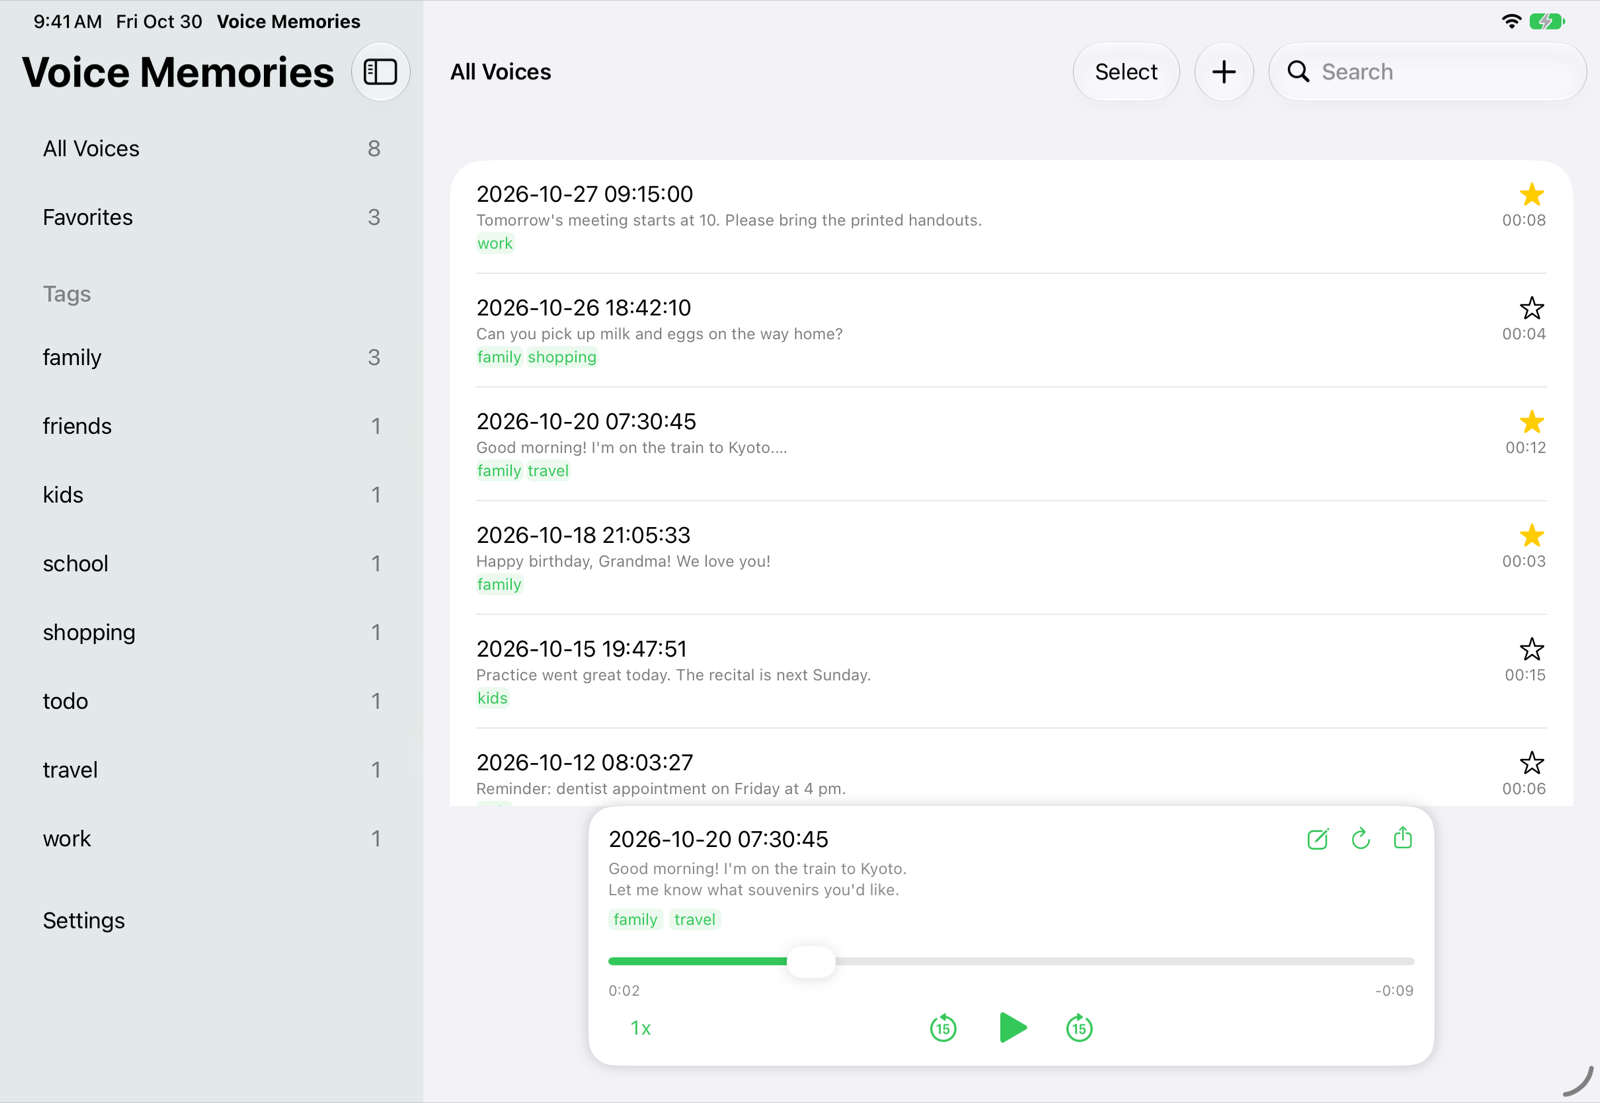
Choose a list in the sidebar on the left, then tap a row to listen. On iPhone the sidebar and the list are separate screens; use the button at the top left to switch between them.
Sidebar
| Button / display | What it does |
|---|---|
| All Voices | Shows every saved voice, most recently saved first. The number on the right is the count. |
| Favorites | Shows only the starred voices (see Tags & Favorites). |
| Tags | Lists the tags on your voices, with a count for each. Tap one to see only the voices with that tag. Swipe left to delete a tag (see Tags & Favorites). |
| Settings | Opens the settings for transcription, iCloud, moving to a new iPhone and in-app purchase (see Settings). |
| Premium | Shown at the bottom (below Settings) only on the free plan. Tap it to see what Premium adds and the purchase buttons (see Free Plan & Premium). |
List
| Button / display | What it does |
|---|---|
| Date and time | The heading of each row is the date of the voice (the date of the audio file you received). |
| Transcription and length | Under the date are the first line of the transcription and the length (minutes:seconds), then the tags. |
| ☆ | Tap to add the voice to Favorites or remove it. |
| Cloud icon | The audio for this voice couldn't be prepared when you tapped it. It may not have arrived from iCloud yet, so wait a moment and tap it again (see iCloud Sync & Storage). |
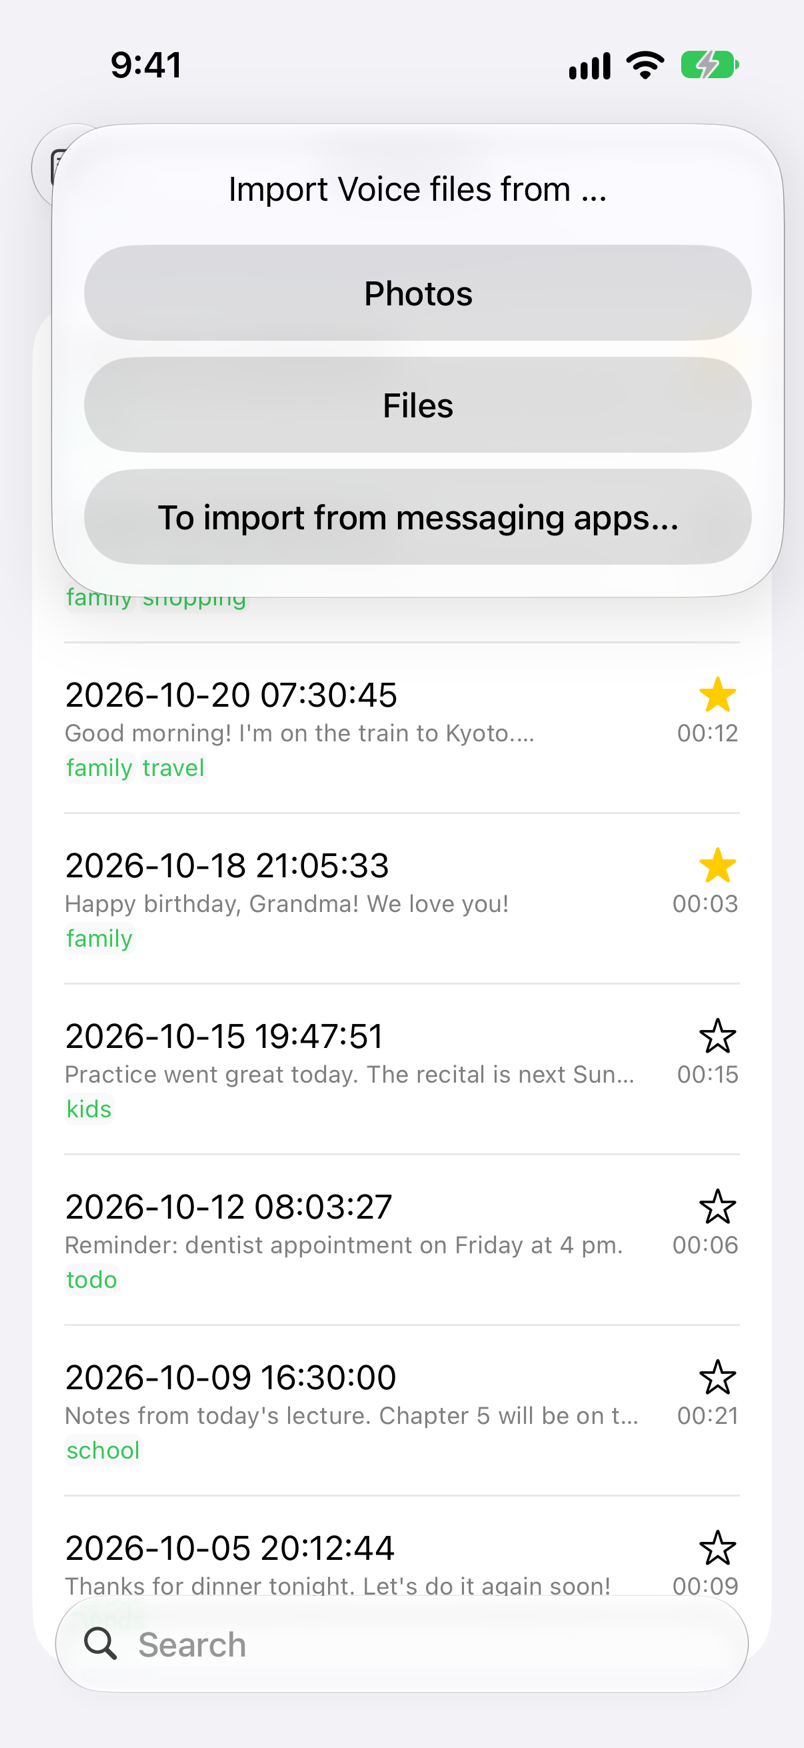
| + | Imports from Photos or Files, or shows how to save from messaging apps (see Importing from Photos & Files). |
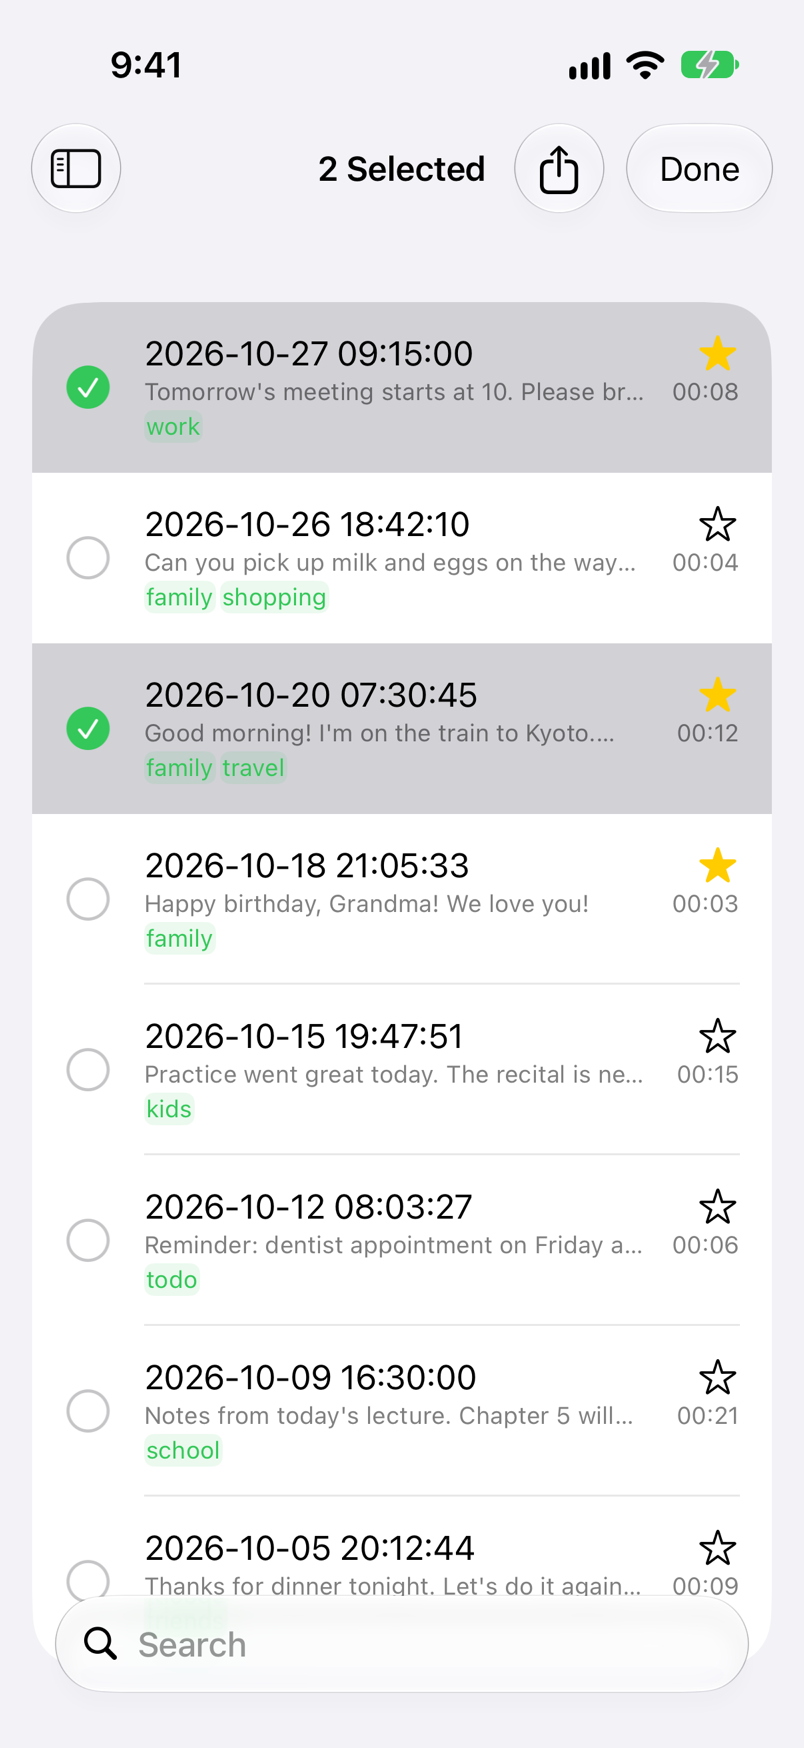
| Select | Choose voices and send them together as audio files (see Send voices). |
| Search field | Filters by date, transcription and tags (see Search & Delete). |
Touch gestures
| Gesture | What it does |
|---|---|
| Tap a row | Plays the voice. If it hasn't been transcribed yet, transcription starts too. |
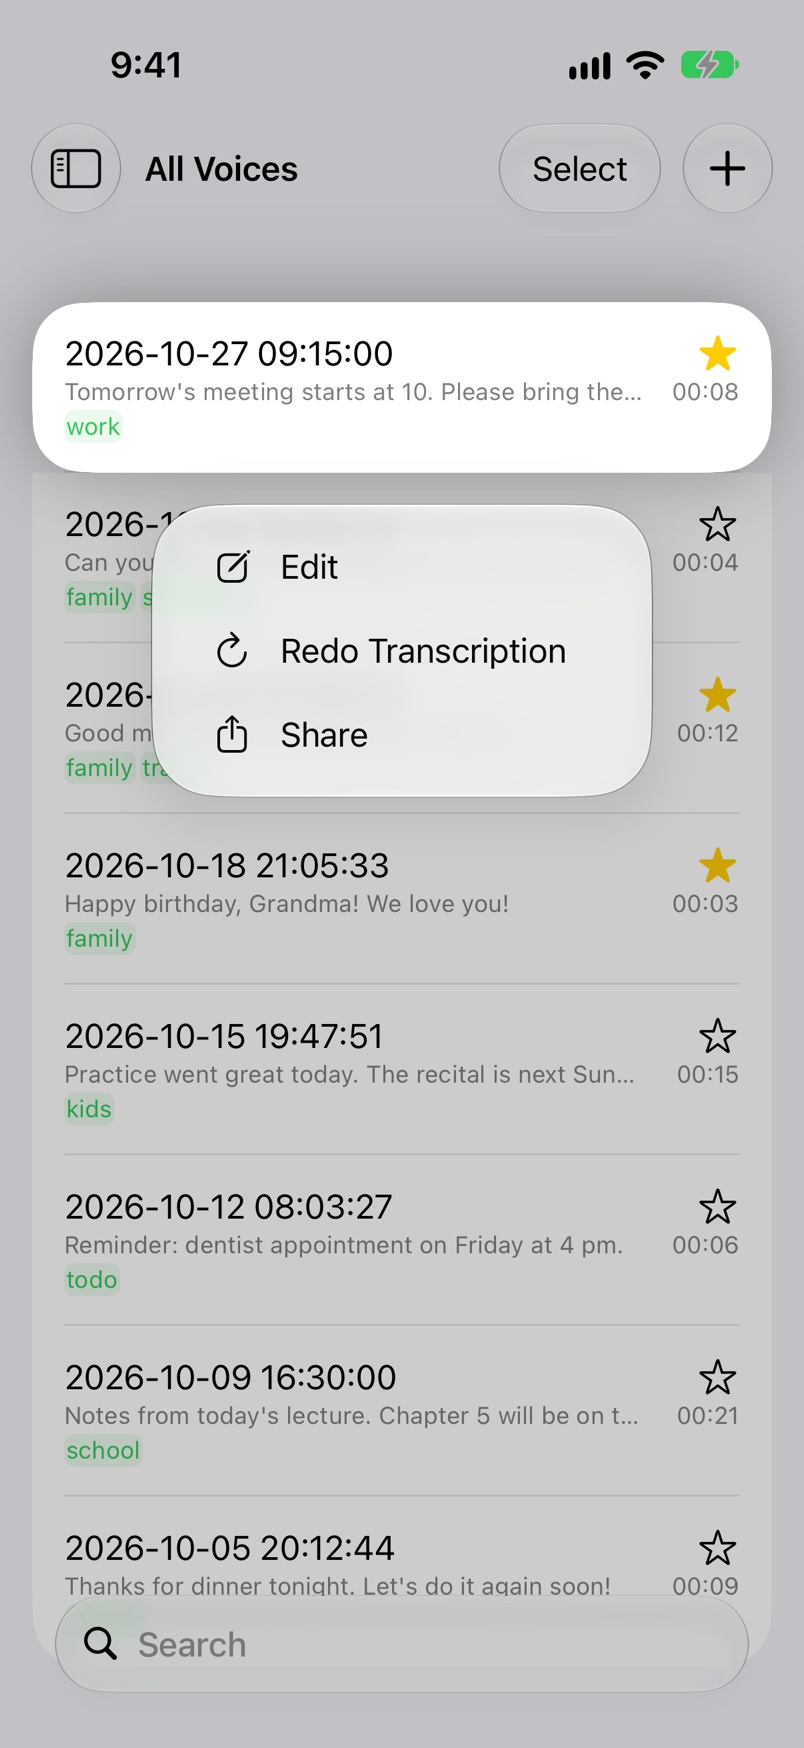
| Long-press a row | Shows the “Edit”, “Redo Transcription” and “Share” menu (see Tags & Favorites, Transcription and Send voices). |
| Swipe a row right | Shows the Redo Transcription button. |
| Swipe a row left | Shows the Delete button. Tap it to move the voice to Recently Deleted (see Search & Delete). |
| Pull the list down | Reloads the list. |
iPad and landscape
On iPad, and on a large iPhone held sideways, the sidebar and the list sit side by side. The player appears under the list.
Saving from Messaging Apps
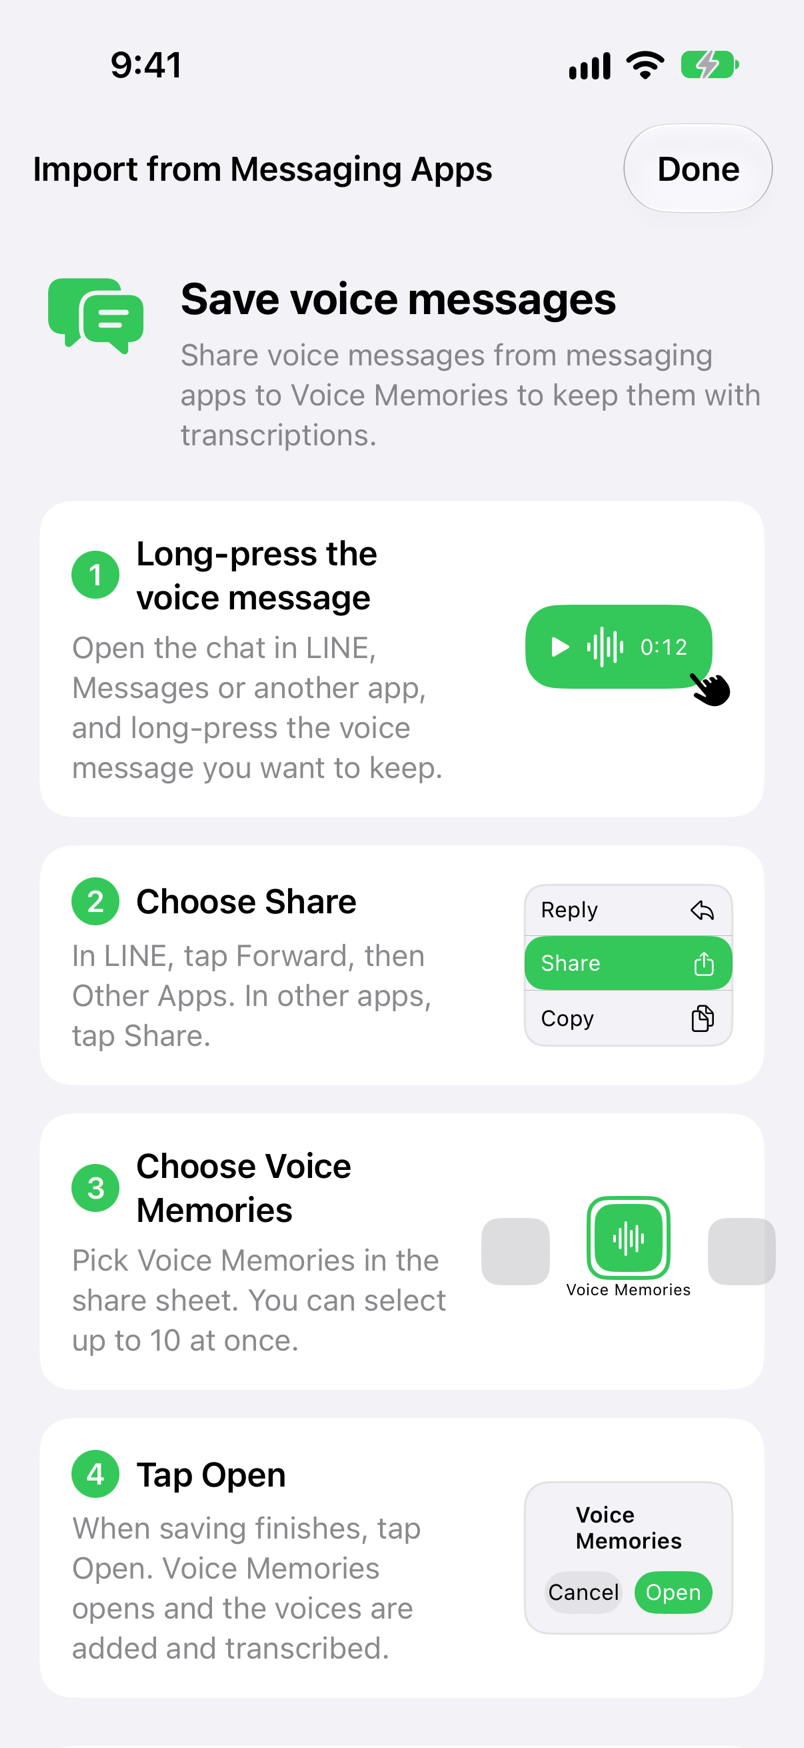
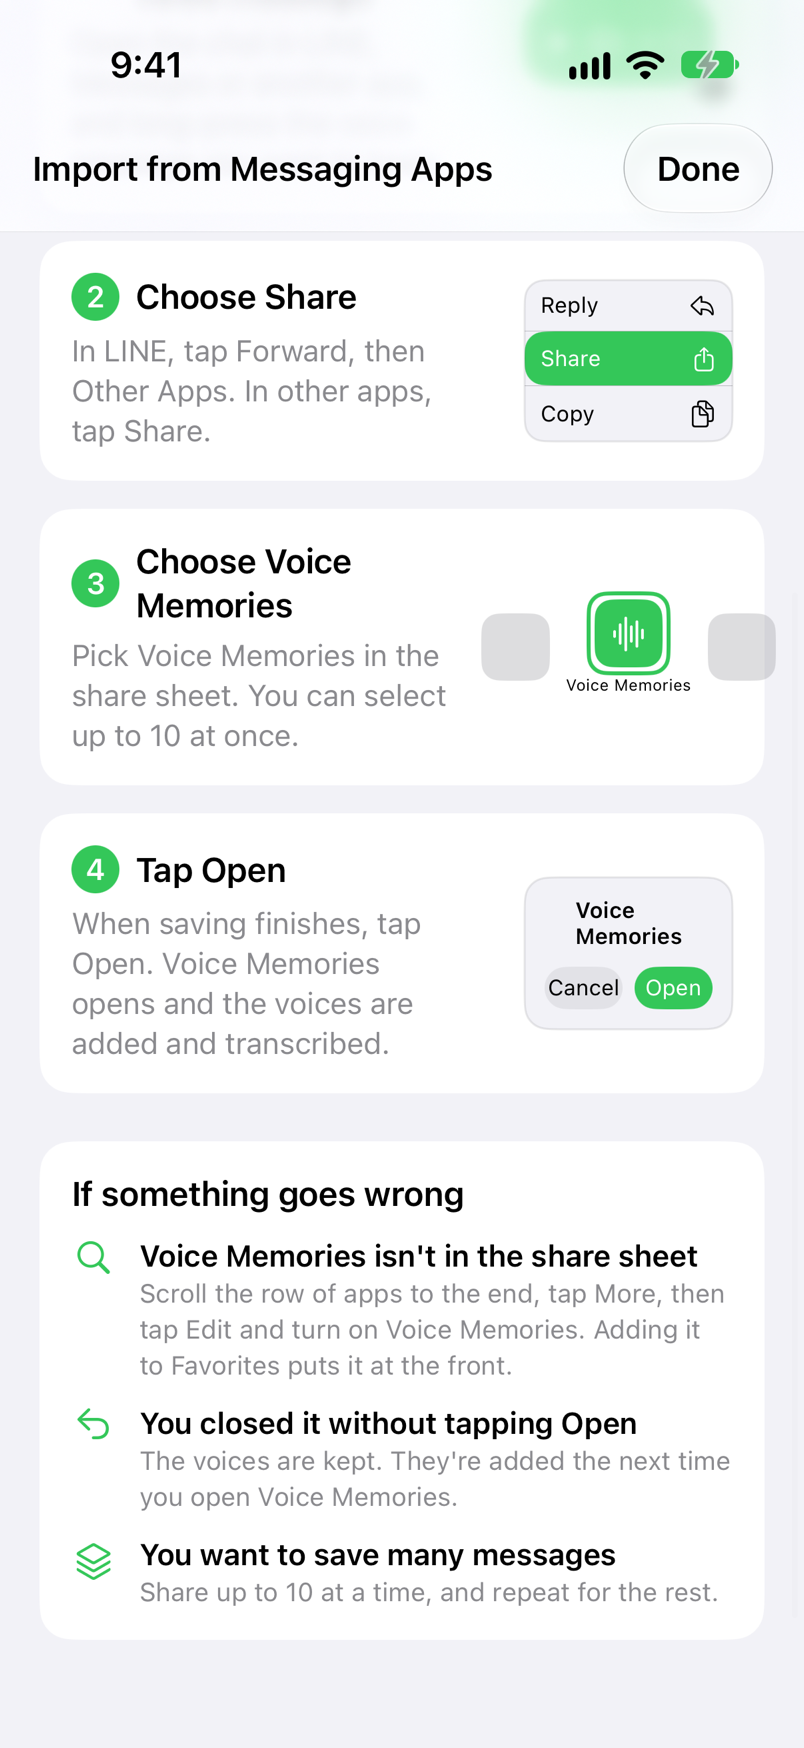
Save voice messages from LINE and other messaging apps to Voice Memories through the share sheet. You can see the same steps in the app under + › “To import from messaging apps...”.
Long-press the voice message
Open the chat in LINE or another app and long-press the voice message you want to keep.
Tap Share
Tap Share. In LINE, then tap Other apps at the bottom right (LINE’s English menu says Share; the guide inside Voice Memories calls it Forward, after the Japanese label 転送). Select several messages before sharing to save them together.
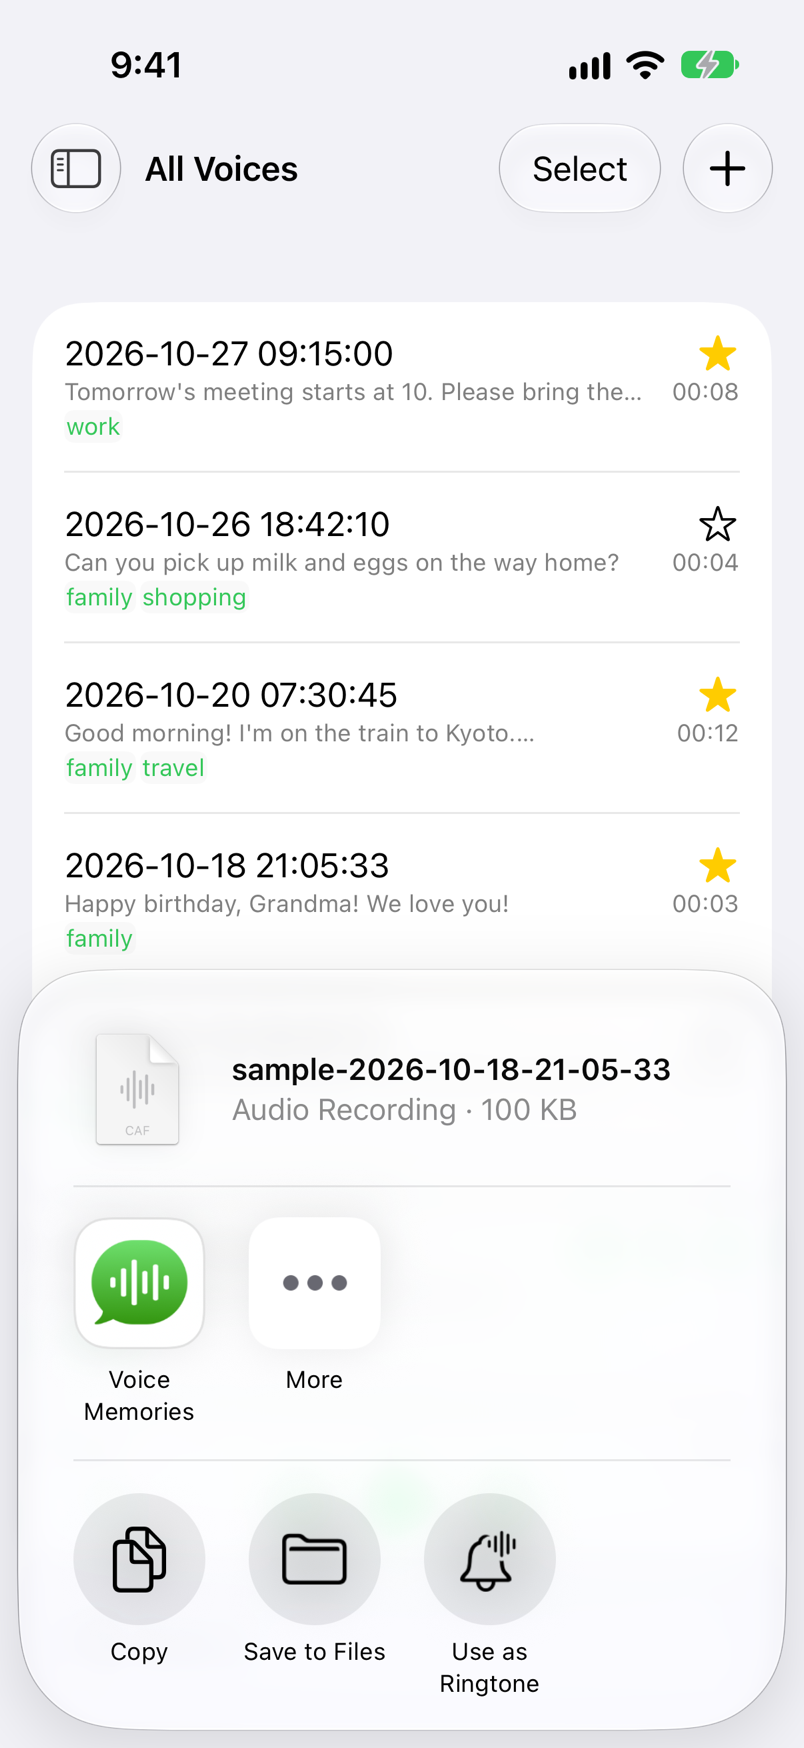
Choose Voice Memories
Pick Voice Memories in the row of apps in the share sheet. You can send up to 10 at a time.
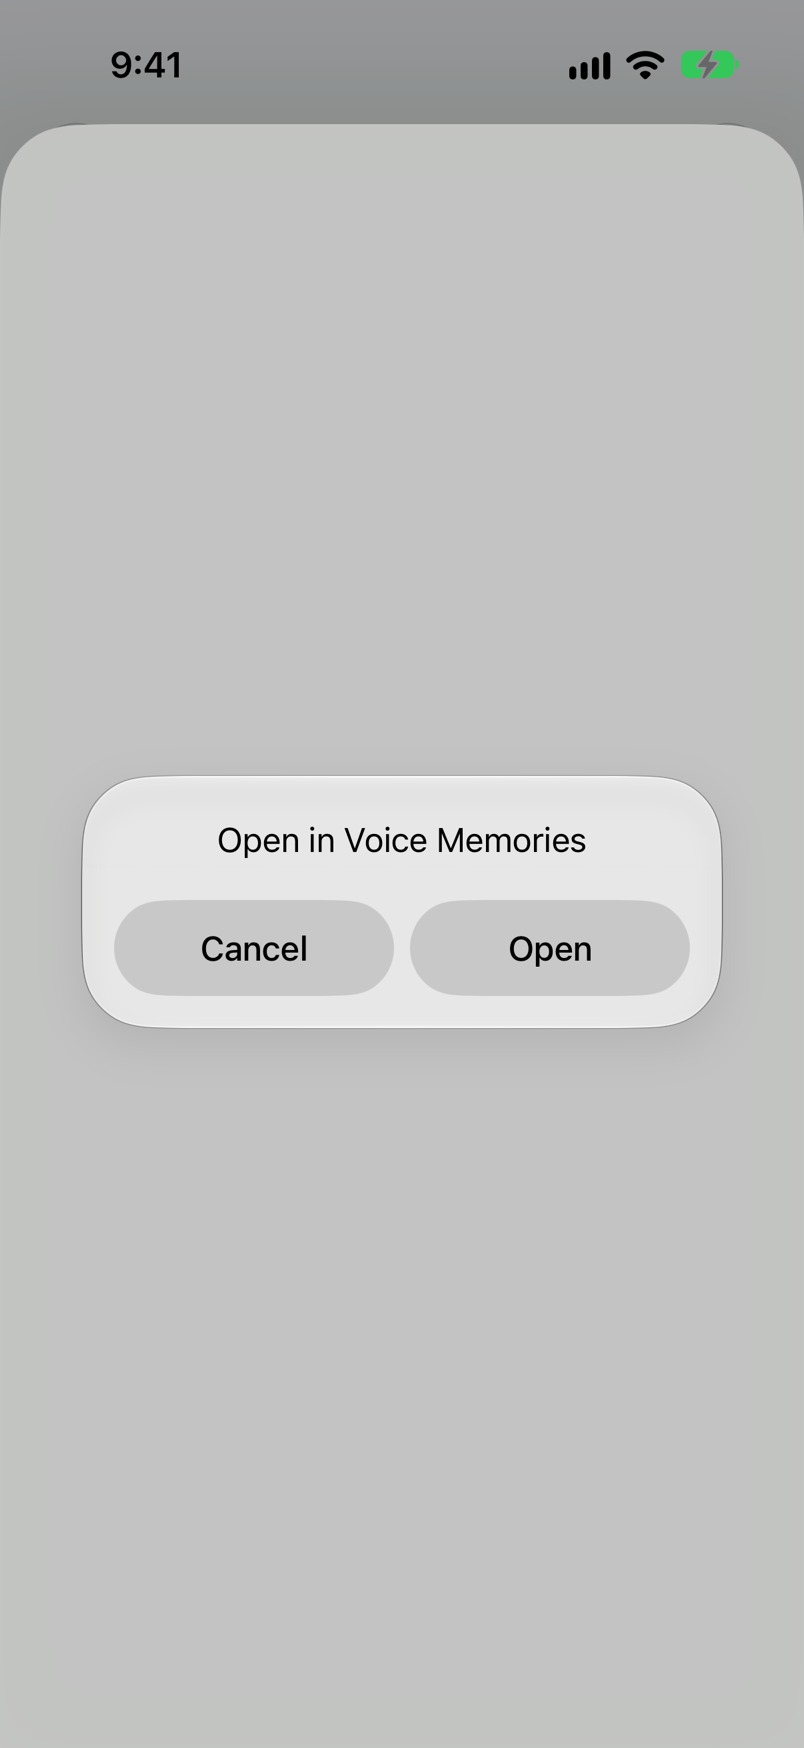
Tap Open
When every voice has been received, Open appears. Tap it to open Voice Memories; the voices are added to the list and transcription starts.
🔍 Voice Memories isn't in the share sheet
Scroll the row of apps to the end, tap More, then tap Edit and turn on Voice Memories. Adding it to Favorites puts it at the front of the row.
↩️ You closed it without tapping Open
The voices are kept. They're added the next time you open Voice Memories. If you tapped Cancel, the voices received that time aren't saved.
📚 You want to save many messages
You can send up to 10 at a time. Share 10 at a time and repeat for the rest.
🔁 You saved the same voice again
If the same audio is already saved, it isn't added again. The same goes for importing from Photos and Files. If it's in Recently Deleted, it goes back to the list.
Importing from Photos & Files
Use + at the top right of the list to import videos from the Photos app, or audio and video files from the Files app. For videos, only the sound is played and transcribed.
| How to add | What to do |
|---|---|
| Photos | Select up to 5 videos in the Photos app. The first time, iOS asks for access to your photos. |
| Files | Select audio and video files in the Files app (iCloud Drive, On My iPhone and so on), several at once. The original files stay where they are. |
| To import from messaging apps... | Shows how to save from messaging apps (see Saving from Messaging Apps). |
| Share sheet | Choose Voice Memories in another app's share sheet to save audio and video files (up to 10 at a time). |
🕒 The date in the list
The date heading is the date of the imported audio file (year-month-day hour:minute:second). The list is in the order you saved, with the latest at the top.
📝 After importing
If speech recognition is allowed, voices are transcribed automatically, one at a time in the order they were imported (see Transcription).
Playback
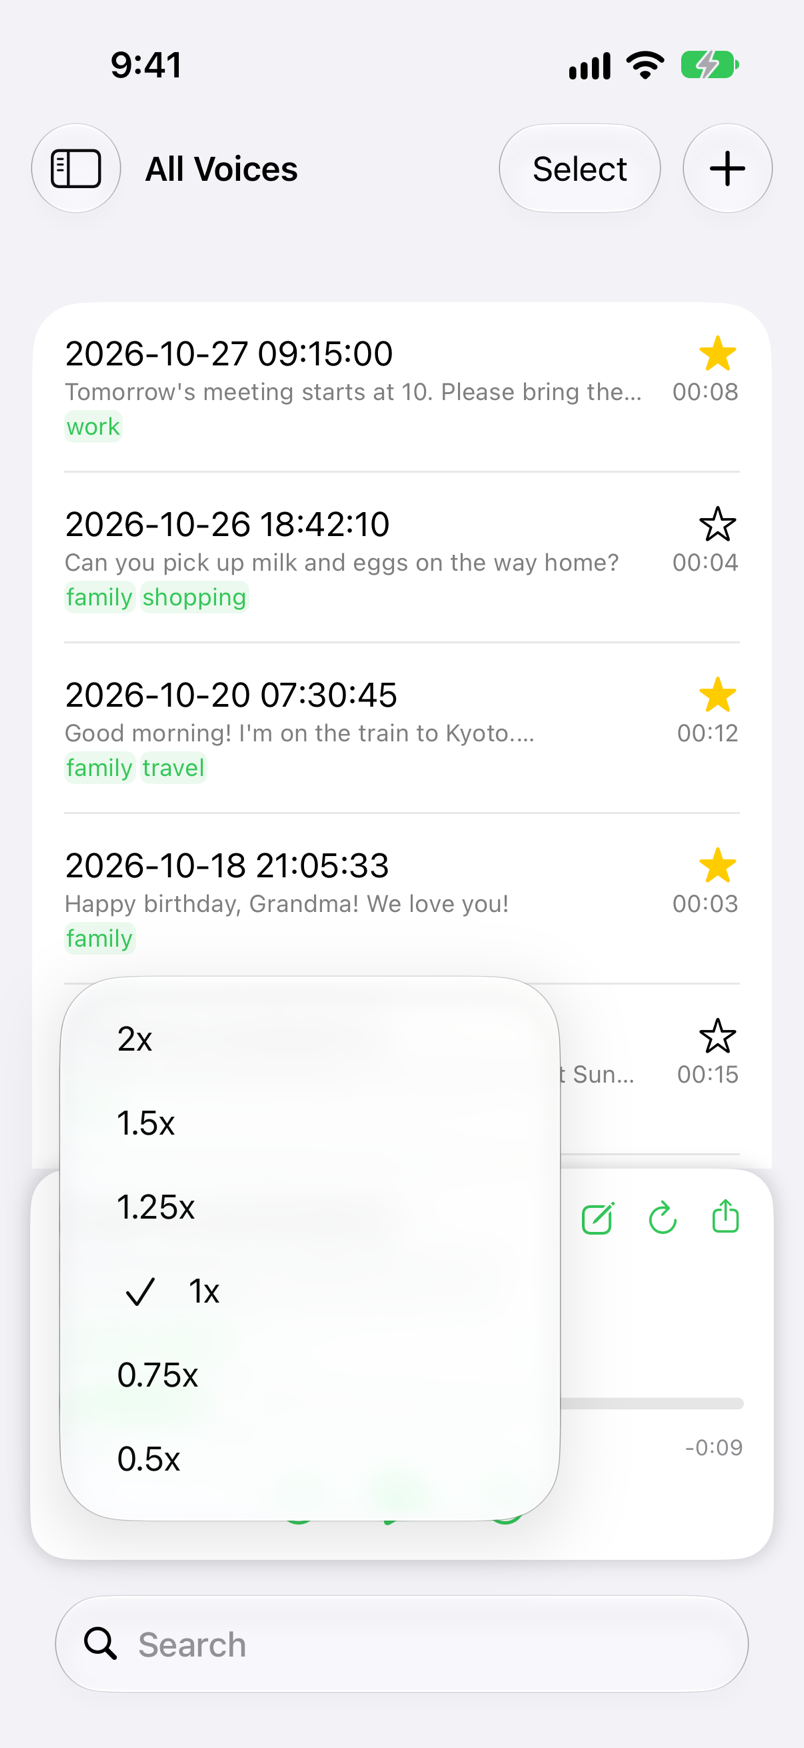
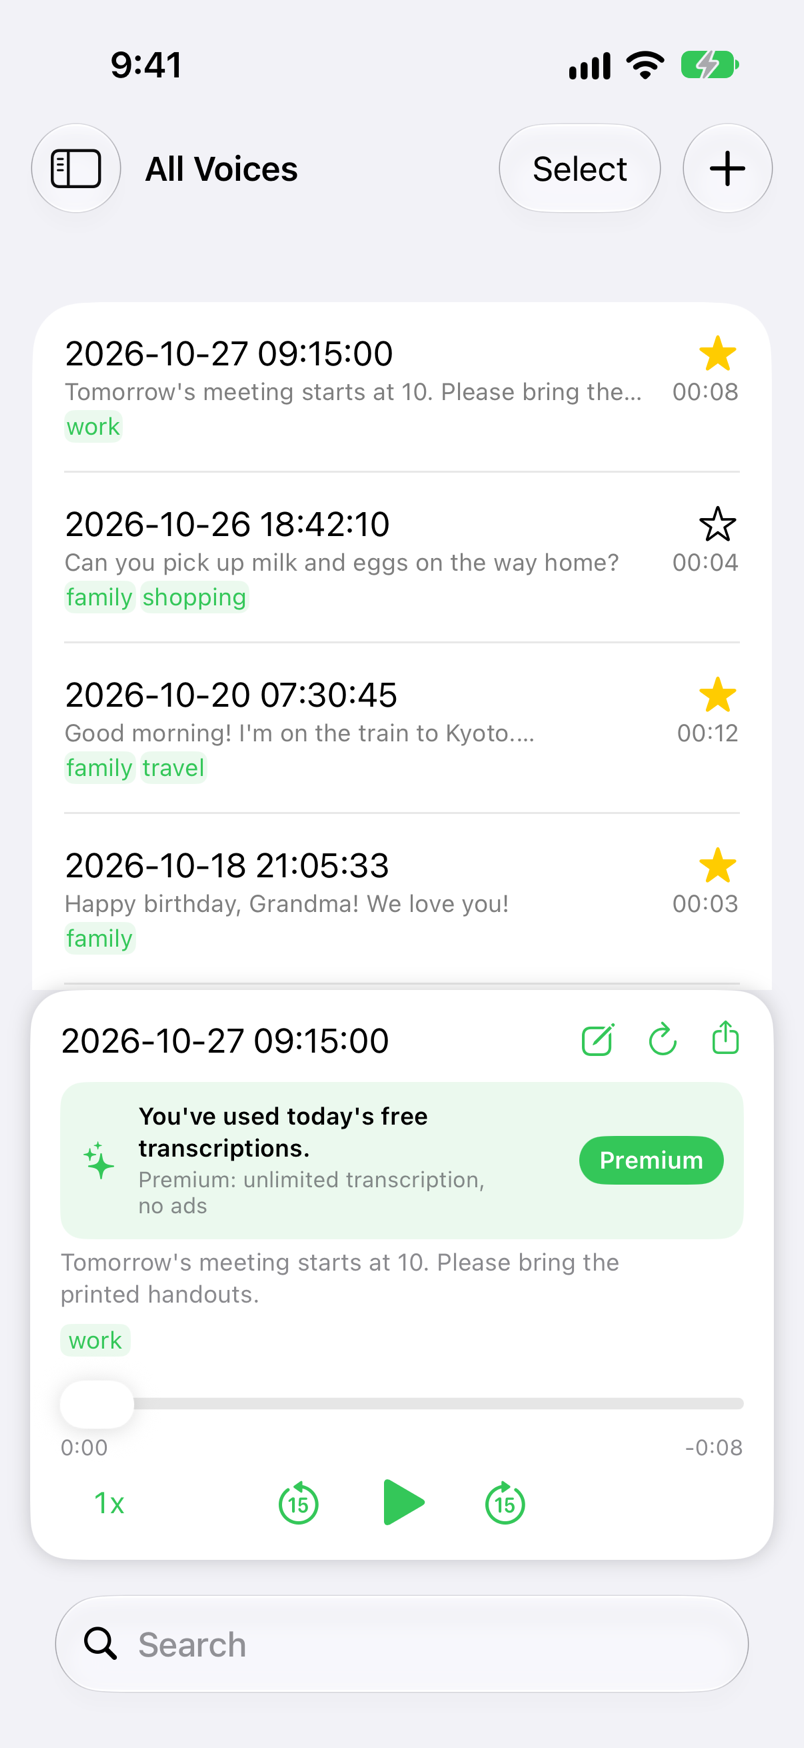
Tap a row in the list to open the player at the bottom of the screen and play the voice. It plays even in silent mode and keeps playing when you switch to another app.
| Button / display | What it does |
|---|---|
| Edit (pencil) | Opens the edit screen to change the title, tags and transcription (see Tags & Favorites). |
| ↻ (redo) | Redoes the transcription (see Transcription). |
| Share | Sends the audio file through the share sheet, for example to send it to family again or save it to Files. |
| Transcription and tags | Shows the transcription (up to 12 lines) with the tags below it. Tap the title, transcription or tags to open the edit screen. |
| Position bar | Drag to jump to the part you want to hear. The elapsed time is on the left and the remaining time on the right. |
| Playback speed | Choose 0.5x, 0.75x, 1x, 1.25x, 1.5x or 2x. The speed you choose is kept for next time. |
| Back 15 seconds / Forward 15 seconds | Moves back or ahead 15 seconds. |
| Play / Pause | Switches between playing and pausing. At the end, playback returns to the start and stops. |
🔒 Lock Screen and Control Center
On the Lock Screen and in Control Center you can play and pause, move the position, and skip 15 seconds back or ahead.
🎧 Earphones and AirPlay
Listen with Bluetooth earphones or AirPlay speakers. Playback pauses for a phone call and resumes when it ends.
Send voices
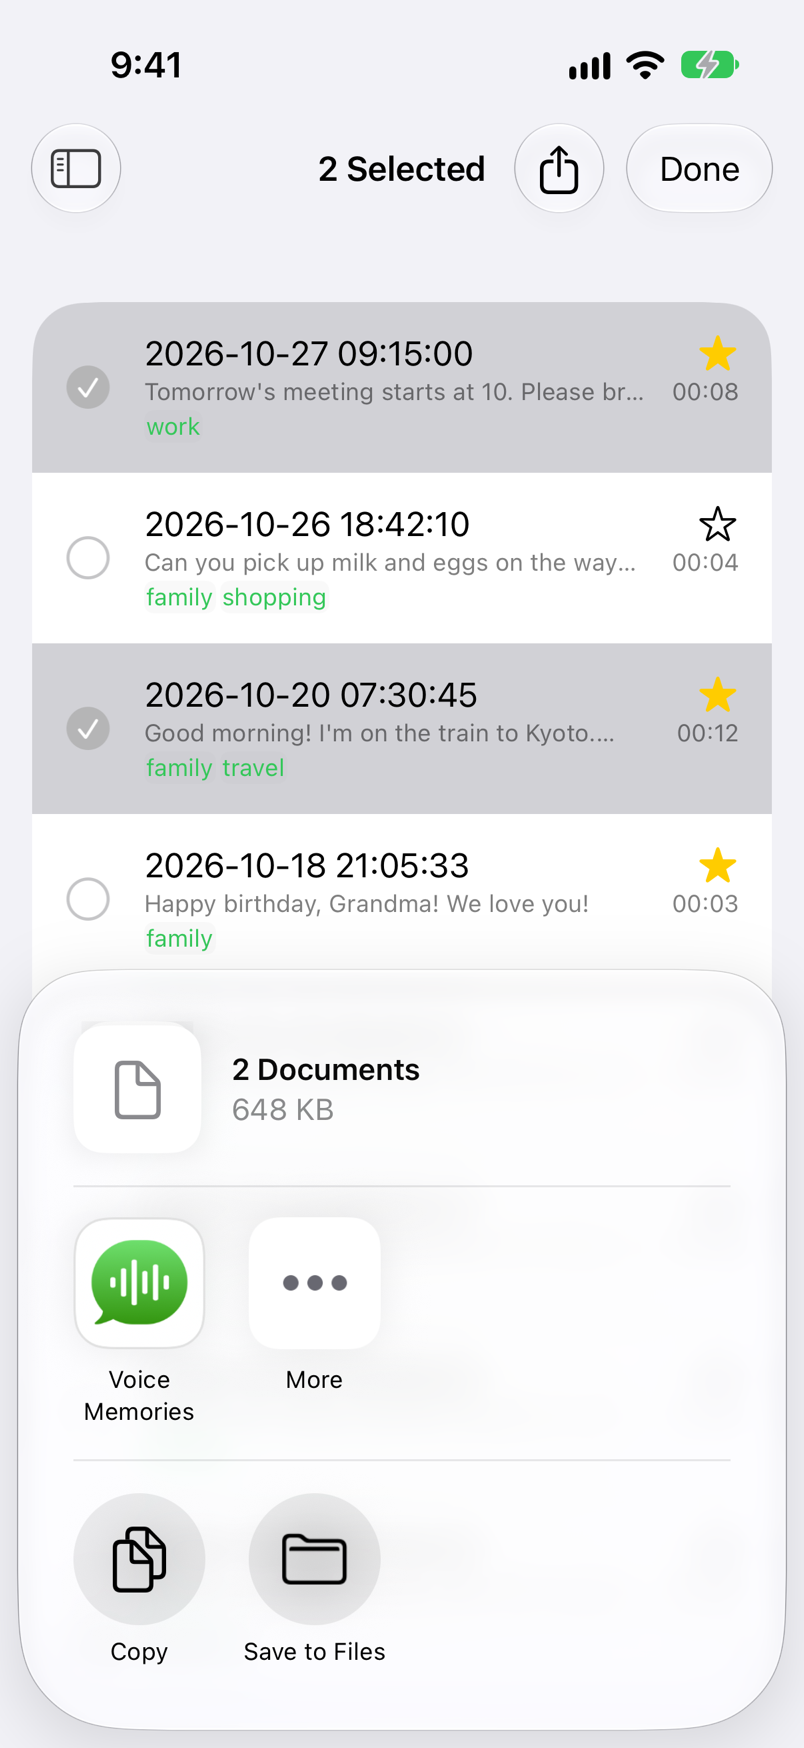
You can send voices as audio files with a messaging app, email, AirDrop and more. People who don't use Voice Memories can still play them as audio files. Choose “Save to Files” to save them in the Files app.
| How to send | Action |
|---|---|
| Send one voice | Long-press a row in the list and tap Share, or tap the share button in the player. Then choose where to send it in the share sheet. |
| Send several at once | Tap Select at the top right of the list, then tap the rows of the voices you want to send (tap again to deselect). Tap the share button at the top right to send the selected voices together from the share sheet. |
| Stop selecting | Tap Done at the top right. |
Transcription
Saved voices are transcribed automatically with Apple's speech recognition. When you save several in a row, they're transcribed one at a time in the order you saved them.
⏱️ Long recordings
Recordings longer than a minute are split at pauses (quiet moments), recognized in order, and joined together, so nothing is cut off before the end.
🔄 Redo a transcription
Tap ↻ in the player, or long-press or swipe right on a row and choose Redo Transcription. The current transcription is cleared and the voice is recognized again from the start.
✏️ Fix it by hand
Tap the transcription in the player to open the edit screen, where you can fix words the recognizer got wrong or add your own notes. When you tap the transcription field, it grows so the keyboard doesn't cover it. Tap Done above the keyboard (on iOS 18, just below the transcription field) to close it, then tap Save.
⏳ While it's transcribing
Voices being transcribed show a spinner in the list and the player, and the bottom of the list shows “Transcribing… (count)”. Transcription may stop if you switch to another app or lock the screen, so keep Voice Memories open until it finishes. If it stops, redo the transcription.
🌐 Transcription language
It's set from your iPhone's language the first time you open the app. To transcribe voices in another language, change Locale in Settings (see Settings).
Tags & Favorites
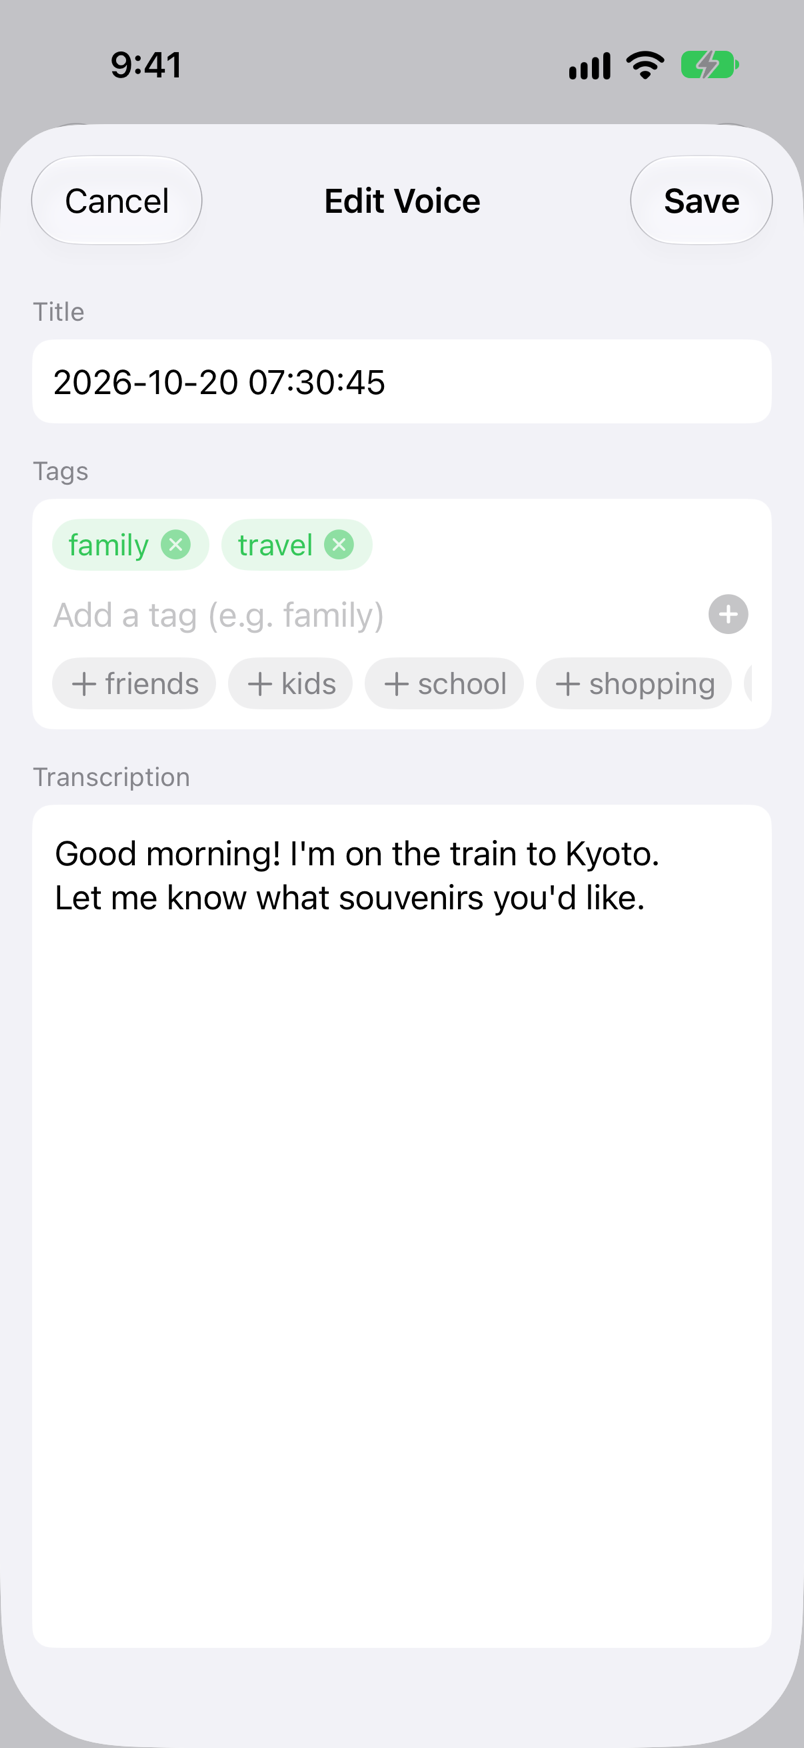
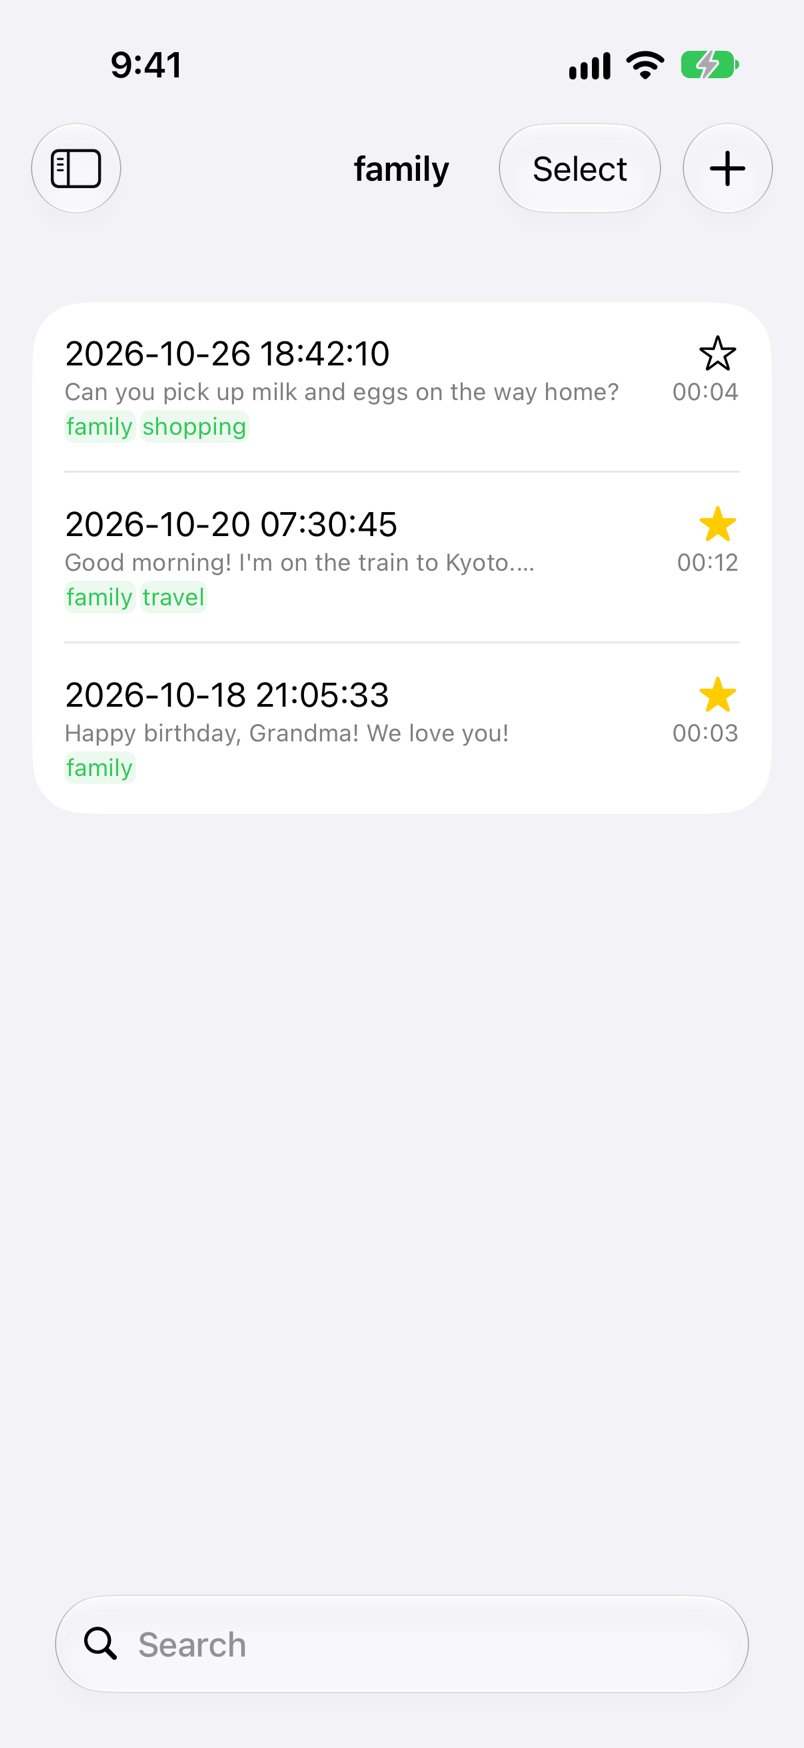
Add and remove tags on a voice's edit screen, where you can also change the title and transcription. Tags and favorites are listed in the sidebar.
Open the edit screen
Tap the edit button (the pencil icon) in the player. Tapping the title, transcription or tags in the player also opens it, as does long-pressing a row in the list and choosing Edit.
Type a tag
In the Tags section, type a word such as “family” in “Add a tag (e.g. family)” and tap return or +. Separate words with spaces or commas, as in “family travel” or “family, travel”, to add several at once. Tags you've put on other voices appear below as suggestions; tap one to add it.
Tap Save
The tags appear under the transcription in the list and the player, and are added under Tags in the sidebar. Tap a tag in the sidebar to see only the voices with that tag. Tap Cancel to close without saving your changes.
🏷️ How tags work
Type tags without “#” (adding one makes no difference). “family” and “familytrip” are different tags, and typing the same tag twice adds it only once. A “#” written in the transcription doesn't make a tag.
✂️ Remove or delete a tag
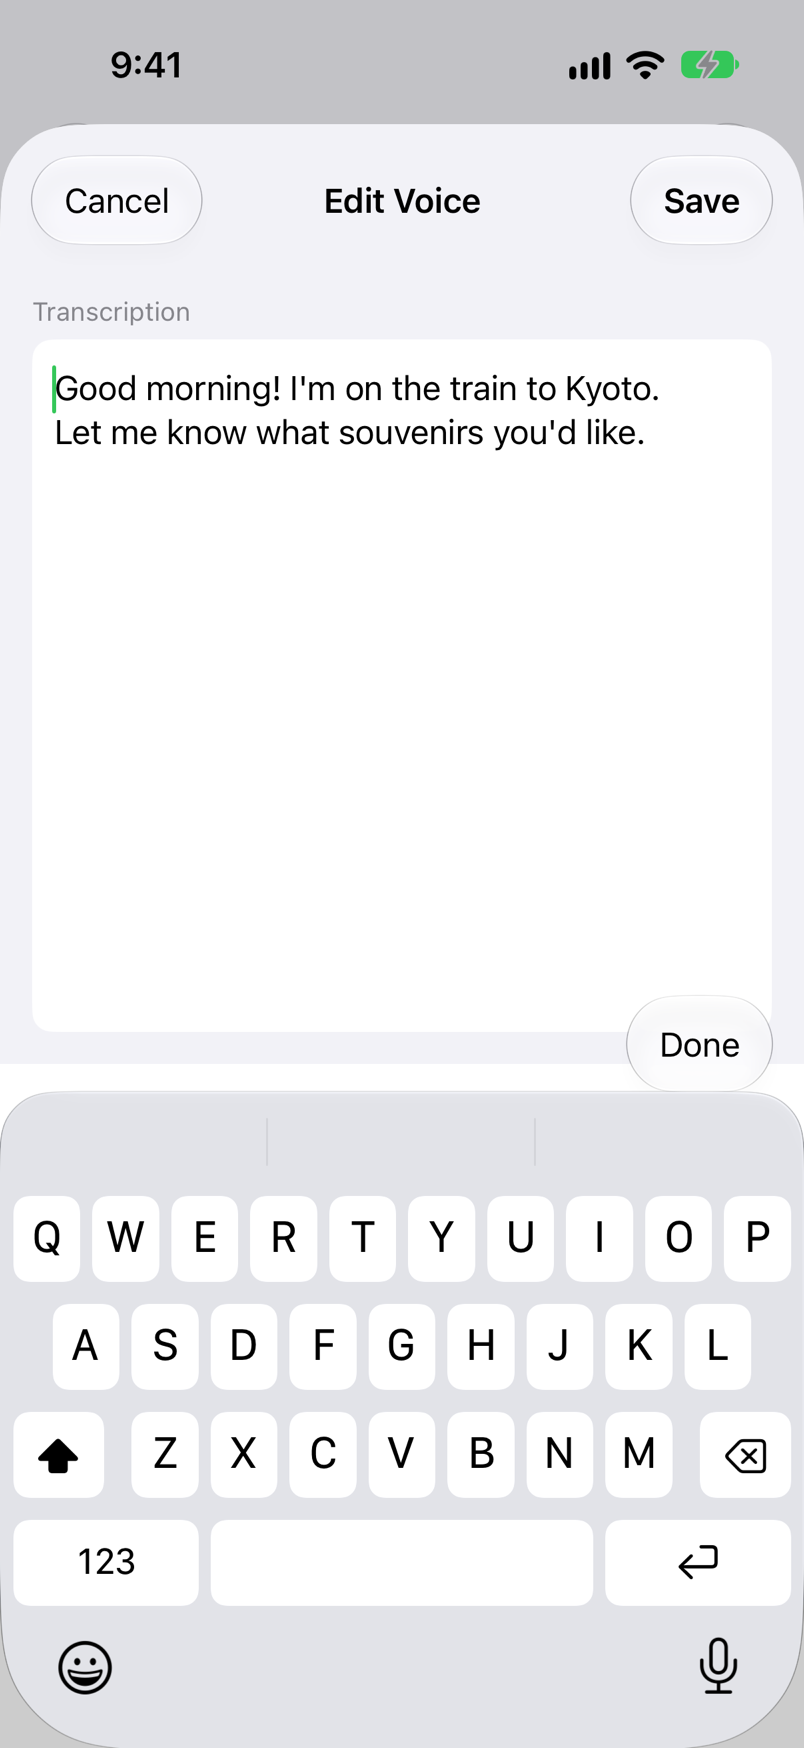
Tap the × on a tag in the edit screen to remove it from that voice. To delete a tag, swipe left on it in the sidebar and tap Delete; after you confirm with Delete Tag, the tag is removed from every voice. The voices, their audio files and transcriptions are not deleted. Tags no longer on any voice are deleted automatically.
⭐️ Favorites
Tap ☆ on a row and it turns into a yellow ★ and joins Favorites. Listen to them together from Favorites in the sidebar.
Search & Delete
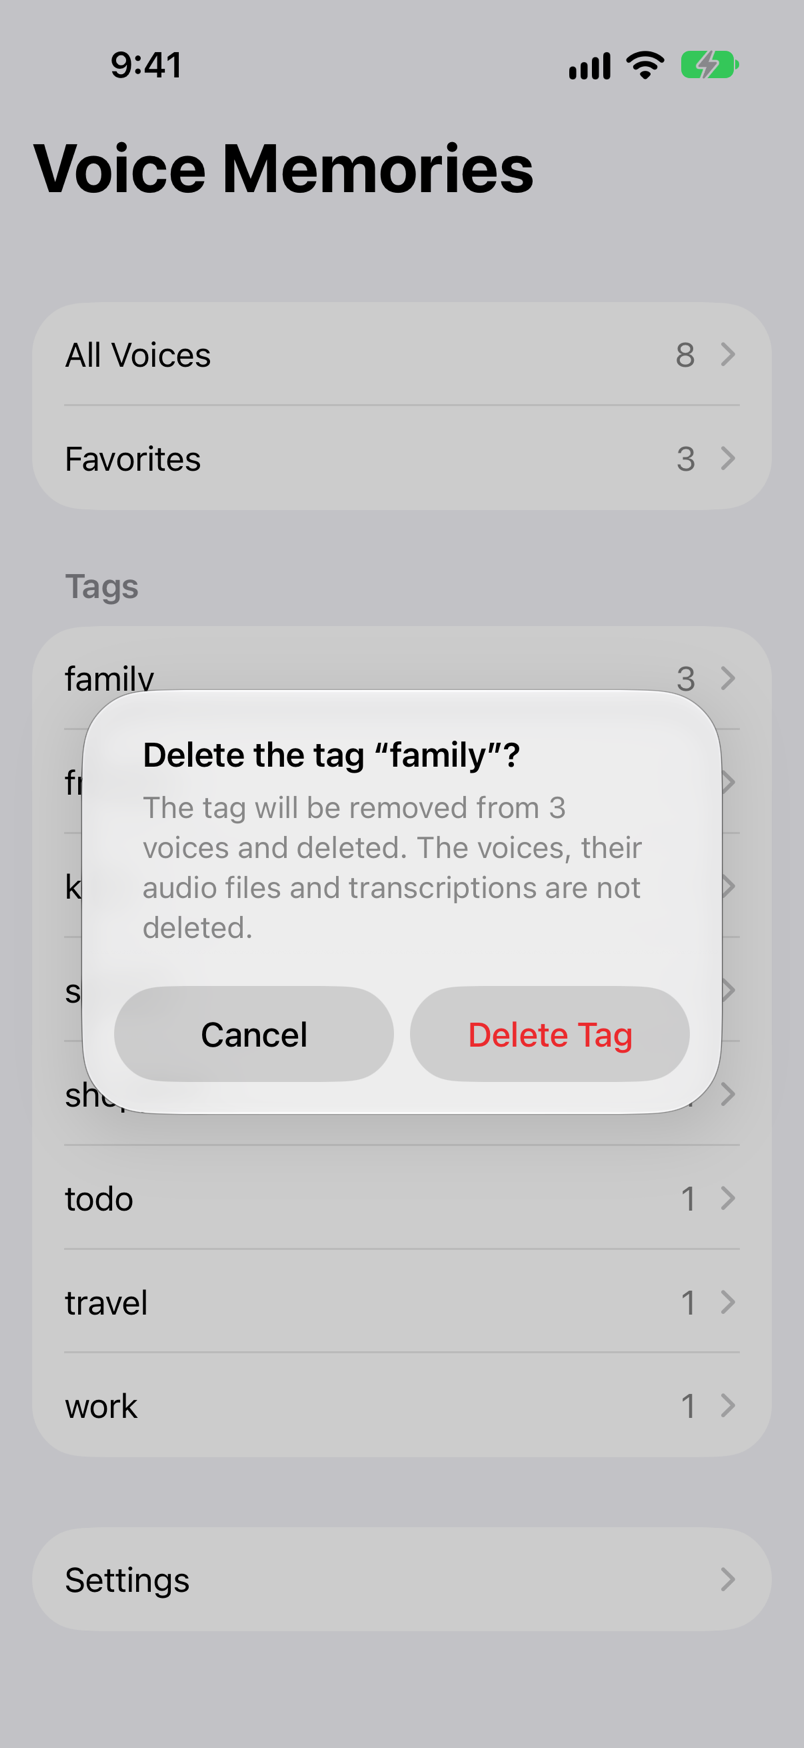
Type in the search field of the list to see only the voices whose date, transcription or tags contain the words. You can delete voices you no longer need from the list. Deleted voices stay in Recently Deleted for 30 days, so you can get them back.
🔎 Search with several words
Separate words with spaces to find voices that contain all of them. Upper and lower case, and full-width and half-width characters, are treated the same.
🗑️ Delete a voice
Swipe left on a row and tap Delete. The voice leaves the list and moves to Recently Deleted, and it's deleted permanently after 30 days. The deletion also reaches your other devices with the same Apple Account.
Recently Deleted
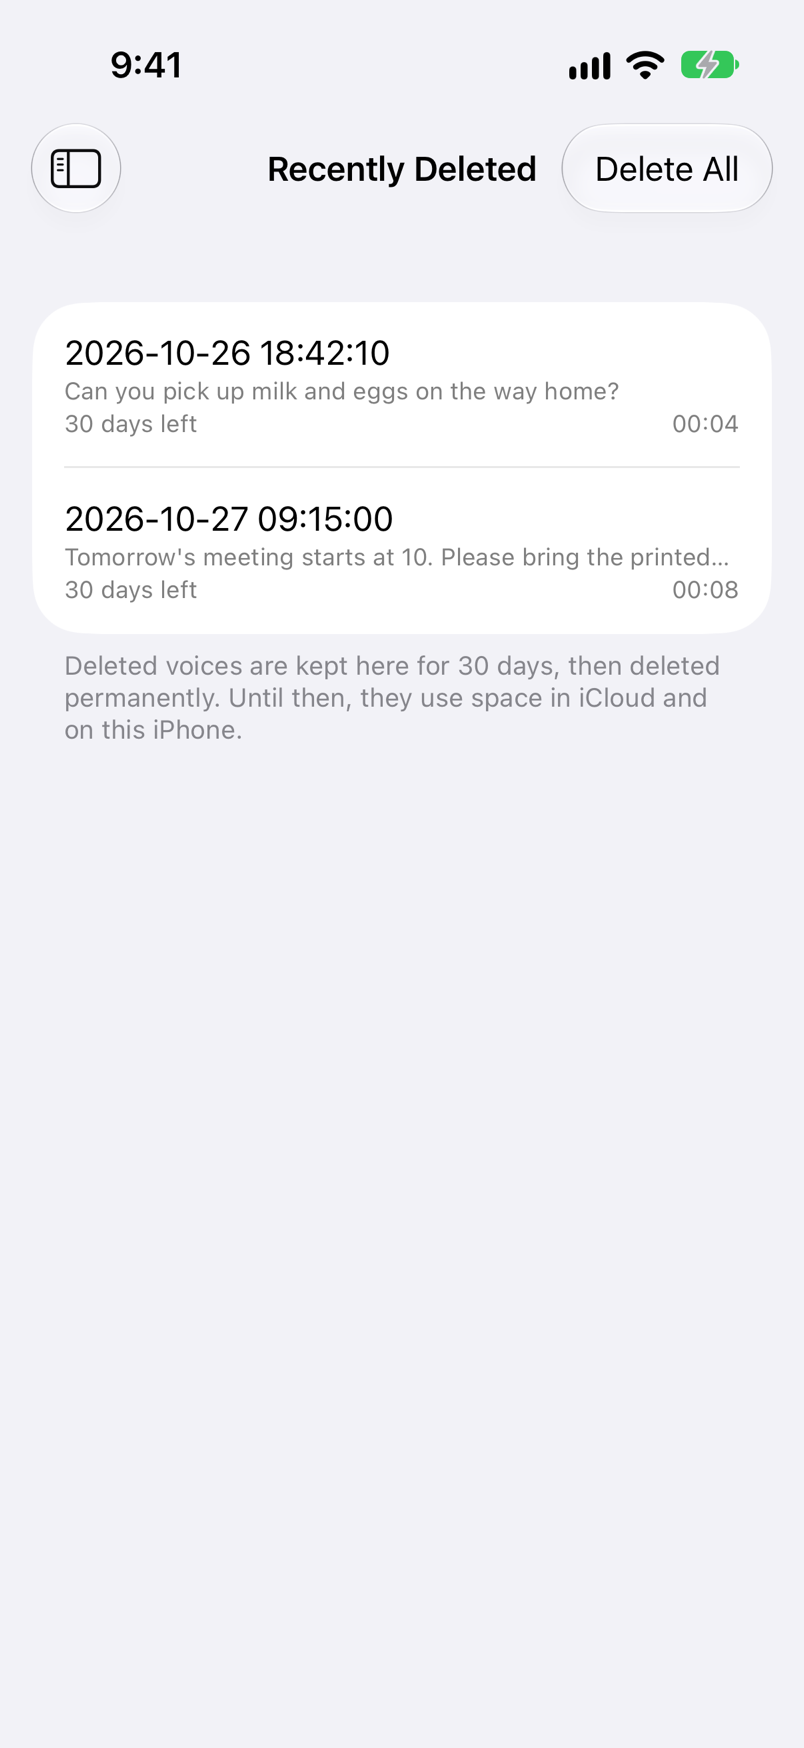
Deleted voices are listed in Settings › Data Management › Recently Deleted, most recently deleted first, with the days left before they're deleted permanently (such as “30 days left”). After 30 days they're deleted permanently. Until then, they use space in iCloud and on this iPhone.
| Action | What it does |
|---|---|
| Swipe right or long-press, then Restore | Puts the voice back in the list, with its transcription, tags and favorite as they were. |
| Swipe left and tap Delete, or long-press and tap Delete Permanently | Tap Delete Permanently to confirm, and the voice is deleted from iCloud and all your devices. This can't be undone. |
| Delete All (top right) | Tap Delete All to confirm, and every voice in Recently Deleted is deleted permanently. |

iCloud Sync & Storage
If your iPhone is signed in to iCloud, voices, transcriptions, tags and favorites are saved to iCloud, and you can hear the same voices on any iPhone or iPad with the same Apple Account. There's nothing to set up.
☁️ Voices from other devices
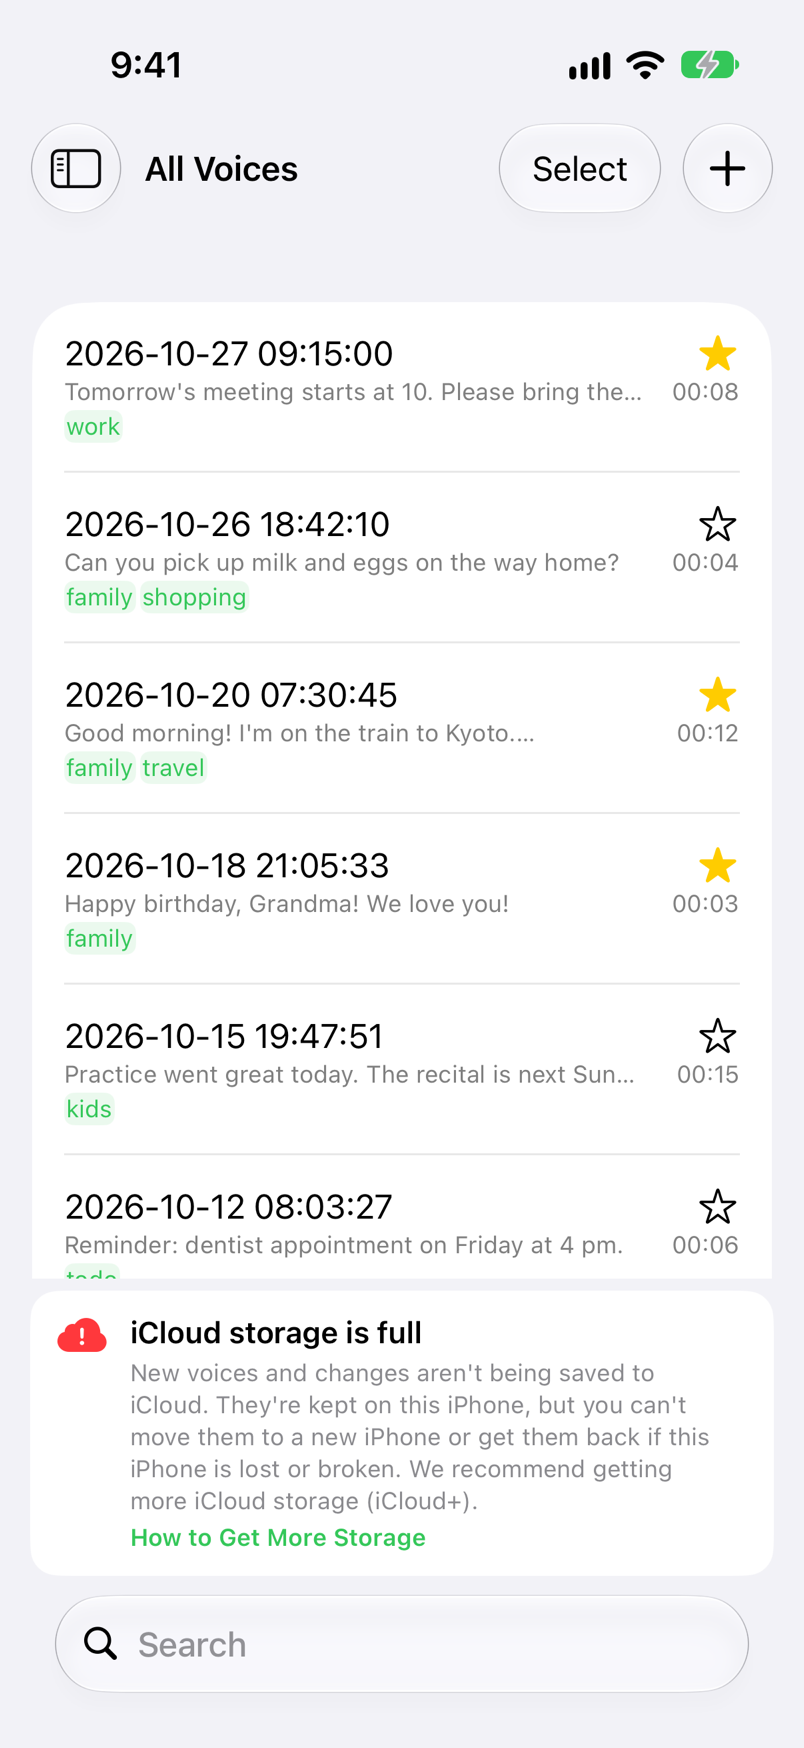
Voices saved on another device appear in the list once they arrive from iCloud. If a voice's audio can't be prepared when you tap it, the row shows a cloud icon. Wait a moment and tap it again.
⚙️ Synced settings
The transcription language, “Run on Device” and the playback speed also sync between devices with the same Apple Account.
📊 Sync status
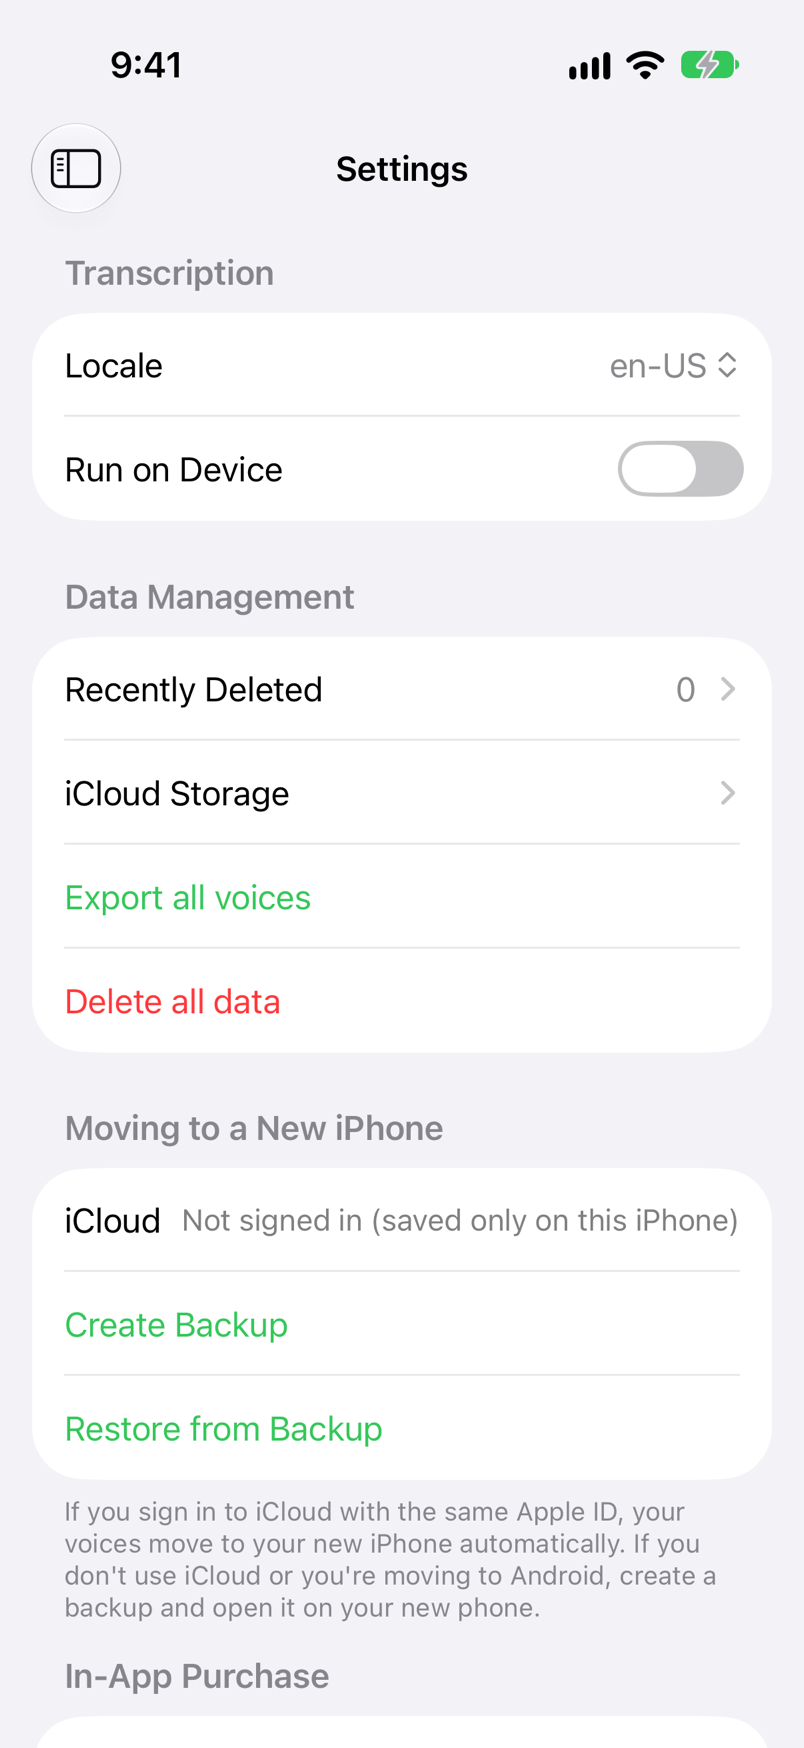
Settings › Moving to a New iPhone › iCloud shows the status, such as “Syncing…”, “Synced (time)” or “Not signed in (saved only on this iPhone)”.
💾 iCloud storage
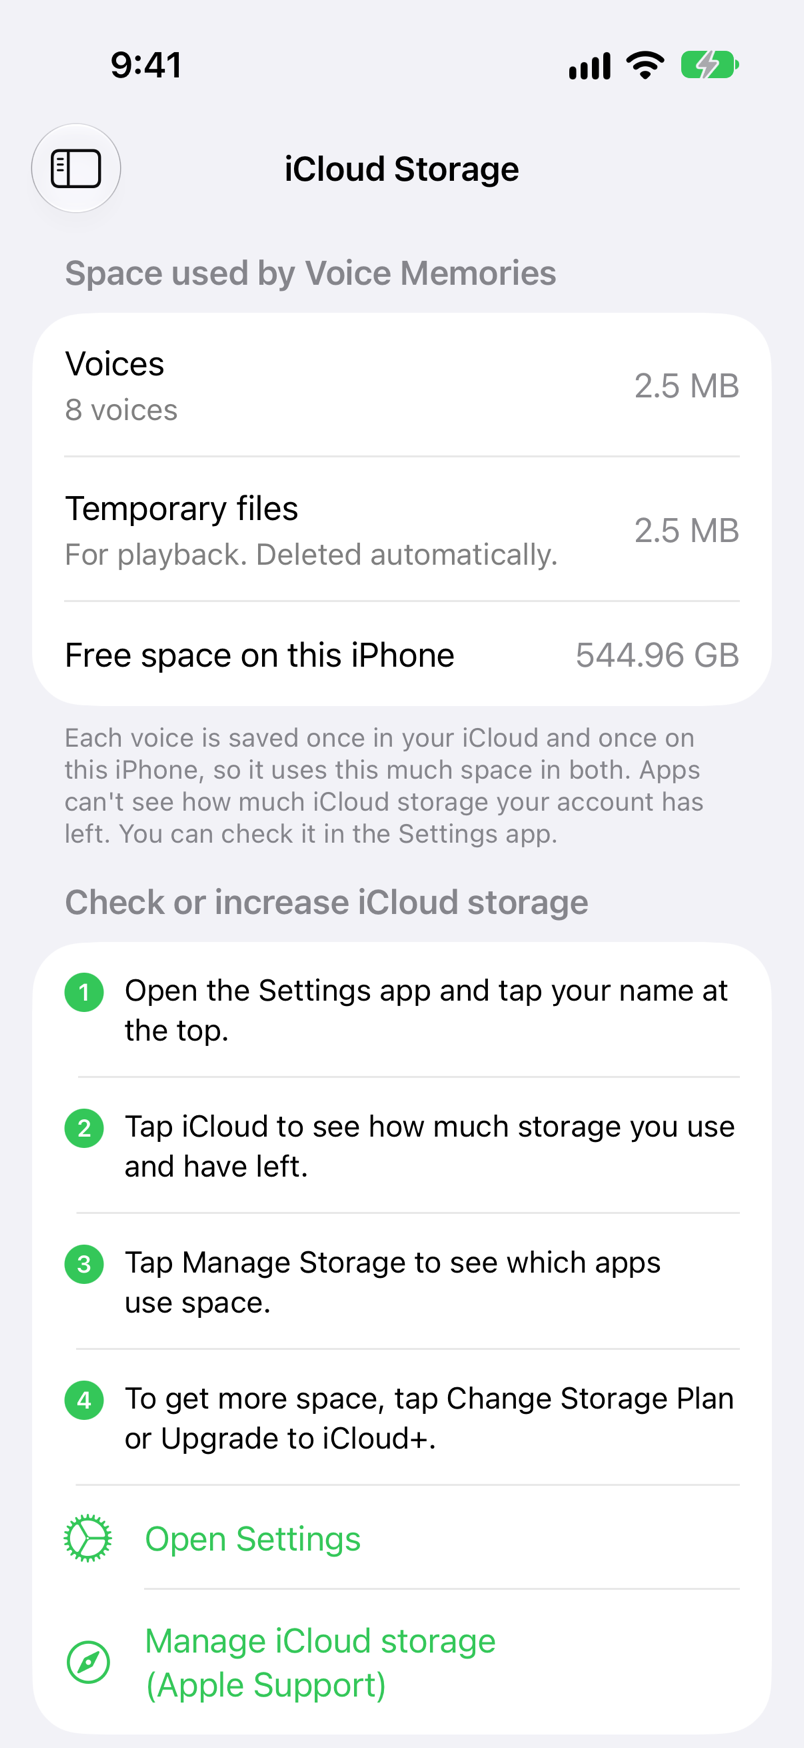
iCloud Storage in Settings shows the number and size of your voices, and how much free space the iPhone has. Each voice is saved once in iCloud and once on this iPhone, so it uses the same space in both. Voices in Recently Deleted and temporary files for playback are shown too, when there are any.
Moving to a New iPhone
If you sign in to iCloud with the same Apple Account on your new iPhone, just install and open Voice Memories and your voices come along. If you don't use iCloud or your Apple Account changes, move them with a backup file.
| How to move | What to do |
|---|---|
| iCloud | Sign in with the same Apple Account on the new iPhone and open Voice Memories. While it loads, the list shows “Loading from iCloud”. |
| Whole-iPhone transfer | If you move everything with Quick Start or an iCloud backup, your Voice Memories voices move with it. |
| Backup file | Tap Create Backup on the old iPhone, send the file to the new iPhone with AirDrop or Files, and open it to restore. |
Before you switch (old iPhone)
Save the voice messages you want to keep
LINE's standard chat history backup doesn't carry voice messages in chats over to a new iPhone. Before you switch, save the voice messages you want to keep in Voice Memories (see Saving from Messaging Apps).
Check that your voices are in iCloud
If iCloud under Moving to a New iPhone in Settings shows “Synced” with a time, your voices are saved in iCloud. If it shows “Not signed in (saved only on this iPhone)” or “iCloud storage is full”, they aren't in iCloud, so move them as a file with “Create a backup” below.
Move with iCloud (new iPhone)
Sign in with the same Apple Account
On the new iPhone, sign in to iCloud with the same Apple Account as your old iPhone.
Install and open Voice Memories
Install Voice Memories from the App Store and open it. The new iPhone asks again for permission to use speech recognition.
Wait for it to finish loading
While the list is empty, it shows “Loading from iCloud”. With many voices this can take a while. It's done when iCloud under Moving to a New iPhone in Settings shows “Synced” with a time. Settings such as the transcription language come along too, and Premium works automatically with the same Apple Account.
Create a backup (old iPhone)
Tap Create Backup
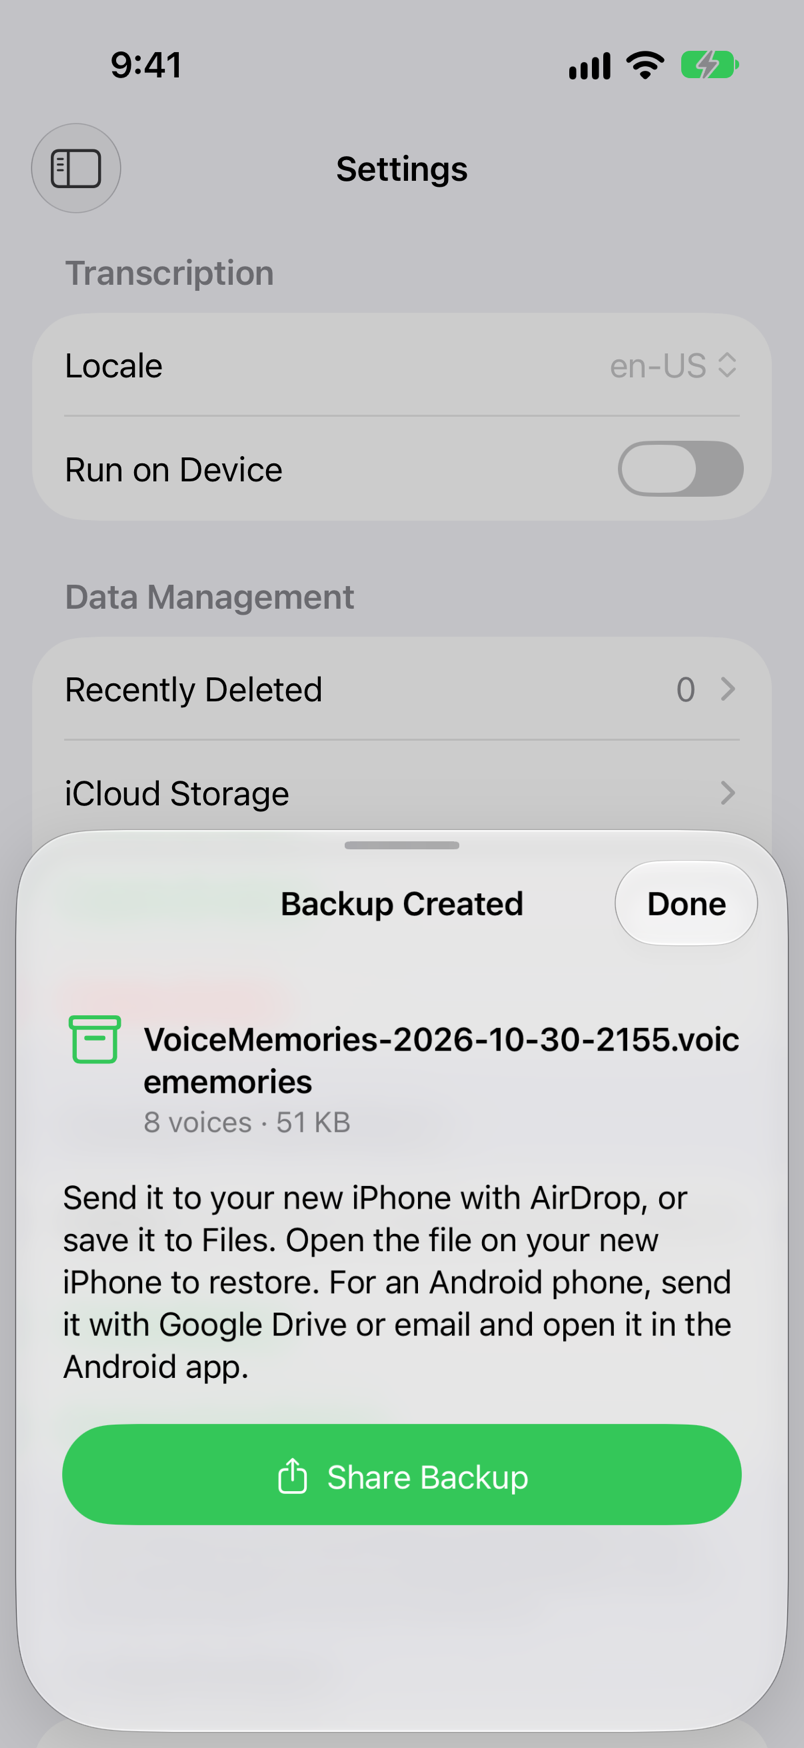
In Settings › Moving to a New iPhone, tap Create Backup. All voices, transcriptions, tags, favorites and settings such as the transcription language go into one file (.voicememories). Voices in Recently Deleted aren't included.
Send it with Share Backup
On the Backup Created screen, tap Share Backup, then send it to your new iPhone with AirDrop, or choose “Save to Files”.
Restore from a backup (new iPhone)
Open the backup file
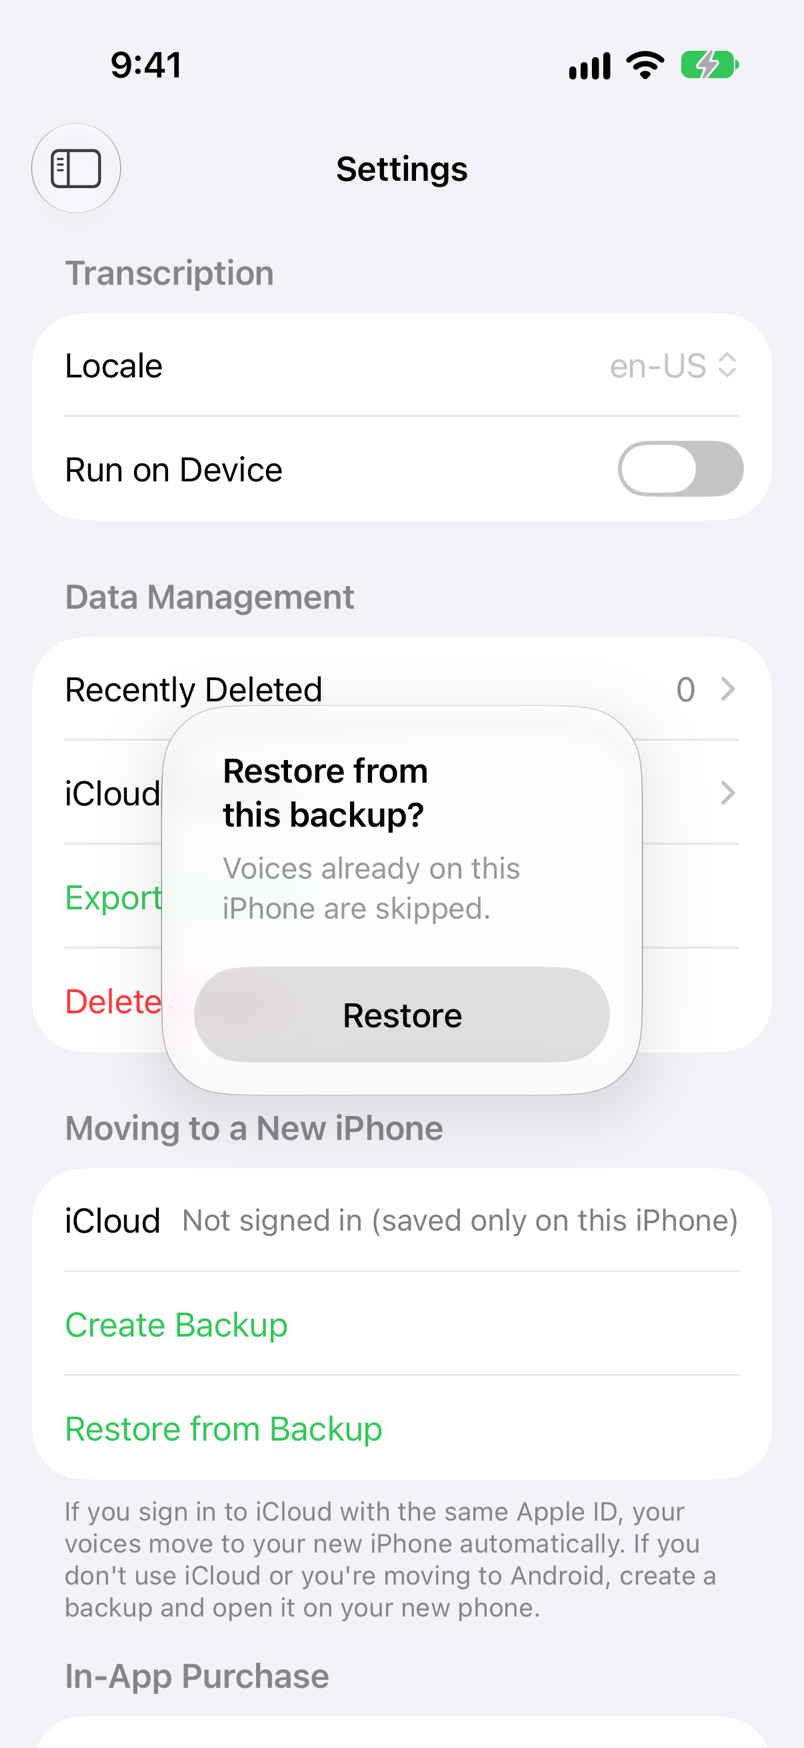
Tap the file you received with AirDrop, or the file in the Files app, and Voice Memories opens. You can also choose the file from Restore from Backup in Settings.
Tap Restore
At “Restore from this backup?”, tap Restore. Voices already on this iPhone are skipped, so restoring again never creates duplicates. Voices in Recently Deleted are skipped too; restore them from Recently Deleted.
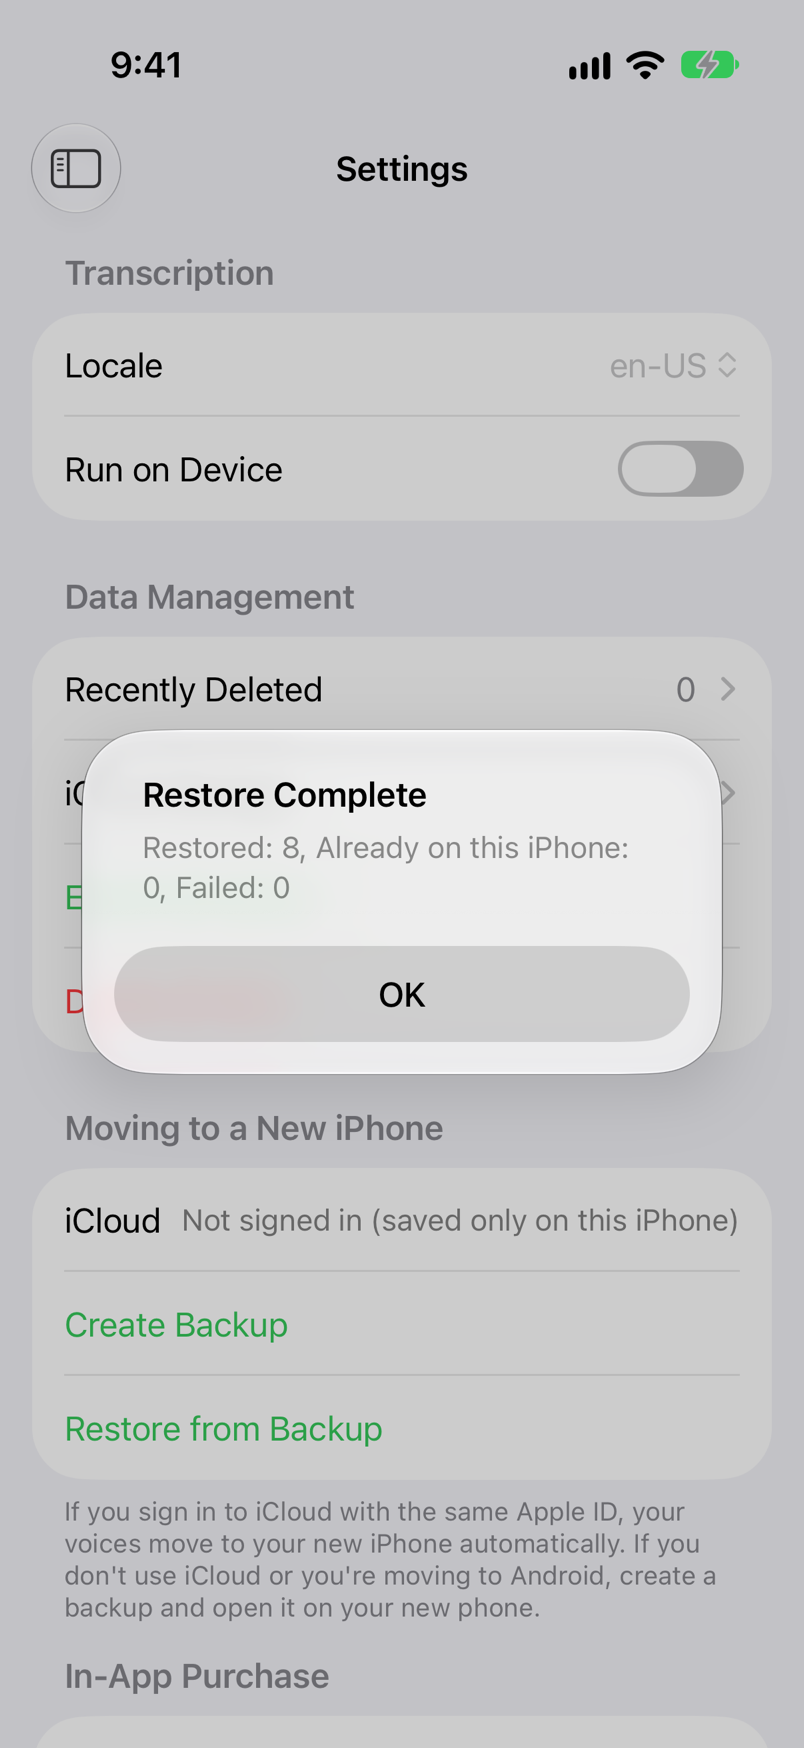
Check the result
Restore Complete shows how many voices were restored, already on this iPhone, or failed. The voices return to the list with their original dates, transcriptions, tags and favorites.
Settings
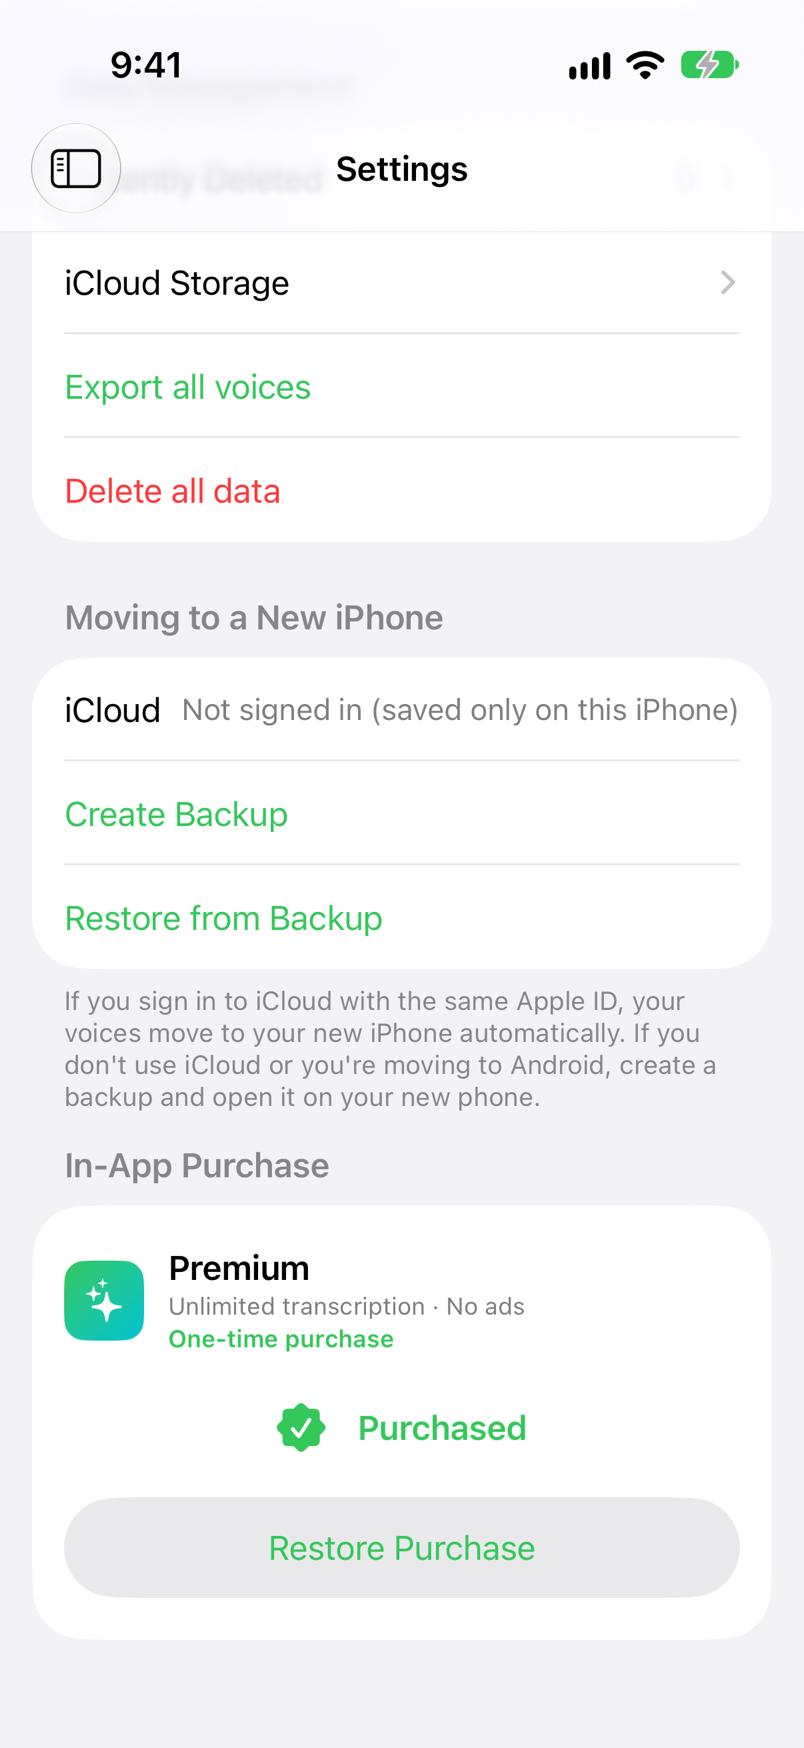
Open Settings from the sidebar. Defaults are the values the app uses the first time you launch it.
| Setting | Default | Description |
|---|---|---|
| Locale (Transcription) | Your iPhone's language | The language to transcribe (“en-US” is US English, “ja-JP” is Japanese). If your iPhone's language can't be transcribed, it's “en-US”. |
| Run on Device (Transcription) | Off |
When on, voices are transcribed only on this device, without sending audio to Apple (see Transcription). |
| Recently Deleted (Data Management) | — | The number of deleted voices. Tap it to get back or permanently delete voices deleted in the last 30 days (see Search & Delete). |
| iCloud Storage (Data Management) | — | Shows the space Voice Memories uses, and how to check and add iCloud storage (see iCloud Sync & Storage). |
| Export all voices (Data Management) | — | Saves the audio files of all voices anywhere you choose in the Files app. The file names are the dates in the list (for example, 2026-10-27-09-15-00.m4a). Voices in Recently Deleted aren't exported. |
| Delete all data (Data Management) | — | Permanently deletes all voices (including those in Recently Deleted) and tags right away. Data in iCloud is deleted too, so they disappear from your other devices. This can't be undone. |
| iCloud, Create Backup, Restore from Backup (Moving to a New iPhone) | — | The iCloud sync status, and creating and restoring backup files (see Moving to a New iPhone). |
| Premium, Purchase, Restore Purchase (In-App Purchase) | — | Buying Premium and restoring the purchase. Once you've bought it, it shows “Purchased”. On the free plan, it also shows how many free transcriptions are left today (see Free Plan & Premium). |
Free Plan & Premium
Voice Memories is free to use. Premium, a one-time in-app purchase, gives you unlimited transcription and removes ads. The screenshots in this guide were taken with Premium, except those of the free plan.
| Feature | Free plan | Premium |
|---|---|---|
| Saving voice messages and audio | ✓ | ✓ |
| Playback, tags, favorites and search | ✓ | ✓ |
| iCloud sync and backups | ✓ | ✓ |
| Transcription | Up to 5 a day | Unlimited |
| Ads | Banner at the bottom of the screen | None |
💳 Purchase and restore
On the free plan, a Premium card appears at the bottom of the sidebar. In the screen it opens, or under In-App Purchase in Settings, tap the “Buy for …” button that shows the price. It's a one-time purchase, not a subscription. Check the App Store for the current price. If you reinstall the app, tap Restore Purchase.
🆓 Free transcriptions left today
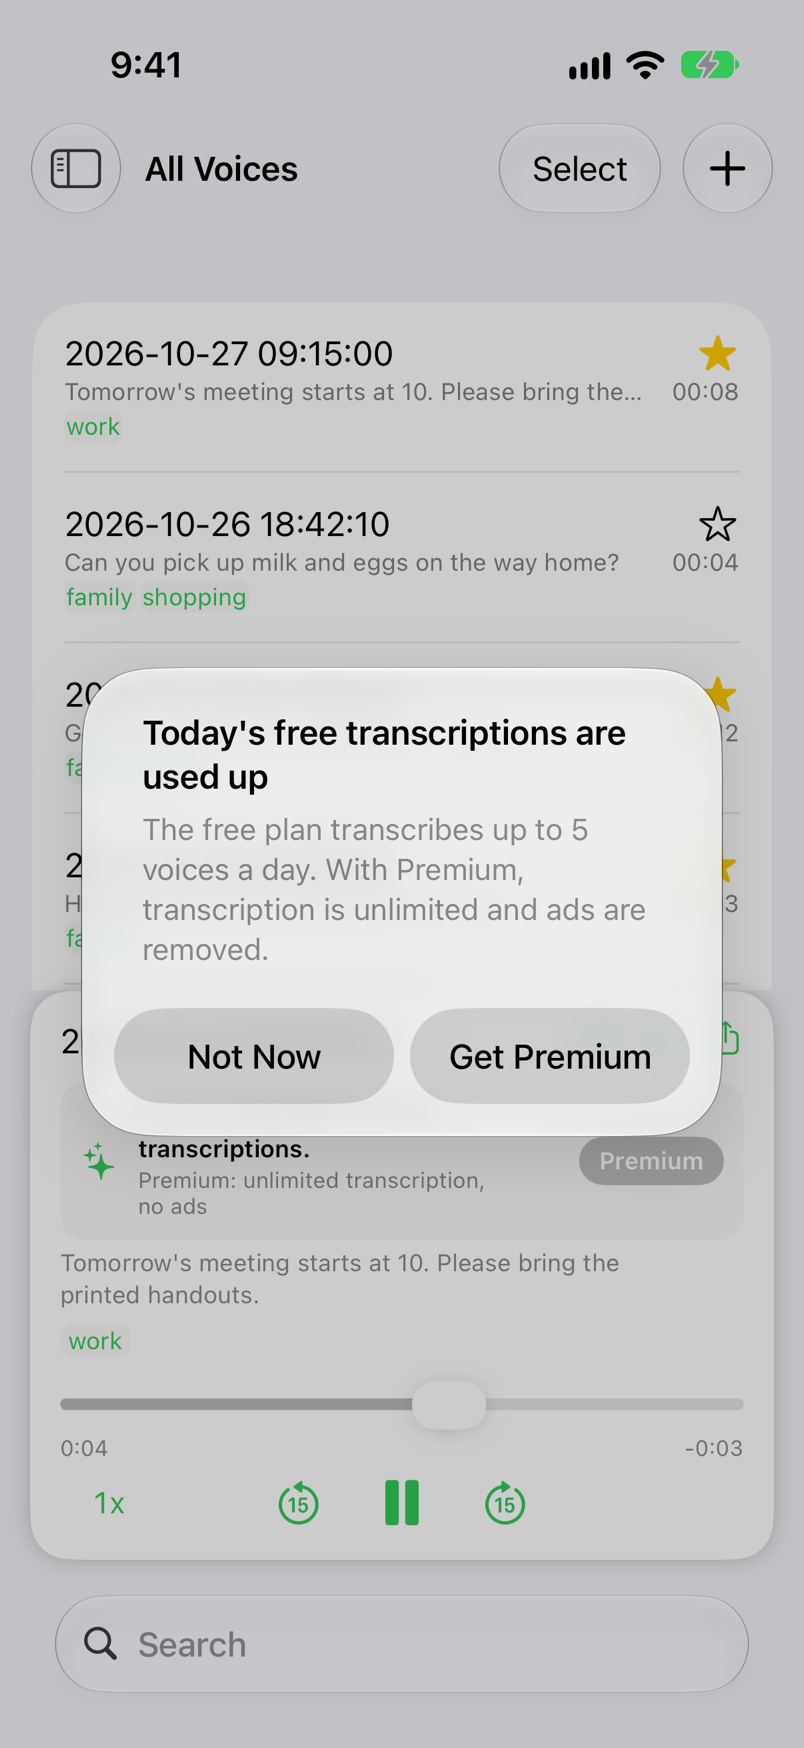
On the free plan, In-App Purchase in Settings shows “Free transcriptions left today: n of 5”. When they're used up, the player and an alert suggest Premium.
🌐 Ads and tracking
On the free plan, the app asks for permission to track so it can show ads more relevant to you. Every feature works whether or not you allow it. In regions such as the EEA and the UK, change your consent with “Ad Privacy Choices” in Settings. Your voices and transcriptions are never sent for ads.
Supported Files & Requirements
The files you can save, the requirements, and where your data is kept.
| Item | Details |
|---|---|
| Files you can save | Audio files your iPhone can play (m4a, as used for LINE voice messages, mp3, wav and more) and videos with sound (mp4, mov and more) |
| How many at once | 10 from the share sheet and 5 from the Photos app. In the Files app you can select several at once. |
| Transcription | Apple's speech recognition (the languages listed under Locale in Settings). Up to 5 a day on the free plan |
| Requirements | iPhone with iOS 18 or later, iPad with iPadOS 18 or later |
| Languages | English and Japanese (follows your iPhone or iPad language) |
| Where data is kept | Only on this device and in your iCloud. Nothing is sent to SoNice!'s servers (privacy policy). |
FAQ
Answers to common questions about saving voice messages and transcription.
Q. How do I save a LINE voice message?
In the LINE chat, long-press the voice message, tap Share, then tap Other apps at the bottom right. Choose Voice Memories in the share sheet, and tap Open when saving finishes. The voice is added to the list and transcribed (see Saving from Messaging Apps).
Q. Voice Memories doesn't appear in the share sheet
Scroll the row of apps to the end, tap More, then tap Edit and turn on Voice Memories. Add it to Favorites to keep it at the front of the row.
Q. Why isn't a voice transcribed?
Either speech recognition isn't allowed, or today's free transcriptions (5 a day) are used up. Turn on Speech Recognition for Voice Memories in the Settings app. A quiet or noisy recording, or no internet connection, can also produce no text. In that case, redo it with ↻ in the player.
Q. Can I fix mistakes in a transcription?
Yes. Tap the transcription in the player to open the edit screen, fix it, and tap Save. To recognize the voice again from the start, redo the transcription with ↻.
Q. Where are my voices stored? Are they sent anywhere?
They're stored only on your device and in your iCloud, and are never sent to SoNice!'s servers. Transcription uses Apple's speech recognition; unless “Run on Device” is on, audio may be sent to Apple for recognition. Voices are kept inside the app and don't appear in the Files app. To get them as audio files, use Export all voices in Settings.
Q. Will my voices move to a new iPhone?
Yes. Sign in to iCloud with the same Apple Account on the new iPhone and open Voice Memories; your voices load automatically. Without iCloud, create a backup with Create Backup in Settings on the old iPhone and open the file on the new one to restore. See Moving to a New iPhone.
Q. Why do some rows show a cloud icon?
The audio for that voice couldn't be prepared when you tapped it. A voice saved on another device may not have arrived from iCloud yet. Wait a moment and tap it again.
Q. How many voices can I save?
There's no limit on the number of voices, as long as your device and iCloud have free space. The share sheet sends up to 10 at a time, so share larger sets 10 at a time.
Q. Can I get back a voice I deleted by mistake?
Yes, within 30 days. In Settings › Recently Deleted, swipe right on the voice or long-press it, then tap Restore. Voices deleted with Delete Permanently or Delete all data can't be restored.
Q. Can I send a saved voice to family or friends?
Yes. Long-press a row in the list and tap Share to send that voice as an audio file with a messaging app or email. To send several at once, tap Select at the top right of the list, choose the voices, and tap the share button at the top right (see Send voices).
Q. Can I use Premium on another iPhone or iPad?
Yes, with the same Apple Account. The app checks your purchase when it starts, so Premium turns on automatically. If it doesn't, tap Restore Purchase under In-App Purchase in Settings.