WebP Converter. User Guide
A macOS image converter that turns JPEG, PNG, HEIC, and other images into WebP in batches, with nothing more than a drag and drop. It also converts WebP back to PNG or JPG, and converts between animated GIF and animated WebP.
Key Features of WebP Converter.
Everything you need for converting to and from WebP, in a single window.
Batch conversion
Add many images or folders at once and convert them to WebP at the same time. The number of images processed at once is set automatically to suit your Mac's memory and number of CPU cores.
Detailed WebP settings
Fine-tune how WebP files are written: Quality, Lossless, Method, Presets, Keep Color Profile, and Sharp YUV.
From WebP to PNG / JPG
WebP images can be converted to PNG (the default), JPG, or WebP. Animated WebP can become an animated PNG (APNG) or a GIF, and animated images such as GIFs are converted to animated WebP.
Comparison preview
Compare the original and the converted image with a slider, and check how the file size changed along with the color profile and EXIF data.
Batch renaming
Rename converted files in bulk with 1- to 5-digit sequence numbers, a prefix or suffix, or the resized width or height.
Resizing
Set a maximum width and height in pixels to scale images down while keeping the aspect ratio. Smaller images are never enlarged.
Watermarks
Add a logo or other image as a watermark, with control over its position, size, offset, and opacity. You can also choose whether it's added before or after resizing.
Presets
Save your conversion settings, resizing, watermark, output, filename settings, post-conversion actions, and more under a name, and switch between them instantly with ⌘ + 1–9.
Works with Finder
Send images or folders from Finder with Services in the right-click menu. Any image the app can read works, whatever the format: JPEG, PNG, HEIC, WebP, AVIF, and more. You can also use Open With or drop images on the app's Dock icon.
Quick Start (Basic Usage)
Choose an output folder, drag and drop your images, and click Start. That's all it takes to convert them to WebP.
Choose an output folder
The first time you launch the app, the output is set to “Not yet specified”, and the blue button at the top right of the toolbar reads “Select Output Folder”. Click it and choose the folder where the converted files should go; the button then changes to Start. To save them next to the originals instead, choose “Save in Original Image Folder” from the OUTPUT pop-up menu. In the free version OUTPUT is below the list; after upgrading it's in the right sidebar (see Output & Post-Conversion).
Drag and drop your images
Drag the images or folders you want to convert onto the “Drag & Drop images here” area of the list. You can also choose them with the + button in the toolbar (⌘ + O), or add image files you copied in Finder with ⌘ + V (see Adding Images & Finder Integration).
Check the conversion settings
After upgrading, you can adjust Quality and other settings in ENCODE OPTIONS in the right sidebar (Quality starts at 75.0). The free version always converts with the default settings (see Converting to WebP).
Click Start
Click the blue Start button at the top right of the toolbar (or press ⇧ + ⌘ + S). If images are selected, only those are converted; otherwise every image in the list is. While converting, the button shows the progress (%). Each finished row shows the converted file size and the change from the original (the free version just shows that it's done); click Show to see the converted file in Finder.
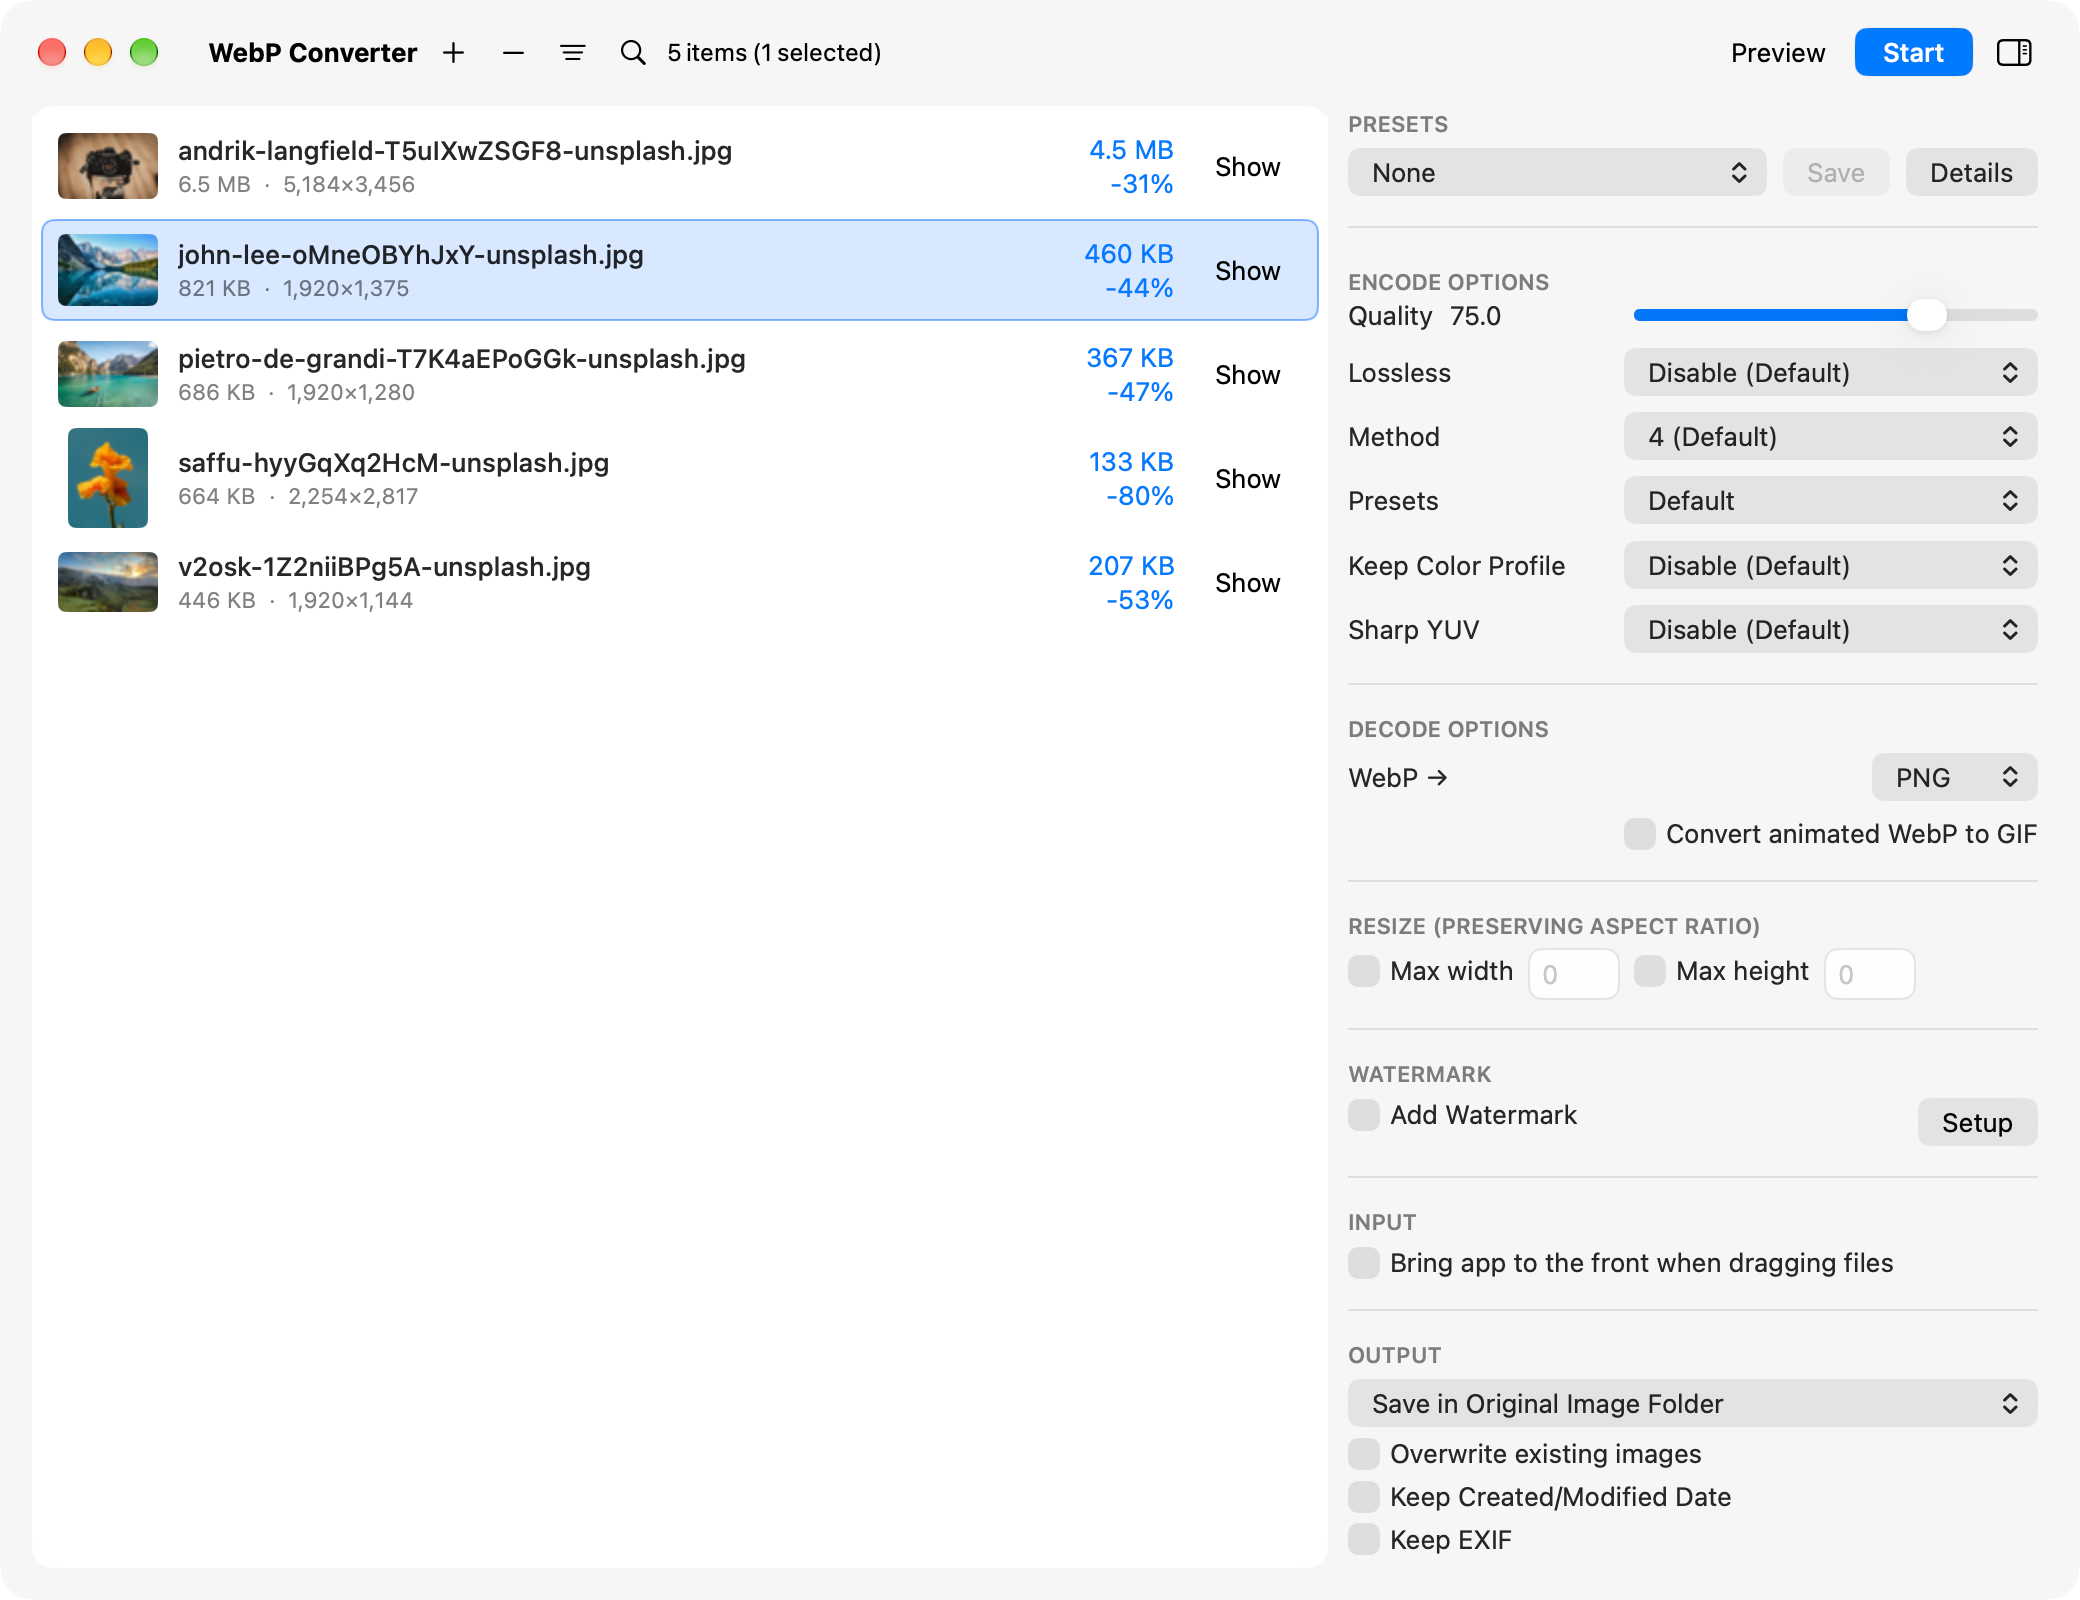
-31% to -80%), and a Show button, and the conversion settings are in the right sidebar. The selected row is highlighted in blue, and the toolbar reads “5 items (1 selected)”The Main Window
The main window has the toolbar, the image list, and the right sidebar. The right sidebar appears after upgrading; in the free version, the INPUT and OUTPUT settings appear below the list instead.
Toolbar
| Button / display | What it does |
|---|---|
| + | Adds images or folders to the list (⌘ + O). You can pick several files and folders at once. |
| − | Removes images from the list. With images selected, only those are removed; with nothing selected, the whole list is cleared. The original files aren't deleted. |
| Sort | Each click switches the list order: “Sorted by loading” → “Sorted by Filename (ASC)” → “Sorted by Filename (DSC)”. |
| Search (magnifying glass) | Shows the search field so you can filter the list by file name (⌘ + F). |
| Item count | Shows how many images are in the list and how many are selected, as in “5 items (1 selected)”. |
| Preview | Opens the comparison preview of the conversion result (⇧ + ⌘ + P; after upgrading). |
| Watermark: ON / OFF | Free version only. Opens the Watermark window. |
| Start | Starts converting (⇧ + ⌘ + S). While converting, it shows the progress in %. When the output is “Not yet specified”, it reads “Select Output Folder”; click it to choose the output folder. |
| N Errors | Appears when some images couldn't be converted. Click it to select the rows with errors one after another. Click × to clear the count. |
| Right sidebar | Shows or hides the right sidebar (⌘ + →; after upgrading). |
The image list
🖼️ Thumbnails and file names
Click a file name to show the original in Finder. After upgrading, clicking a thumbnail opens the comparison preview for that image.
📏 Size and new name
After upgrading, the file size and the width × height in pixels appear under each file name. Images that the resize settings will scale down show “→ width × height” next to their size, and when anything other than “None” is chosen under MODIFY FILENAME, “→ new name.ext” appears next to the file name.
📊 Conversion results
After upgrading, finished rows show the converted file size and the change from the original (for example, -44%). In the free version, finished rows show Done! instead. Click Show to see the converted file in Finder.
⚠️ When something goes wrong
Rows that couldn't be converted show a red Error; hover over it to see what went wrong. If converted data is available, you can save it yourself with the Save button.
Selecting images and the right-click menu
Click a row to select it, ⌘-click to add it to or remove it from the selection, and ⇧-click to select a range. Use ↑ / ↓ to move the selection and ⌘ + A to select everything; click an empty spot in the list or press esc to deselect. Right-click a row to open this menu:
| Menu item | What it does |
|---|---|
| Preview | Opens the comparison preview for that image (after upgrading). |
| Start Conversion | Converts the selected images. |
| Select Output Folder & Start Conversion | Asks for a folder, then converts into it. The output folder in the settings doesn't change. |
| Initialize Process Status | Puts converted images back to the unconverted state. Originals that “Trash original images” moved to the Trash are put back where they were. |
| Show results in Finder | Shows the converted file in Finder (converted rows only). |
| Show in Finder | Shows the original in Finder. |
| Clear Image / Clear Images | Removes the selected images from the list (the original files aren't deleted). |
| Add Images... / Add Images from Clipboard | Adds images to the list. These also appear when you right-click an empty spot in the list. |
Filtering with search
Click the magnifying glass or press ⌘ + F to open the search field, then type part of a file name to filter the list (upper and lower case are treated the same). When the search field opens, “#Error” and “#Trashed” buttons appear below it; click one to show only the images that failed, or only those whose originals were moved to the Trash. If you click Start while the list is filtered, only the images shown are converted. Close the search with the × button or esc. The comparison preview also steps only through the images shown.
Adding Images & Finder Integration
Besides drag and drop, you can add images to the list from the menus and from Finder. Whichever way you use, if “Automatically Start Conversion” is on, conversion starts once loading is finished.
| How to add | What to do |
|---|---|
| Drag and drop | Drop images or folders onto the list area. You can drop several files and folders at once. The border of the area is highlighted while you drag. |
| Add Images... | Choose files or folders with the + button in the toolbar, File > “Add Images...” in the menu bar, or the right-click menu in the list (⌘ + O). |
| Add Images from Clipboard | Adds image files or folders you copied in Finder (⌘ + V). Copied image data itself can't be added. |
| Open With / Dock | In Finder, choose “WebP Converter” from Open With, or drop images onto the WebP Converter. icon in the Dock. |
| Finder Services | In Finder, select images or folders, right-click, and choose Services > “WebP Converter” to add them to the list. Any image the app can read works, whatever the format: JPEG, PNG, HEIC, WebP, AVIF, and more. If you don't see it, turn it on in System Settings > Keyboard > Keyboard Shortcuts > Services. |
| Open Recent | Reopens files or folders you loaded before, from the File menu. |
📁 Adding folders
When you add a folder, the images directly inside it are loaded. Subfolders inside it aren't loaded.
🖼️ Supported images
You can load JPEG, PNG, GIF, TIFF, BMP, HEIC, PSD, WebP, and other images macOS can open. Files that can't be read as images are removed from the list automatically once loading finishes.
⏳ While images are loading
The toolbar shows “Loading...” and a “Stop loading” button while images are being loaded. Click “Stop loading” to cancel; images that hadn't finished loading are removed from the list, and automatic conversion doesn't start for that batch. New images are placed in the list according to the current sort order (load order or file name).
🌐 Images dragged straight from apps
You can also drag images straight in from other apps, such as a browser or Photos. With “Save in Original Image Folder” selected, the results for these images are saved in your Downloads folder.
⚡️ Bring the app to the front when dragging
Turn on “Bring app to the front when dragging files” in the INPUT section, and the WebP Converter. window comes to the front as soon as you start dragging files in Finder or elsewhere, so you can drop them even when the window is behind other windows (a minimized window or a hidden app isn't brought forward; off by default).
▶️ Automatically Start Conversion
This checkbox appears under “Drag & Drop images here” while the list is empty. When it's on, the images in the list that haven't been converted yet are converted automatically as soon as loading finishes. You can't turn it on while the output is “Not yet specified”. With “Select Output Folder when Starting”, a dialog opens first so you can choose where to save. It's off by default.
Output & Post-Conversion
Set where converted files are saved, what happens when a file with the same name already exists, and what the app does when conversion is finished. OUTPUT appears below the list in the free version and in the right sidebar after upgrading. Defaults are the values the app uses the first time you launch it.
Output folder
| Option | What it does |
|---|---|
| Save in Original Image Folder | Saves each file in the same folder as its original. Images dragged straight from other apps are saved to your Downloads folder. |
| Select Output Folder when Starting | Every time you click Start in the toolbar, a dialog opens so you can choose where to save (it opens at the folder you chose last time). |
| (folder name) / Not yet specified | Saves to the folder you chose. It's “Not yet specified” the first time you launch the app. |
| ┣ Select Output Folder | Opens a dialog to choose a folder and makes it the output folder. The folder is kept for next time. |
| ┗ Show in Finder | Shows the chosen output folder in Finder. |
You can also drag a folder onto the OUTPUT pop-up menu to choose it. A folder dialog opens showing that folder, so you only need to confirm it.
Save options (after upgrading)
| Setting | Default | Description |
|---|---|---|
| Overwrite existing images | Off |
When it's on, an existing file with the same name in the folder you save to is overwritten. When it's off, the new file is saved with a number added, as in IMG_1234(1).webp and IMG_1234(2).webp. |
| Keep Created/Modified Date | Off |
Gives the converted file the same creation and modification dates as the original. |
| Keep EXIF | Off |
When it's on, metadata such as EXIF (including location) is kept in the converted file. When it's off, it isn't. |
Post-conversion (after upgrading)
| Setting | Default | Description |
|---|---|---|
| Trash original images | Off |
When conversion finishes without errors, the originals of the images in the list (only those shown, if the list is filtered) are moved to the Trash. Their rows show “Trashed” (click it to show the original in the Trash). For converted rows, you can put them back with “Initialize Process Status” in the right-click menu. |
| Play sound | Off |
Plays a sound when everything is done. A different sound plays if there were errors. |
| Show notification | Off |
Shows a notification when everything is done: “Conversion Completed”, or “Error Occurred” if there were errors, with the counts. The first time you turn it on, macOS asks for permission to show notifications. If they aren't allowed, the app asks you to allow them in System Preferences; click “Open System Preferences” to change the setting. |
| Quit app | Off |
When conversion finishes without errors, the app quits about 2 seconds later. |
Converting to WebP
Images that aren't WebP are converted to WebP using the settings in ENCODE OPTIONS in the right sidebar (you can change them after upgrading). Defaults are the values the app uses the first time you launch it.
| Setting | Default | Description |
|---|---|---|
| Quality | 75.0 |
Image quality for lossy compression. Lower values make smaller files at lower quality. It's set with a slider from 0 to 100 and isn't used when an image is converted losslessly. |
| Lossless | Disable (Default) |
Set it to Enable to convert with lossless compression, so no image quality is lost. Quality and Presets aren't used in this case. Even with Enable, lossy compression is still used while “Add Watermark” is on, for HEIC and PSD images, and for photos whose EXIF orientation rotates or flips them. |
| Method | 4 (Default) |
Sets the balance between encoding speed and compression in seven steps, from 0 to 6. Higher numbers spend more time compressing. The options run from 0 (Fast/Low Quality) to 6 (Slow/High Quality). |
| Presets | Default |
Uses the parameters libwebp provides for each type of image (Photo / Picture / Drawing / Icon / Text). Choose one of six, including Default. Used for lossy compression. |
| Keep Color Profile | Disable (Default) |
Set it to Enable to embed the original's color profile (ICC) in the WebP. Turn it on when wide-gamut photos, such as Display P3, should keep their original colors. On macOS Monterey and later, Apple's built-in apps show colors according to the color profile. |
| Sharp YUV | Disable (Default) |
Set it to Enable for a more accurate RGB-to-YUV conversion inside lossy compression, which keeps color edges sharp. The output color model is still RGB. |
🎞️ Animated images
Animated GIFs and animated PNGs are converted to animated WebP.
🆓 In the free version
The free version converts with the default settings: Quality 75.0, Lossless disabled, Method 4, Presets Default, Keep Color Profile disabled, and Sharp YUV disabled.
📊 See the result right away
After upgrading, the list shows how much each file changed compared with the original once it's converted. To check the result before converting, use the comparison preview and try different settings while watching image quality and file size.
Converting from WebP (PNG / JPG / GIF)
Images with the .webp extension are converted to the format you choose in DECODE OPTIONS in the right sidebar. Defaults are the values the app uses the first time you launch it.
| Setting | Default | Description |
|---|---|---|
| WebP → | PNG |
Chooses what WebP images are converted to: PNG / JPG / WebP. Choose WebP to re-encode them as WebP with the ENCODE OPTIONS. |
| Convert animated WebP to GIF | Off |
When it's on, animated WebP images are converted to GIF, whatever “WebP →” is set to. |
Output formats at a glance
| Original image | Converted to |
|---|---|
| Images other than WebP | WebP (.webp, following Converting to WebP) |
| Animated GIF / APNG | Animated WebP |
| WebP (still image) | PNG / JPG / WebP, as chosen in “WebP →” |
| Animated WebP | Animated PNG when “WebP →” is PNG, or animated WebP when it's WebP; GIF instead when “Convert animated WebP to GIF” is on |
🖼️ JPG quality
There's no setting for the quality of JPG output. JPGs are saved at a fixed quality.
🧩 Other settings still apply
When converting from WebP, settings such as resizing, the watermark, the filename settings, and “Keep EXIF” are used too.
🆓 In the free version
The free version always converts WebP images to PNG (animated WebP becomes animated PNG). JPG, WebP, and GIF are available after upgrading.
Resize (Scale Down, Keeping the Aspect Ratio)
Set the maximum size of the output images in RESIZE (PRESERVING ASPECT RATIO) in the right sidebar (after upgrading). Defaults are the values the app uses the first time you launch it.
| Setting | Default | Description |
|---|---|---|
| Max width | Off / 0 |
Turn it on, type the maximum width in pixels, and press return to confirm (“Enter to Save” appears while you type). Only images wider than this are scaled down; the height follows the aspect ratio. |
| Max height | Off / 0 |
The maximum height. It works the same way as Max width. |
📐 Scales down only, never enlarges
Images smaller than the limit are converted at their original size. With both Max width and Max height on, images are scaled down to fit inside that box. A value of 0 means no scaling.
👀 See the new size in the list
Images that will be scaled down show their new size as “→ width × height” next to their size in the list.
🔗 Watermarks and file names
The watermark's “Insert” setting chooses whether it's added before or after resizing. You can also add the resized width or height to file names (see Batch Rename & Filename Settings).
| Setting | Original image | Converted |
|---|---|---|
Max width 1920 |
4000×3000 |
1920×1440 |
Max width 1920 |
1000×750 |
1000×750 (unchanged) |
Max width 1920 + Max height 1920 |
3000×4000 |
1440×1920 |
Comparison Preview
Before you convert, compare the quality and file size of the result with the original (after upgrading). Open the comparison preview with Preview in the toolbar (⇧ + ⌘ + P), by clicking a thumbnail in the list, or with Preview in the right-click menu. The Preview button and ⇧ + ⌘ + P show the selected image (if several are selected, the topmost of them in the list). If nothing is selected, they show the first image in the list (or, if you deselected an image by clicking it, that image).
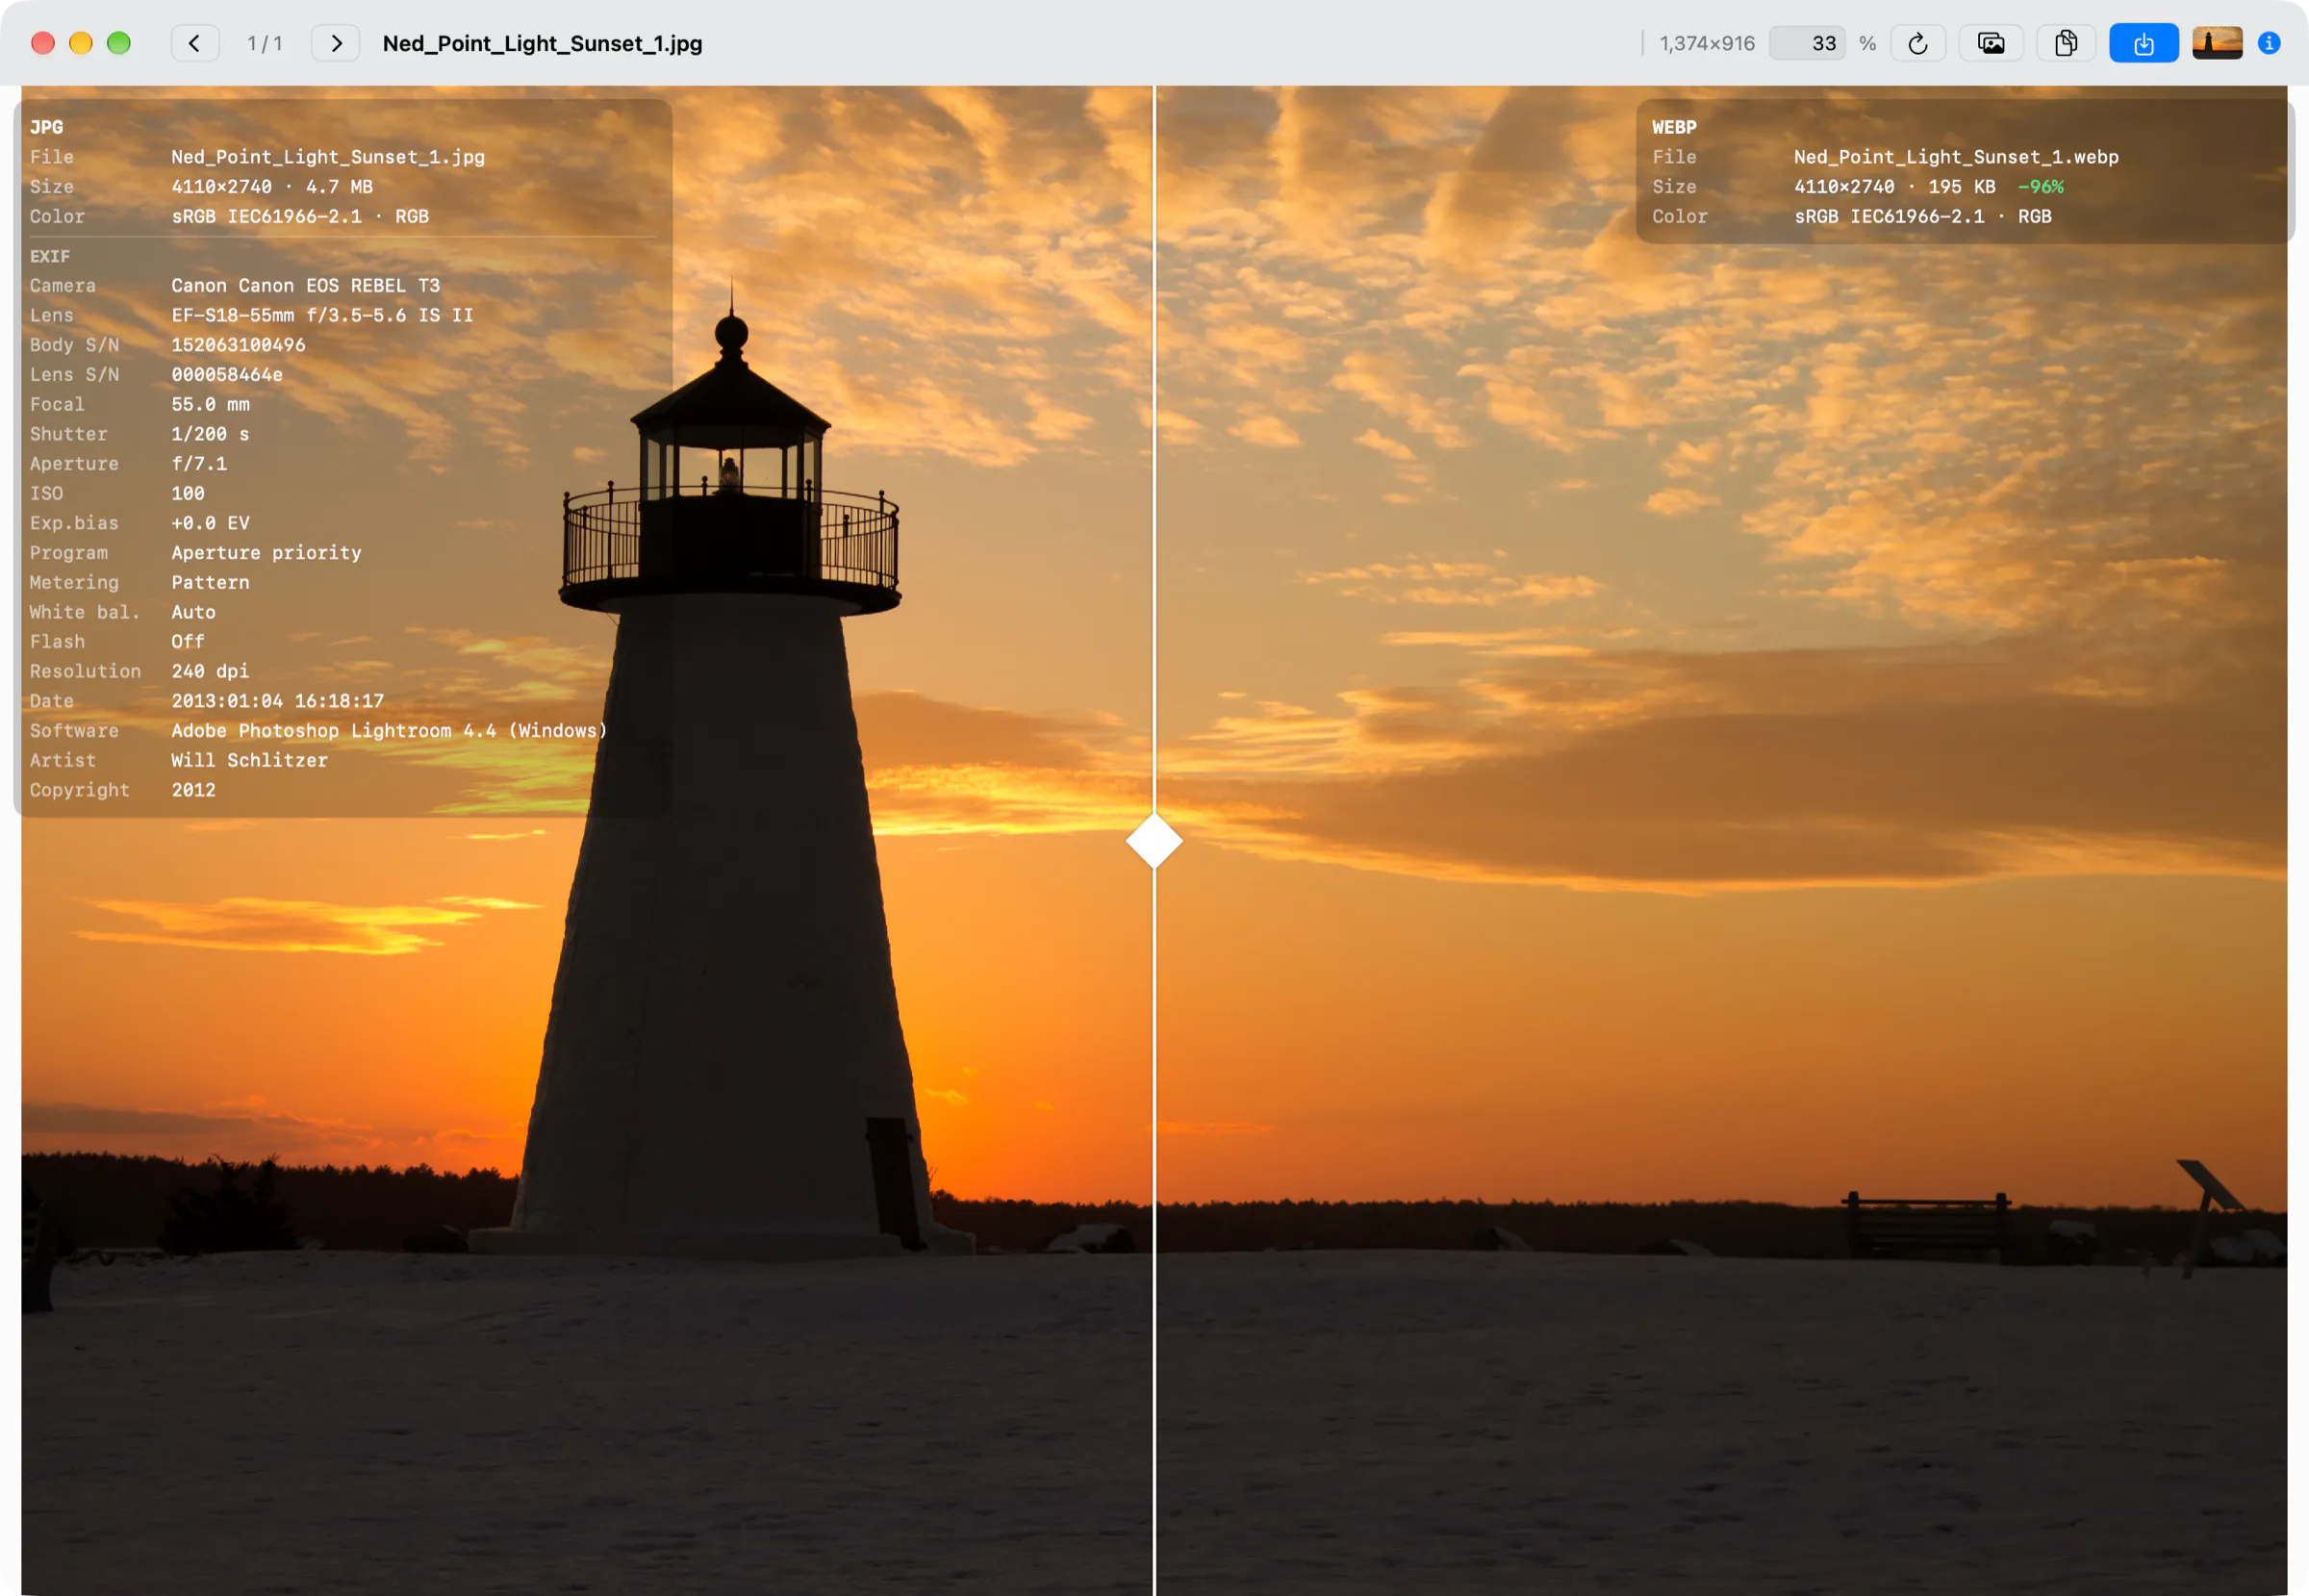
-96%, color sRGB IEC61966-2.1). The converted WebP has no EXIF sectionToolbar
| Button / display | What it does |
|---|---|
| ‹ 1 / 5 › | Moves to the previous or next image shown in the list (← / →). The numbers show which image this is and how many there are in total. |
| File name | Click it to show the original in Finder. |
| Display size and % | The size shown on screen and the zoom level. Type a number in the % field and press return to zoom to that level (“Enter to apply” appears while you type). At 100%, one image pixel is one screen point. This doesn't change the size of the converted image. |
| ▶ / ■ | Appears only for animated images, and plays or stops the animation on both sides. |
| ↻ Reconvert | Converts the displayed image again with the current settings (⌘ + R). |
| Copy as Data | Copies the converted image to the clipboard as image data, ready to paste into other apps (⌘ + D). |
| Copy as File | Copies the converted file to the clipboard (⌘ + C). Paste it in Finder to save it as a file. |
| Save | Saves the converted file with the name and location you choose (⌘ + S). |
| Thumbnail (Drag to Save) | Drag it to Finder or the desktop to save the converted file there. |
| ⓘ | Shows the metadata of the original and the converted image (⌘ + I). The tooltip reads “Show image metadata (source + target) ⌘I”. |
↔️ Split slider
Drag the slider to move the boundary between the original (left) and the converted image (right) and compare the effect of compression on the very same spot. Press Space to switch between showing only the converted image and only the original. The slider is the white line with the ◆ handle. ⌘ + ← shows only the converted image, and ⌘ + → only the original.
🔎 Zoom and pan
Zoom in and out with ⌘ + = / ⌘ + -, and press ⌘ + 0 to reset the zoom. You can also zoom by pinching on the trackpad or scrolling while holding ⌘, and drag the image to move around. Double-clicking the image also fits it to the window again. Press esc to reset the zoom and position and move the slider back to the center.
ℹ️ Metadata
The ⓘ button (⌘ + I) overlays the file name, width × height in pixels and file size, color profile, and EXIF for both the original and the converted image. The original's information is at the top left and the converted image's at the top right. Next to the converted size is the change from the original (green when smaller, orange when larger). Whether it's on or off is remembered the next time you open the preview.
🔄 Reconverts when settings change
If you change the conversion settings in the right sidebar, “WebP →”, resizing, the watermark, “Keep EXIF”, and so on while the preview is open, the image is converted again and the preview updates automatically. The preview shows exactly the result you'd get by clicking Start. Converting in the preview doesn't save any files to the output folder.
Batch Rename & Filename Settings
Use FILENAME in the right sidebar to rename converted files in bulk (after upgrading). When you choose anything other than “None” under MODIFY FILENAME, each row in the list shows the new name as “→ new name.ext” (the saved file gets the real extension in place of “.ext”).
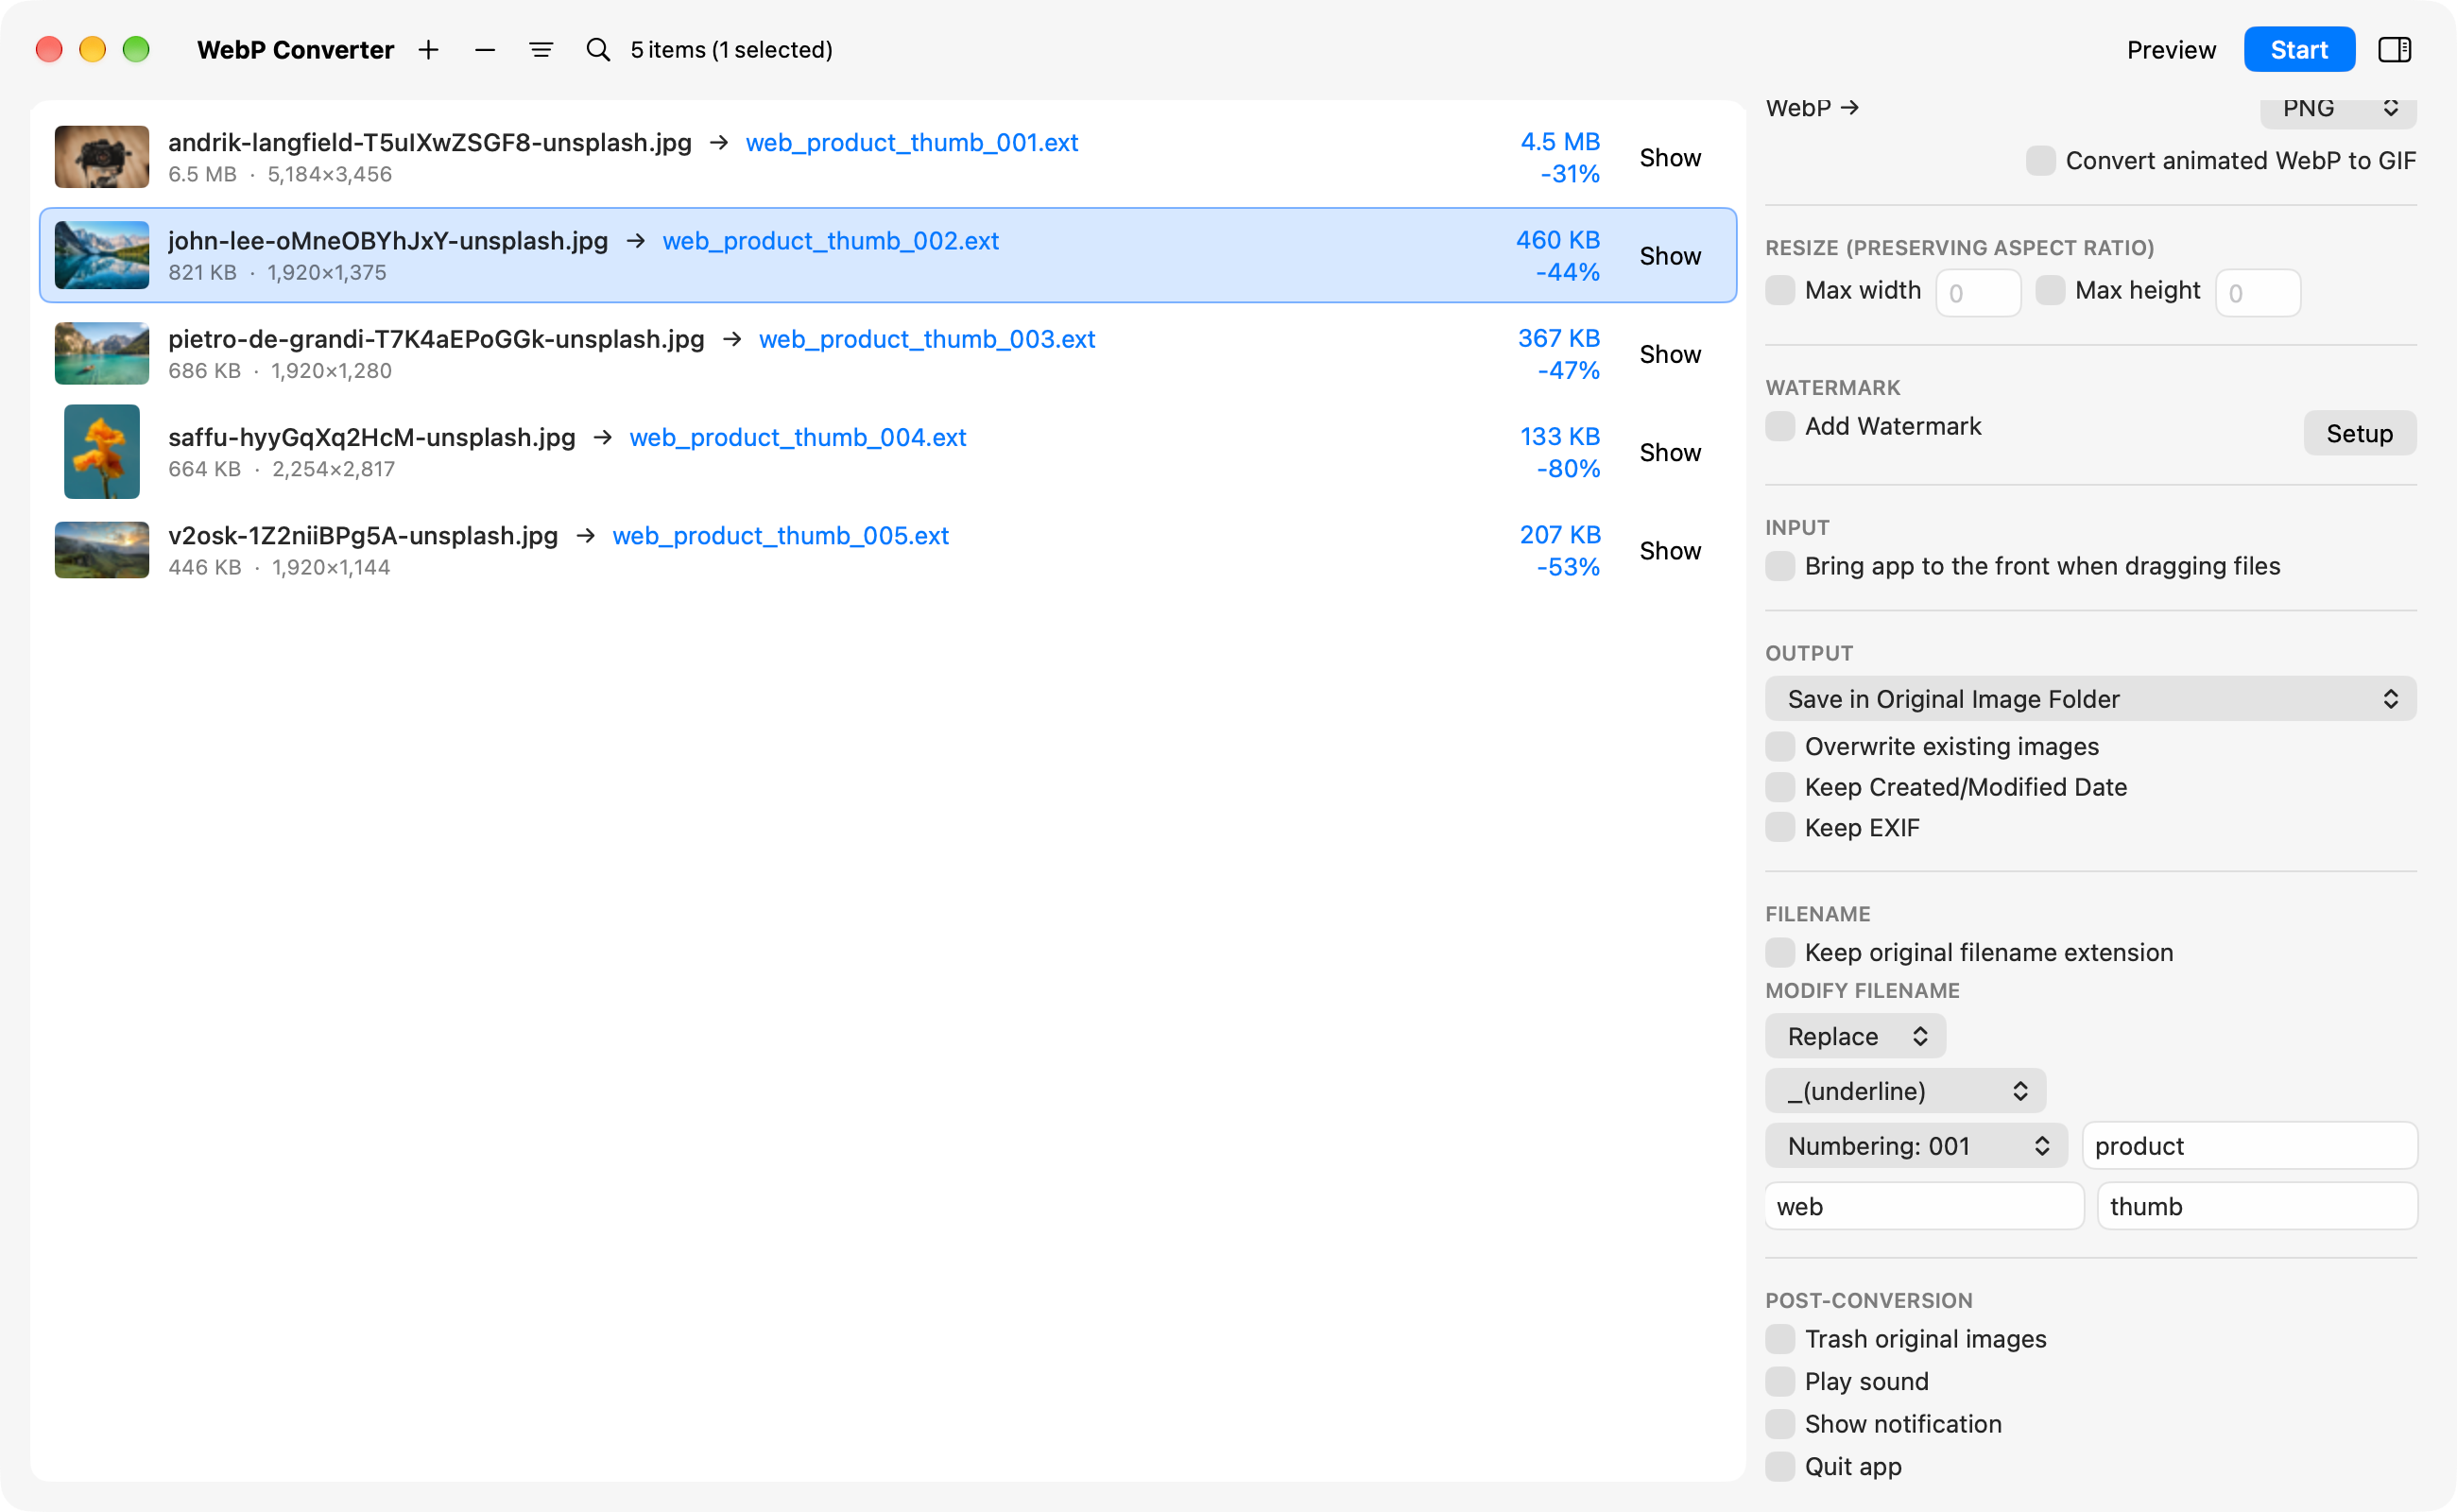
🔢 Rename with sequence numbers (Replace)
“Replace” swaps out the original file name for a new one made of what you type in the “Prefix (optional)”, “New name (optional)”, and “Suffix (optional)” fields and a sequence number, joined by the separator. The parts go in the order prefix, new name, suffix, number; empty fields are skipped, and the number always comes last. Numbers follow the list order; choose the number of digits from “Numbering: 1” to “Numbering: 00001” (the default is “Numbering: 0001”). Any / or : in the name is replaced with _.
➕ Prefix / Suffix
Adds text before (Prefix) or after (Suffix) the original file name. Choose what to add: “Custom” (type it in the “Write here...” field), “Order in list” (the image's position in the list), “Resized width or height”, or “Resized width or height (with px)”. The resized size is added only to images that actually get scaled down. Handy when exporting several sizes of responsive web assets (for srcset).
🔤 Separator
Choose the character that joins the parts of the name: “(none)”, “ (space)”, “-(hyphen)”, “_(underline)”, or “+(plus)”. While it's still “Select Separator”, no separator is added. However, if you choose “Replace” without having picked a separator, “-(hyphen)” is used.
📎 Keep the original extension
Turn on “Keep original filename extension” to keep the original extension in the name, with its upper or lower case unchanged, as in IMG_1234.JPG.webp.
| Feature / setting | Example settings | Resulting file name (original: IMG_1234.JPG, 3rd in the list) |
|---|---|---|
| Default | “None” | IMG_1234.webp |
| Keep the original extension | “Keep original filename extension” on | IMG_1234.JPG.webp |
| Prefix + Custom | web / separator - |
web-IMG_1234.webp |
| Suffix + Custom | small / separator _ / “Keep original filename extension” on |
IMG_1234.JPG_small.webp |
| Suffix + Order in list | Separator - |
IMG_1234-3.webp |
| Suffix + resized size | “Resized width or height (with px)” / separator _ (a 4000×3000 image scaled down with Max width 1920) |
IMG_1234_1920px.webp |
| Replace (numbered) | Prefix web / new name product / suffix thumb / separator _ / Numbering: 001 |
web_product_thumb_003.webp (the 1st image gets web_product_thumb_001.webp) |
| Replace (all fields empty) | Numbering: 0001 | 0003.webp |
| Replace + keep the original extension | New name trip / separator - / Numbering: 0001 |
trip-0003.JPG.webp |
| A file with the same name exists | “Overwrite existing images” off | IMG_1234(1).webp |
Watermarks
Add a logo or other image to your images as a watermark. Set it up in the Watermark window, which you open with Edit > “Open Watermark...” in the menu bar (⇧ + ⌘ + W), the Setup button in the WATERMARK section, or, in the free version, the Watermark button in the toolbar. Close it with esc or ⌘ + W. Defaults are the values the app uses the first time you launch it.
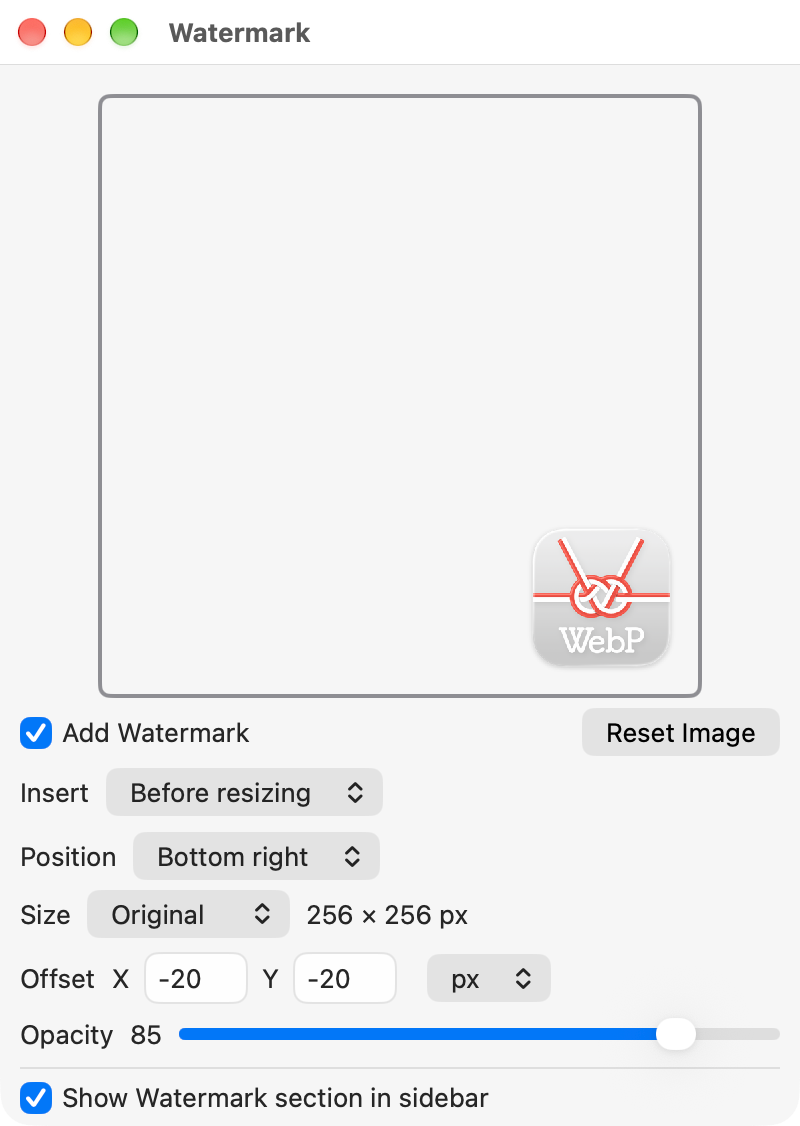
Drop your logo image
Drag a logo image, such as a PNG, onto the box that says “Drag & Drop watermark image here.” Drag and drop is the only way to set it; clicking the box doesn't open a file dialog. “Add Watermark” turns on automatically when you drop it.
Set the position and size
Choose one of nine spots for Position, from “Top left” to “Bottom right” (the default is “Bottom right”). The logo is placed flush against the edges of the image. Choose a Size: “Original”, “Scaled”, “Relative”, or “Absolute” (see the table below). Insert chooses whether the logo is added before or after resizing.
Adjust the offset and opacity
Use Offset X and Y to shift the logo (in px or %; % is relative to the size of the logo). Right and down are the positive directions, so to move a bottom-right logo in from the edges, use negative values such as −20. Press return to confirm the values you type. Opacity goes from 0 to 100 (the default is 100). The box shows how the watermark will look with those settings.
Convert
While “Add Watermark” is on, the logo is added to every image you convert. Turn it off when you no longer want it.
| Setting | Default | Description |
|---|---|---|
| Add Watermark | Off |
Whether the watermark is added. It's the same setting as “Add Watermark” in the right sidebar. |
| Reset Image | — | Removes the watermark image you set. |
| Insert | Before resizing |
“Before resizing” adds the watermark to the full-size image and then shrinks both together. “After resizing” adds the watermark to the image after it has been shrunk. |
| Position | Bottom right |
Choose one of nine positions, from “Top left” to “Bottom right”. |
| Size | Original |
See the table below. |
| Offset | X 0 / Y 0 / px |
How far to shift the watermark from its Position. Right and down are the positive directions, so to move a bottom-right watermark in from the edges, use negative values for X and Y (for example, -20). The unit is px or % (relative to the size of the logo). Press return to confirm. |
| Opacity | 100 |
How strong the watermark is, from 0 to 100. |
| Show Watermark section in sidebar | On |
Turn it off to hide the WATERMARK section in the right sidebar (in the free version, the Watermark button in the toolbar). You can still open this window from the Edit menu afterwards. |
| Size | Logo size |
|---|---|
| Original | Uses the logo image at its original size (shown next to it, as in 256 × 256 px). |
| Scaled | Scales the logo image up or down by a percentage. |
| Relative | Sets the size as a percentage of the image being converted. After “of”, choose “Width”, “Height”, or “Auto” (the logo's longer side against the image's longer side). Handy when you convert images of different sizes together. |
| Absolute | Sets the logo's width and height in pixels (the aspect ratio isn't kept). |
🎞️ Works on animated images too
For animated images, the watermark is added to every frame.
🆓 In the free version
In the free version you can try the watermark on a limited number of images. The number left is shown as “Remaining number of trial” at the bottom of the Watermark window. To use it without a limit, buy Unlimited Watermark or upgrade (see Free Version & Upgrade).
🧮 Watermarks and Lossless
While “Add Watermark” is on, images are converted with lossy compression even if Lossless in ENCODE OPTIONS is set to Enable.
Settings & Presets
The Settings window (WebP Converter > “Settings...” in the menu bar, ⌘ + ,) has two tabs: Appearance and Presets. The Presets tab appears after upgrading.
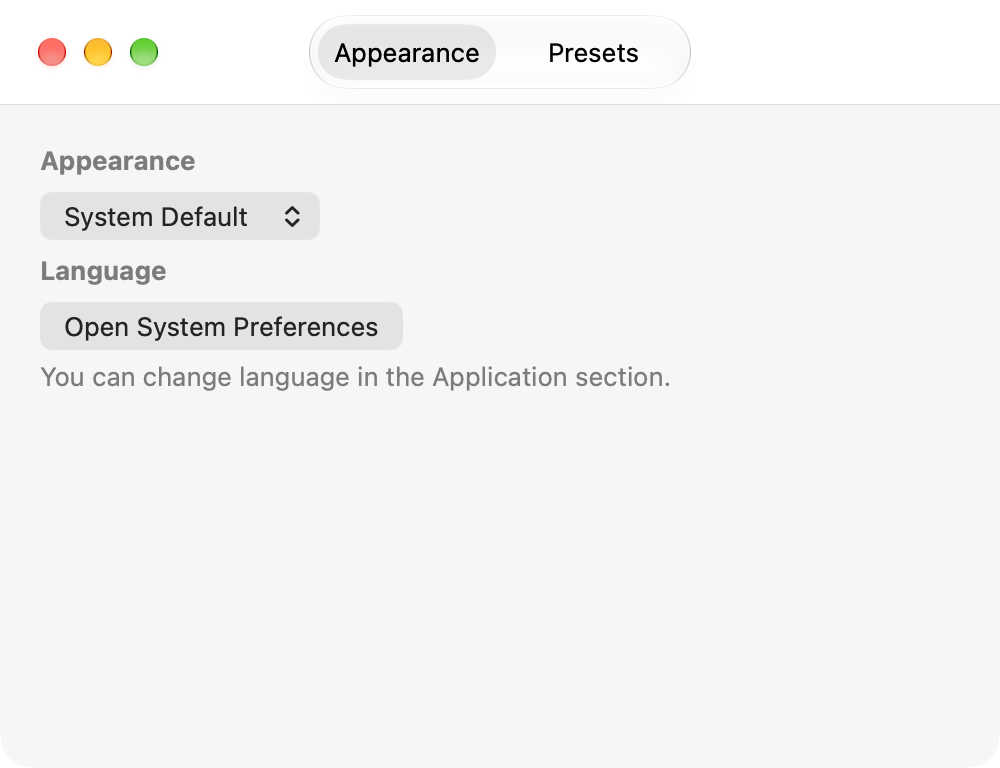
🌓 Appearance (System Default / Light / Dark)
“System Default” (the default) follows the macOS appearance. Choose “Light” or “Dark” to show every window of the app in that appearance, whatever macOS is set to. Open windows change right away.
🌐 Language
Click “Open System Preferences” to open the Language & Region settings in macOS, and choose a language for “WebP Converter” in the Applications section. The app is available in Japanese, English, German, French, Spanish, and Chinese (Simplified).
A preset is a named copy of your right-sidebar settings (conversion settings, resizing, watermark, output, filename settings, post-conversion actions, and more). Make one for each job, and you can switch all your settings in one step. Presets don't change your purchase status.
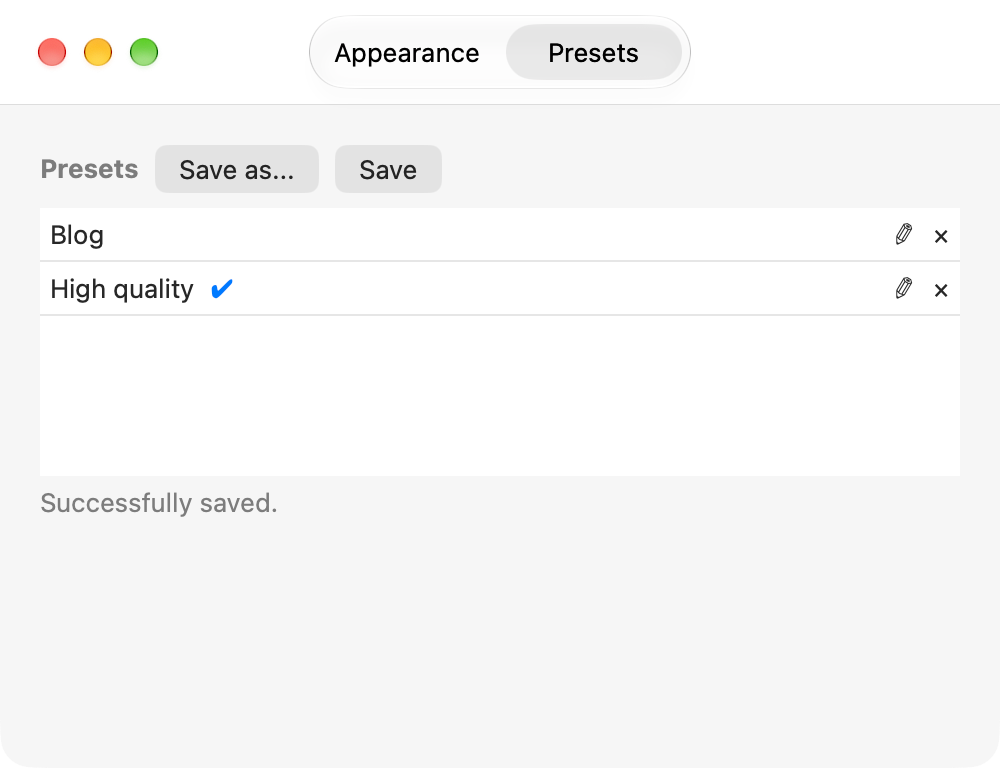
💾 Save as...
Click Save as..., type a name, and click OK to save the current settings as a new preset. Each preset needs its own name (the naming sheet also says “Preset name must be unique.”). The new preset is added to the end of the list and becomes the selected one.
🔄 Save (overwrite)
Click Save and confirm to overwrite the selected preset with the current settings. After saving, “Successfully saved.” appears. The button is unavailable when no preset is selected.
✔ Select, rename, and delete
Click a preset name in the list to load its settings; it gets a ✔. Click the selected preset again to deselect it (your current settings stay as they are). Use ✎ to rename a preset and × to delete it (deleting can't be undone). Before deleting, the app asks you to confirm with “(preset name) will be deleted.”
⚡️ Switch from the sidebar or menu (⌘ + 1–9)
Switch presets with the pop-up menu in the PRESETS section of the right sidebar or with the Preset menu in the menu bar. ⌘ + 1–9 switches to presets 1–9, and ⌘ + 0 chooses “None (no preset)”, which only deselects the preset and leaves your current settings as they are. Choose the 10th preset and beyond from the right sidebar or this tab. Save in the right sidebar overwrites the selected preset, and Details opens this tab. In the right sidebar's pop-up menu, the no-preset state is shown as “None”.
Free Version & Upgrade
WebP Converter. converts images to WebP and WebP to PNG for free. Upgrade with an in-app purchase to unlock every feature, including changing the conversion settings and the comparison preview.
| Feature | Free version | After upgrading |
|---|---|---|
| Converting images to WebP | ✓ (default settings) | ✓ |
| ENCODE OPTIONS (Quality, Lossless, Method, Presets, Keep Color Profile, Sharp YUV) | — | ✓ |
| WebP → PNG | ✓ | ✓ |
| WebP → JPG / WebP, animated WebP → GIF | — | ✓ |
| Choosing the output folder, Automatically Start Conversion, bringing the app to the front when dragging | ✓ | ✓ |
| Search, sorting | ✓ | ✓ |
| File size and change shown in the list | — | ✓ |
| Comparison preview | — | ✓ |
| Resizing | — | ✓ |
| Save options (Overwrite existing images, Keep Created/Modified Date, Keep EXIF) | — | ✓ |
| Filename settings, batch renaming | — | ✓ |
| Post-conversion | — | ✓ |
| Presets | — | ✓ |
| Watermark | Trial (limited number of images) | ✓ (no limit) |
💳 How to upgrade
Choose Help > “In App Purchase” in the menu bar to open the “Upgrade WebP Converter” window. You can pick “Lifetime unlock”, a one-time purchase, or a subscription (yearly or monthly). Both unlock the same features (the subscription for as long as it's active), unlimited watermarks included.
🎁 Free trial
The subscription comes with a free trial (7 days for new subscribers). To check or cancel your subscription, click “Manage subscription” in the upgrade window.
💧 Unlimited Watermark
If you only need the watermark without limits, you can buy Unlimited Watermark as a separate one-time purchase. It removes the watermark trial limit. Buy it with “Buy Unlimited watermark” in the Watermark window or from the upgrade window (it's included with Lifetime unlock and the subscription).
🔄 Restore purchases
To get your purchases back on another Mac or after reinstalling, click “Restore purchases” in the upgrade window. Unlimited Watermark can also be restored with “Restore Purchase” in the Watermark window.
Keyboard Shortcuts
Common actions are also available from the keyboard.
Main window
| Shortcut | Command | Description |
|---|---|---|
| ⇧ + ⌘ + S | Start Conversion | Converts the selected images (or every image in the list if none are selected). If the output is “Not yet specified”, a folder dialog opens first and conversion starts right after you choose. |
| ⇧ + ⌘ + P | Preview Result... | Opens the comparison preview window for the selected image (after upgrading). |
| ⇧ + ⌘ + W | Open Watermark... | Opens the Watermark window. |
| ⌘ + O | Add Images... | Choose files or folders to add to the list. |
| ⌘ + V | Add Images from Clipboard | Adds image files you copied in Finder to the list. |
| ⌘ + A | Select All | Selects every image in the list. |
| ⌘ + ⌫ | Clear Images | Removes the selected images from the list (the original files aren't deleted). |
| ⇧ + ⌘ + ⌫ | Clear All Images | Removes every image from the list (the original files aren't deleted). |
| ⌘ + F | Search... | Shows a search field for filtering the list by file name. |
| ⌘ + 1 – 9 | Switch preset | Switches to saved presets 1–9 (after upgrading). Numbers with no saved preset can't be chosen. |
| ⌘ + 0 | None (no preset) | Deselects the preset. Your current settings stay as they are (after upgrading). |
| ⌘ + , | Settings... | Opens the Settings window. |
| ⌘ + → | Show or hide the sidebar | Shows or hides the right sidebar (after upgrading). |
| ↑ / ↓ | Move the selection | Moves the selection up or down in the list (hold ⇧ to extend it). |
| esc | Deselect | Clears the selection (or closes the search field if it's open). |
Preview window
| Shortcut | Command | Description |
|---|---|---|
| ⌘ + R | Reconvert | Converts the displayed image again. |
| ⌘ + S | Save | Saves the converted result as a file. |
| ⌘ + C | Copy as File | Copies the converted file to the clipboard. |
| ⌘ + D | Copy as Data | Copies the converted image to the clipboard as image data. |
| ⌘ + I | Show image metadata | Overlays the file information, color, and EXIF of both the original and the converted image. |
| Space | Toggle full view | Switches between showing only the converted image and only the original. |
| ← / → | Previous / next image | Moves to the previous or next image in the list. |
| ⌘ + ← / → | Move the slider to an edge | ⌘ + ← moves the slider to the left edge to show only the converted image, and ⌘ + → moves it to the right edge to show only the original. |
| ⌘ + = / ⌘ + - | Zoom in / out | Zooms the view in or out. |
| ⌘ + 0 | Fit to window | Resets the zoom and position so the whole image fits the window (while the preview window is in front, this key doesn't switch presets). |
| esc | Reset the view | Resets the zoom and position and moves the slider back to the center. |
| ⌘ + W | Close | Closes the preview window. |
Frequently Asked Questions
Answers to common questions about converting images and the app's settings.
Q. Could my original images be overwritten or deleted?
Converting JPEG or PNG to WebP changes the extension, so the originals stay as they are. If a file with the same name already exists where you save, the new file gets a number added, as in IMG_1234(1).webp, and removing images from the list doesn't delete the original files.
However, if you turn on “Overwrite existing images”, converting WebP to WebP into the original's folder overwrites the original. And if you turn on “Trash original images” under POST-CONVERSION, the originals are moved to the Trash after conversion (you can put them back with “Initialize Process Status” in the right-click menu).
Q. Can a converted file end up larger than the original?
Yes, for example when the original is already heavily compressed. After upgrading, the list shows something like +NN% in that case. Lower Quality or raise Method, check the result in the comparison preview, and convert again.
Q. Why can't I find the Start button?
While the output is “Not yet specified”, the button reads “Select Output Folder”. Click it and choose a folder, or choose “Save in Original Image Folder” from the OUTPUT pop-up menu, and the button changes to Start.
Q. Why can't I find or turn on “Automatically Start Conversion”?
“Automatically Start Conversion” only appears while the list is empty. If there are images in the list, clear it by clicking the − button with nothing selected (or press ⇧ + ⌘ + ⌫). It also can't be turned on while the output is “Not yet specified”, so choose an output folder first.
Q. Why does the app ask me to permit access to a folder?
Because WebP Converter. runs in the macOS sandbox, this dialog appears for each folder of your images that you haven't given access to yet. It appears when you add images with “Save in Original Image Folder” selected, when you switch to “Save in Original Image Folder” with images in the list, and when you choose “Prefix”, “Suffix”, or “Replace” or turn on “Keep original filename extension”. Click Permit in the dialog. You won't be asked again for a folder you've already allowed.
Q. Why aren't images in subfolders loaded?
When you add a folder, only the images directly inside it are loaded. To convert the images in a subfolder, add that subfolder as well.
Q. Are EXIF and location data kept?
By default, EXIF (including location) isn't kept in converted files. To keep it, turn on “Keep EXIF” in the OUTPUT section (after upgrading). You can check whether it was kept with ⓘ in the comparison preview (⌘ + I).
Q. What happens when I convert HDR photos?
Every image WebP Converter. saves (WebP, PNG, JPG, or GIF) is 8-bit. When you convert an HDR photo with a gain map, the gain map isn't included in the output. There are no HDR settings, and the comparison preview doesn't show any HDR information.
Q. Can I turn WebP images back into PNG or JPG?
Yes. WebP images you add are converted to the format chosen in “WebP →” under DECODE OPTIONS (PNG by default). JPG and GIF are available after upgrading (see Converting from WebP).
Q. Why did converting the same image twice create a file with “(1)” in its name?
Start converts images again even if they've already been converted. With “Overwrite existing images” off, the previous file is kept and the new one is saved under a name like IMG_1234(1).webp. To replace the file instead, turn on “Overwrite existing images”.
Q. How do I reset all settings to their defaults?
Hold down the ⌥ (Option) key while you open WebP Converter., and the app asks “Do you want to reset all settings?” Choose “Yes, reset and open app” to erase your settings, presets, watermark image, and folder access permissions and go back to the state of the first launch (your purchases, the window position, and the app's language are kept). This can't be undone.