ZipScope User Guide
A macOS app for compressing and extracting archives. It creates ZIPs that people on Windows can open without garbled file names, and it extracts ZIPs made on Windows with the right names. You can create password-protected ZIP and 7z archives, and look inside ZIP, 7z, RAR, LZH, tar.gz, and more without extracting them.
Key Features of ZipScope
Everything you need to create and extract archives, and to look inside them without extracting, right from Finder's right-click menu and the menu bar.
ZIPs that open cleanly on Windows
File names are stored explicitly as UTF-8 (with the UTF-8 flag) and normalized to NFC, so Japanese voiced marks and accented letters don't come apart. Mac-specific files, .DS_Store, __MACOSX folders, and files starting with “._”, are left out by default.
Password-protected ZIP and 7z (Pro)
Encrypt ZIPs with ZipCrypto or AES-256, and 7z with AES-256. Each option tells you whether Windows' built-in tool can open it, so the person you send it to won't get stuck. A password generator is included.
Look inside without extracting
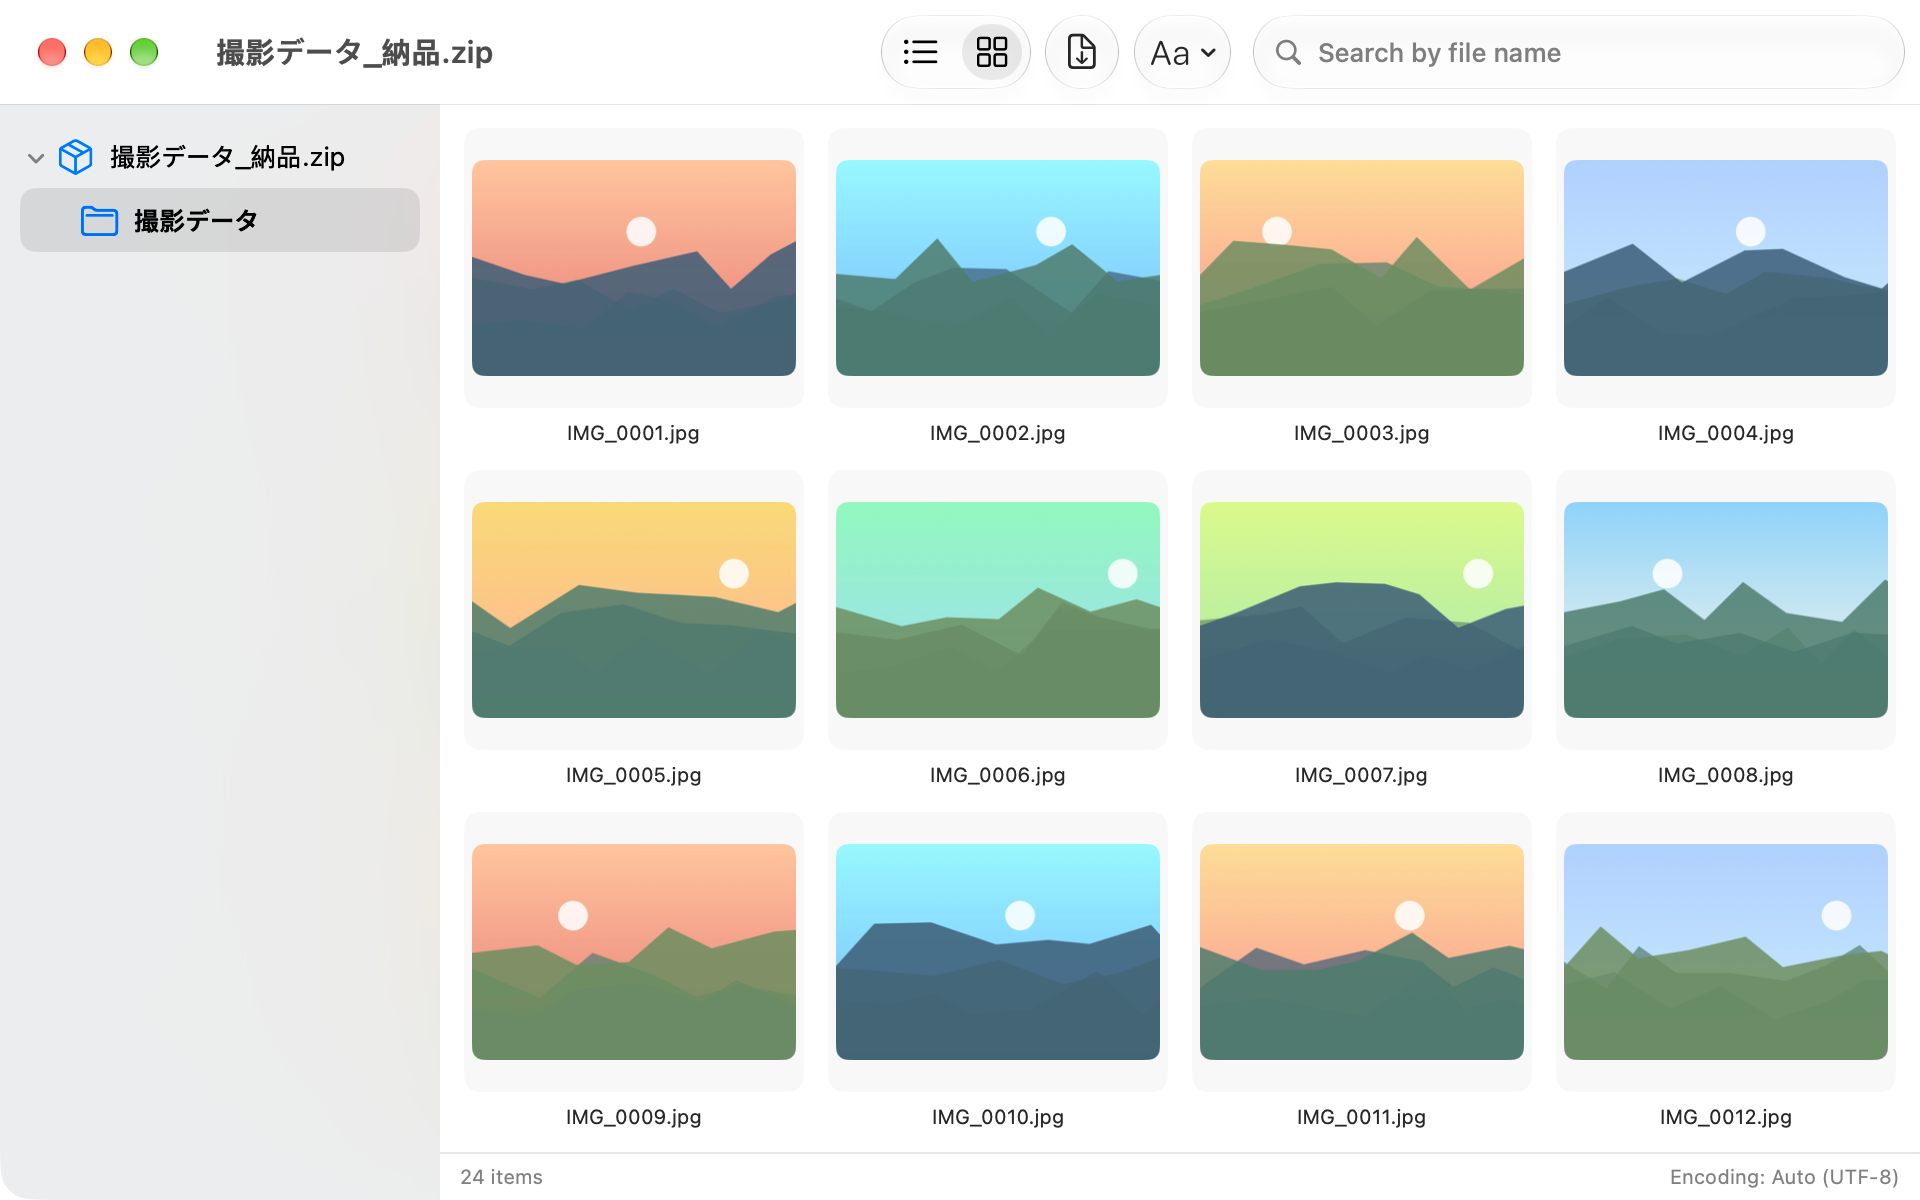
Open ZIP, 7z, RAR, LZH, tar.gz, and more like a Finder folder, without extracting them. Press Space for Quick Look, and drag only the files you need to Finder. Archives full of images can be shown as a thumbnail grid.
ZIPs from Windows, without garbled names
ZipScope detects file names stored in Shift_JIS (CP932) in ZIPs made on Windows, and shows and extracts them correctly. If detection gets it wrong, you can switch the encoding by hand. Japanese passwords are tried as both UTF-8 and CP932.
Extract without .DS_Store
.DS_Store, __MACOSX folders, and “._” files inside ZIPs made on a Mac are not extracted and are hidden while browsing (you can change this in Settings). The extract dialog that opens on double-click lets you check the destination and how to handle files with the same name first.
Works with Finder
Finder's right-click menu shows “Compress with ZipScope” for files and folders, and “Extract with ZipScope” and “View Contents with ZipScope” for archives. Select a ZIP and press Space to see its contents in Quick Look.
Right from the menu bar
Drop files on the menu bar icon to open the Create ZIP window. You can also use ZipScope from the menu bar only, without a Dock icon.
Everything stays on your Mac
ZipScope never uses the network. Your files never leave your Mac, and no data is collected.
Quick Start (Basic Usage)
Right-click files in Finder, choose “Compress with ZipScope”, and click Create. That's all it takes to make a ZIP that opens cleanly on Windows. To open a ZIP you received, use “Extract with ZipScope” or “View Contents with ZipScope” in the right-click menu.
Choose a working folder (optional)
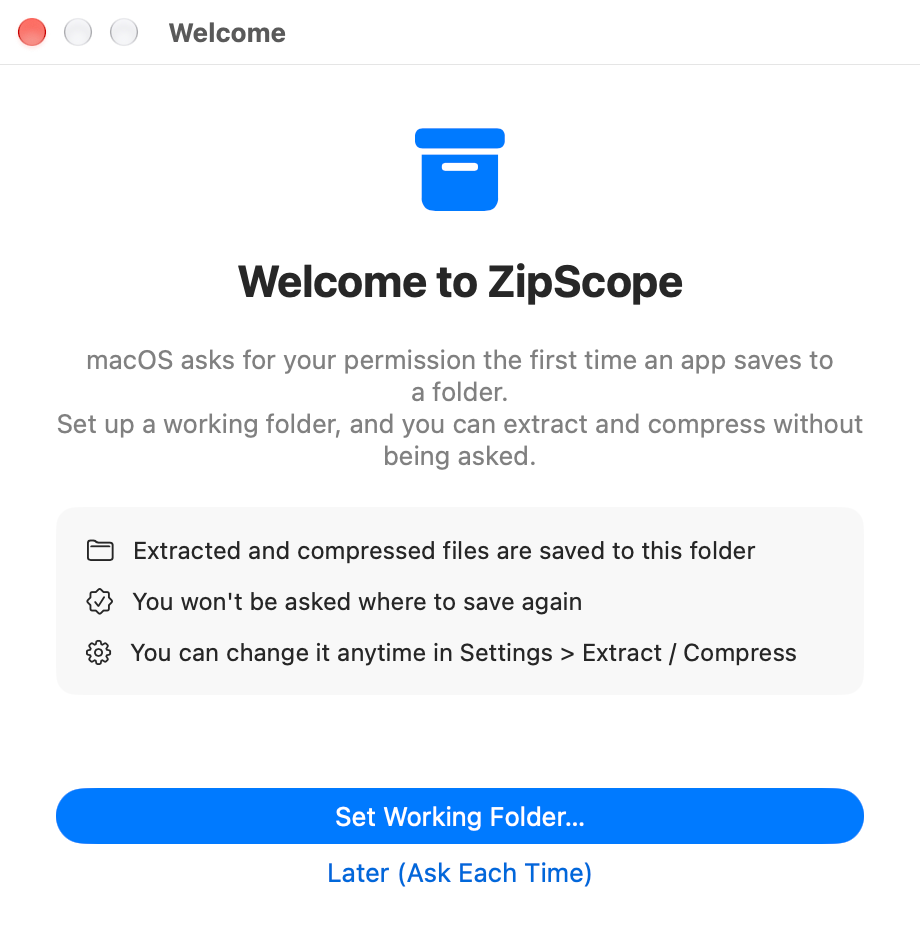
The first time you open ZipScope without opening a file, the “Welcome to ZipScope” window appears. Click “Set Working Folder…” and choose a folder: extracted and compressed files are then saved there, and you won't be asked where to save them. To save next to the original files instead, click “Later (Ask Each Time)” (see Settings).
Choose the files to compress
Select files or folders in Finder, right-click, and choose “Compress with ZipScope”. You can also drop them on the ZipScope icon in the menu bar, or choose File > “Compress Files…” in the menu bar (⌘ + N) (see Creating ZIP Archives).
Click Create
Check the file name and destination in the Create ZIP window, then click Create. Both options under Windows Compatibility are on by default, so the ZIP opens on Windows without garbled names and without .DS_Store. When it's done, Finder shows the new ZIP selected.
Open a ZIP you received
Right-click the ZIP in Finder and choose “Extract with ZipScope” to extract it right away, or “View Contents with ZipScope” to browse it without extracting. If you make ZipScope the default app for ZIP, double-clicking a ZIP opens the extract dialog (see Extracting & the Extract Dialog).
Creating ZIP Archives
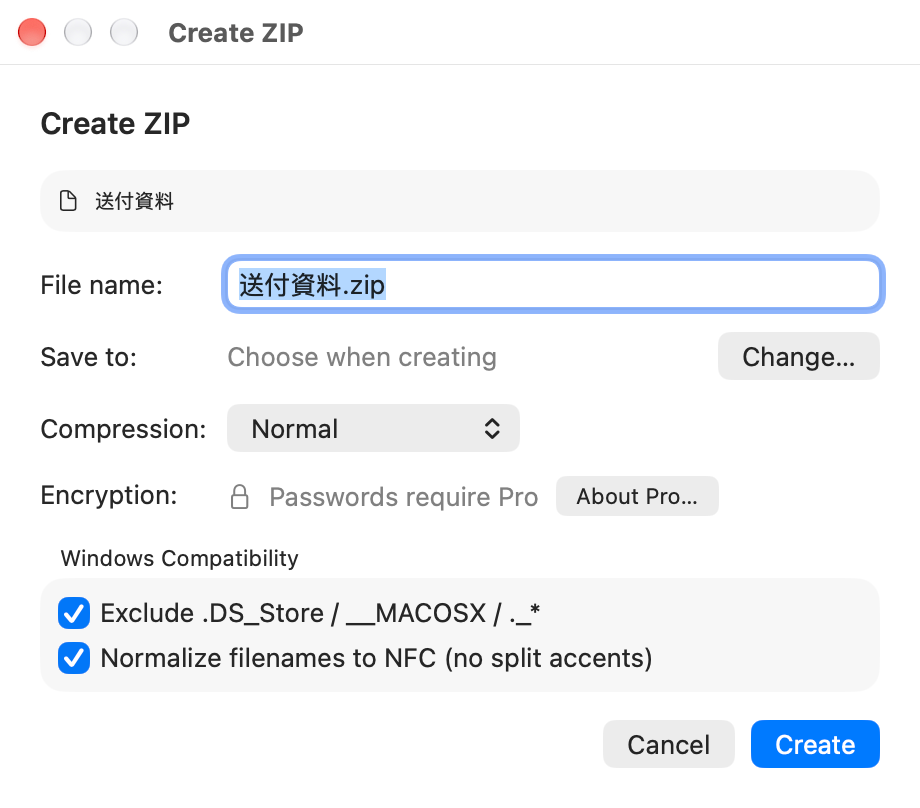
In the Create ZIP window, check the file name, destination, compression level, and the two Windows options, then create the ZIP. Defaults are the values the app uses the first time you launch it.
Opening the Create ZIP window
| How to open | What to do |
|---|---|
| Finder's right-click menu | Select files or folders, right-click, and choose “Compress with ZipScope”. You can select several items at once. |
| Menu bar icon | Drop files or folders on the ZipScope icon in the menu bar (see The Menu Bar). |
| Compress Files… | Choose File > “Compress Files…” in the menu bar, or the same item in the menu bar icon's menu, pick files or folders, and click Add (⌘ + N). |
| Finder Services | Choose Services > “Compress with ZipScope” in the right-click menu (see Finder Integration). |
| Dock / Open With | Drop files or folders on ZipScope's Dock icon, or choose ZipScope from Open With in Finder. Archives opened this way follow the extract settings instead. |
Settings in the window
| Setting | Default | Description |
|---|---|---|
| Format | ZIP |
Shown with Pro only. Choose “ZIP” or “7z (AES-256 encrypted)”. 7z archives can only be created with a password (see Password Protection (Pro)). |
| File name | Original name | For a single item, its name (without the extension) plus .zip; for several items, Archive.zip. If a file with the same name already exists at the destination, a number is added, as in Documents 2.zip. When you drop several items on the menu bar icon with “When dropping multiple items” set to “Create a ZIP for each”, it reads “Creates 3 archives, each named after its item” instead (see The Menu Bar). |
| Save to | Same folder as the originals |
Follows “Save To” in Settings. With “Same folder as the originals” it's the folder of the original files; with “Fixed folder” it's the folder you chose. With “Ask every time” it reads “Choose when creating”, and you pick the folder when you click Create. Click “Change…” to use a different folder just this once. |
| Compression | Normal |
Choose “None (fastest)”, “Low (fast)”, “Normal”, or “Maximum (slow)”. You can change the default with “Default compression level” in Settings. |
| Encryption | None |
With Pro, choose “None”, “ZipCrypto (most compatible)”, or “AES-256 (recommended)”. The free version shows “Passwords require Pro” here. |
| Exclude .DS_Store / __MACOSX / ._* | On |
Leaves Mac-specific files out of the ZIP. You can change the default on the Compress tab of Settings. |
| Normalize filenames to NFC (no split accents) | On |
Stores file names with combined characters, so names don't look split apart on Windows (for example, a Japanese voiced mark shown as a separate character). |
Create can't be clicked while “File name” is empty. If you move the window, it opens in the same place next time.
📦 Stored with the UTF-8 flag
File names that contain Japanese or other non-ASCII characters are stored with the flag that marks them as UTF-8. Recent versions of Windows open them correctly with the built-in tool (File Explorer). Very old unzip tools that don't support UTF-8 may still show wrong names.
🧹 Mac-specific files left out
.DS_Store (where Finder keeps its view settings), __MACOSX folders, and files starting with “._” are used only on a Mac, and on Windows they show up as unfamiliar, useless files. With “Exclude .DS_Store / __MACOSX / ._*” on, they aren't put in the ZIP.
🔡 No split characters
A Mac can store a character such as a Japanese voiced kana as two parts, the base character and the mark (NFD). With “Normalize filenames to NFC (no split accents)” on, names are stored in the combined form (NFC).
📊 While and after creating
While the archive is being created, a “Creating “name”…” window shows the progress; click Cancel to stop. When it's done, Finder shows the ZIP selected and a “ZIP Created” notification appears (click it to show the file in Finder). Up to five recently created archives are listed under “Recently Created” in the menu bar icon's menu.
Password Protection (Pro)
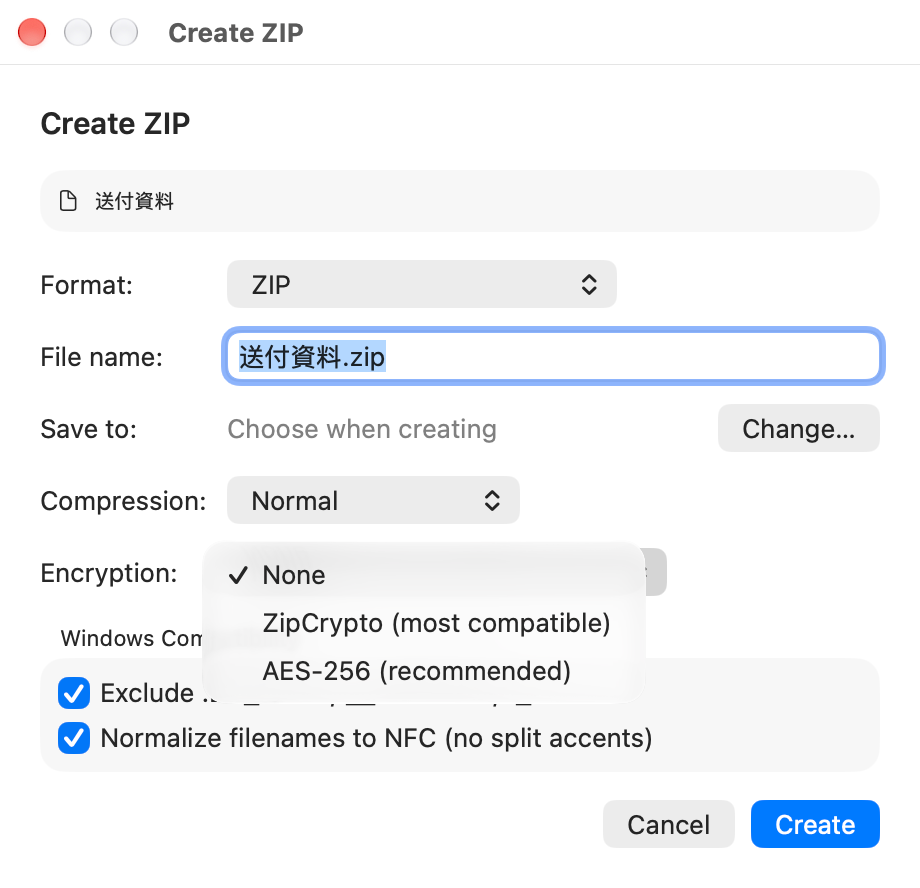
With Pro, you can create password-protected ZIPs (ZipCrypto or AES-256) and 7z archives (AES-256). Each option tells you whether Windows' built-in tool can open it.
| Format and encryption | Windows' built-in tool | Description |
|---|---|---|
| ZIP + ZipCrypto (most compatible) | Opens it | A compatibility mode that File Explorer on Windows can open. The encryption is weaker. When you choose it, “Opens with Windows' built-in tool (weaker encryption).” appears in orange. |
| ZIP + AES-256 (recommended) | Can't open it | Strong encryption. Windows' built-in tool can't open it, so the other person needs 7-Zip or a similar app. |
| 7z (AES-256 encrypted) | Can't open it | Choose it under Format. Files are compressed with LZMA and encrypted with AES-256. A password is required, and the Compression and Encryption settings aren't shown. Opening it needs 7-Zip or a similar app. |
🔑 Entering the password
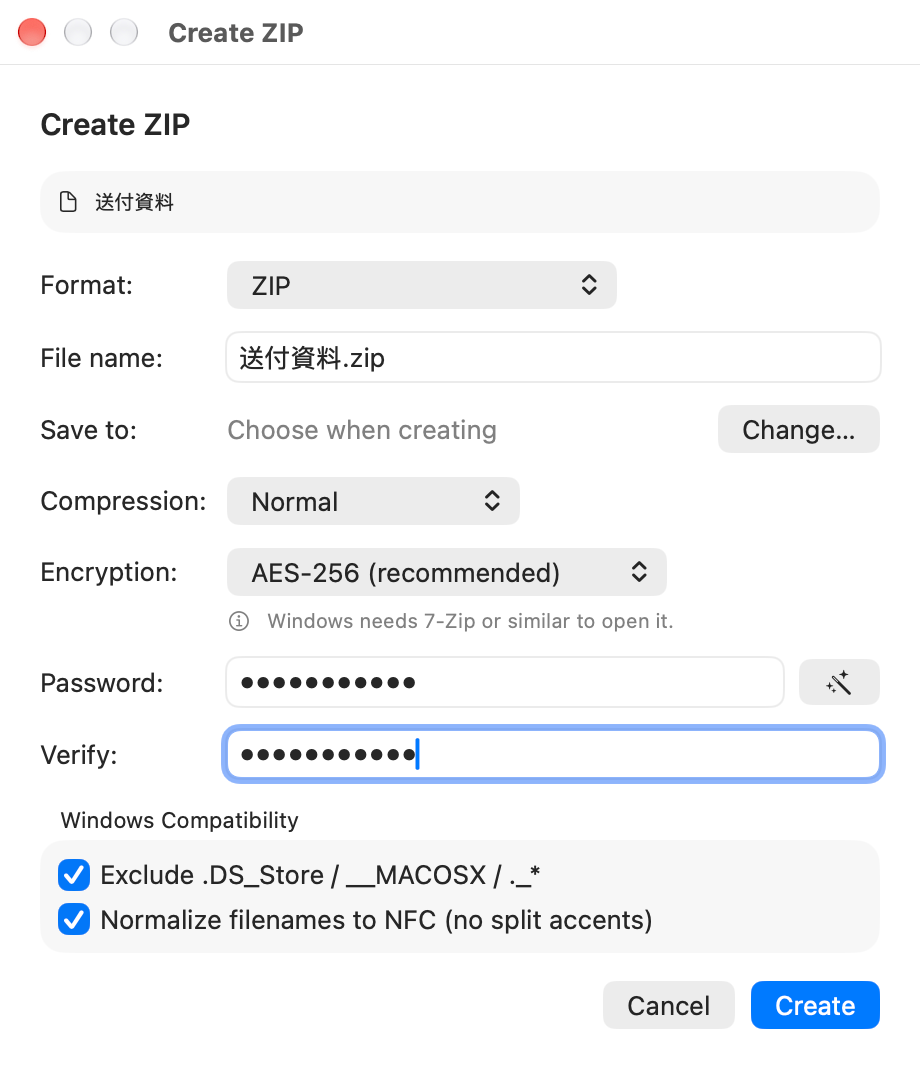
When you choose encryption, the Password and Verify fields appear. Create can't be clicked until both fields contain the same password.
🪄 Generating a password
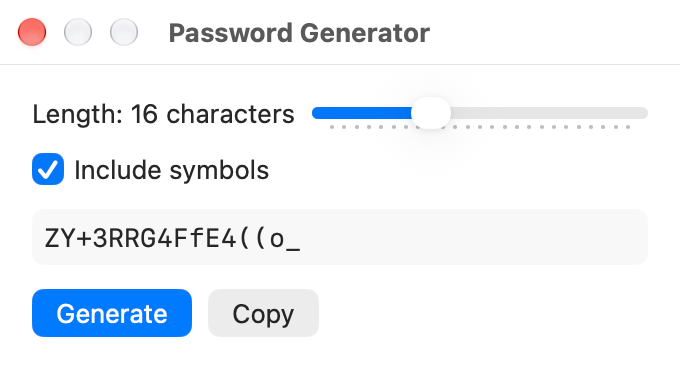
The button next to Password (Generate Password) makes a random password. Length is 8–32 characters (16 by default), and “Include symbols” is on by default. Easily confused characters (I, O, l, 0, 1) are never used. Click Generate for a new one or Copy to copy it. When you open it from the Create ZIP window, “Use This Password” fills in both fields. Generated passwords aren't kept anywhere.
⚠️ Non-ASCII passwords
If the password contains Japanese or other non-ASCII characters, “Contains non-ASCII characters. Some apps may not be able to open the archive (letters and numbers are recommended).” appears. To make sure the other person can open it, use letters and numbers only.
⚡️ Opening with encryption already chosen
Drop files on the menu bar icon while holding ⌥ (Option), or choose Services > “Create Password-Protected ZIP” in Finder, and the Create ZIP window opens with “AES-256 (recommended)” already chosen.
🆓 In the free version
Format isn't shown, and Encryption reads “Passwords require Pro”. Click “About Pro…” to open the Pro tab of Settings. Option-dropping or using the Services item also opens the window without encryption.
Extracting & the Extract Dialog
Extract archives from the extract dialog that opens on double-click, or from Finder's right-click menu. You can set the destination and how to handle files with the same name on the Extract tab of Settings. Defaults are the values the app uses the first time you launch it.
Ways to extract
| How to extract | What to do |
|---|---|
| Double-click | If ZipScope is the default app for ZIP, double-clicking a ZIP follows “On double-click” in Settings (the default is “Show extract dialog”). To make it the default app, see Finder Integration. |
| Extract with ZipScope | Right-click an archive in Finder and choose it to extract the archive right away to the destination set in Settings, without the dialog. |
| Open With / Dock | Choose ZipScope from Open With in Finder, or drop an archive on ZipScope's Dock icon, and it follows “On double-click”. This works for 7z, RAR, LZH, and the other formats too. |
| Extract Here (Services) | Right-click an archive in Finder and choose Services > “Extract Here” to extract it right away. |
The extract dialog
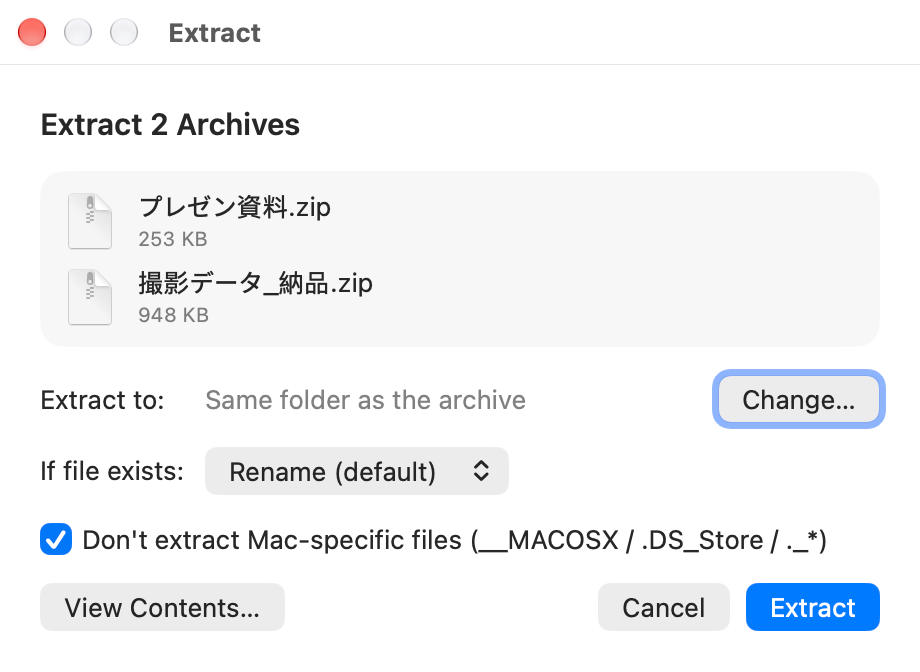
Archives opened at the same time are gathered in one dialog, titled “Extract 2 Archives” and so on. Click Extract to start, or click “View Contents…” to open them in the browser without extracting (see Viewing Contents Without Extracting).
| Setting | Default | Description |
|---|---|---|
| Extract to | Same folder as the archive |
Shows the destination set with “Destination” in Settings. Click “Change…” to use a different folder just this once (the folder you choose is remembered as one you've allowed ZipScope to write to). With “Ask every time”, or when no fixed folder has been chosen, it reads “Choose when extracting”, and you pick the folder when extracting. |
| If file exists | Rename (default) |
What to do when a file with the same name already exists at the destination. “Rename (default)” adds a number, as in Quote 2.pdf; “Replace” overwrites it; “Skip” doesn't extract that file. |
| Don't extract Mac-specific files (__MACOSX / .DS_Store / ._*) | On |
Leaves out .DS_Store, __MACOSX folders, and files starting with “._” that come with archives made on a Mac. |
📁 The folder you get
A ZIP is extracted into a new folder named after the archive only when it has more than one item at the top level (“name 2” if that folder already exists). If it holds a single folder, that folder is extracted as is. Mac-specific files are left out before counting, so ZIPs made on a Mac don't end up in a folder inside a folder of the same name. tar, tar.gz, 7z, RAR, LZH, and the other formats always get a folder named after the archive, with compound extensions such as .tar.gz, .tar.bz2, and .tar.xz removed in full (Docs.tar.bz2 becomes “Docs”). A gz file, which holds a single file, is written as is.
🔑 Password-protected archives
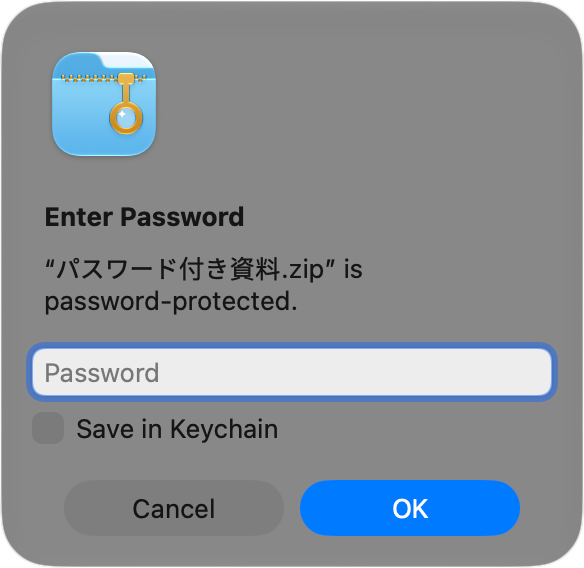
If there are encrypted files, “Enter Password” appears. If the password is wrong, “Incorrect Password” appears so you can try again. Turn on “Save in Keychain” and ZipScope uses the password for that file automatically next time. Japanese passwords are tried as both UTF-8 and CP932. Password-protected 7z and RAR archives may not extract.
⏳ Progress and the completion notice
While extracting, an “Extracting “name”…” window shows the progress; click Cancel to stop. When it's done, an “Extraction Complete” notification appears; click it to show the destination in Finder. The first time, macOS asks whether to allow notifications.
🕒 Dates restored
Extracted files and folders get back the modification dates recorded in the archive. The same applies to items you take out in the browser.
Viewing Contents Without Extracting (Browser)
Open ZIP, 7z, RAR, LZH, tar.gz, and more like a Finder folder, without extracting them. Check files with Quick Look and take out only the ones you need.
Opening the browser
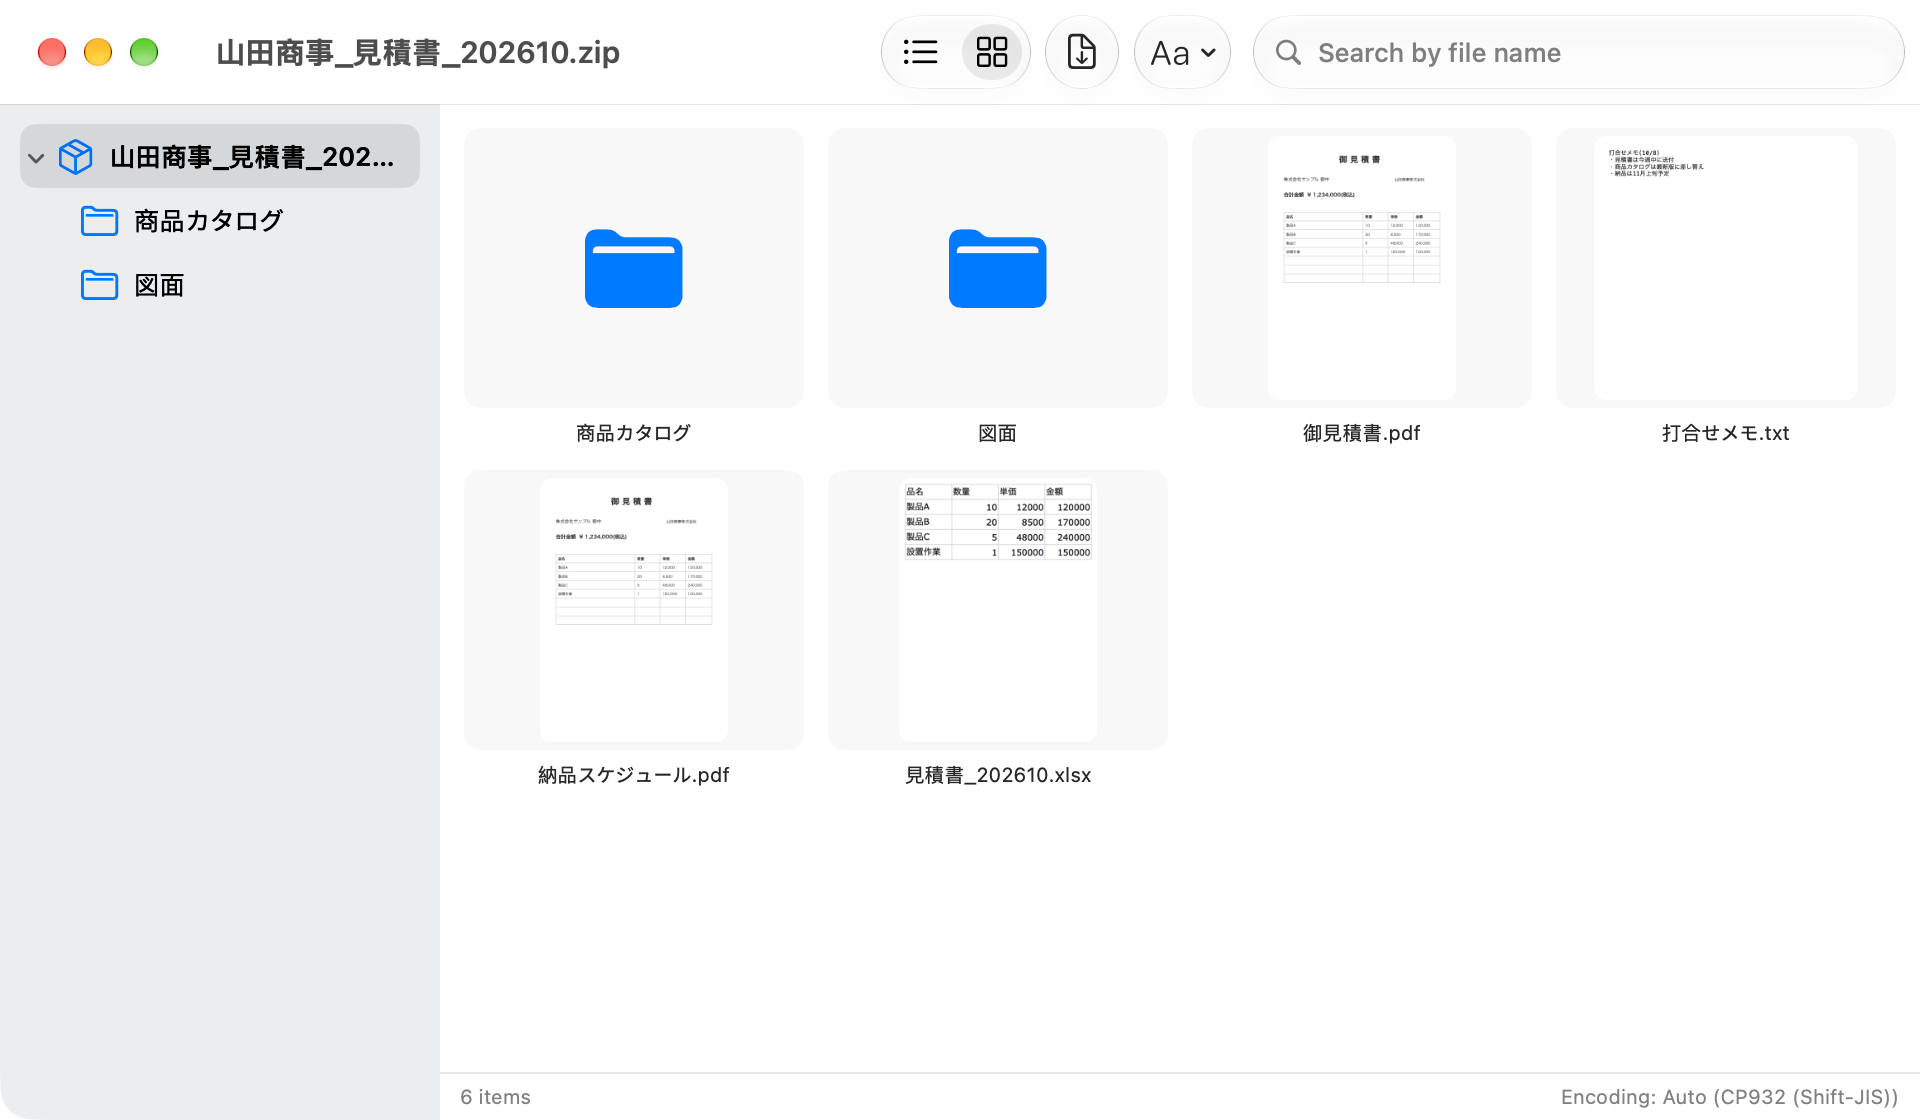
Right-click an archive in Finder and choose “View Contents with ZipScope”, or click “View Contents…” in the extract dialog. The browser also opens when you choose a ZIP file with File > “Open Archive…” in the menu bar (⌘ + O), when you drop only ZIPs on the menu bar icon, and when you double-click a ZIP with “On double-click” set to “Open in browser”.
Toolbar
| Button / display | What it does |
|---|---|
| List / Grid | Switches how the contents are shown. Grid view shows thumbnails of images, PDFs, and other files. |
| Extract | Writes the selected items, or every item when nothing is selected, to a folder you choose. |
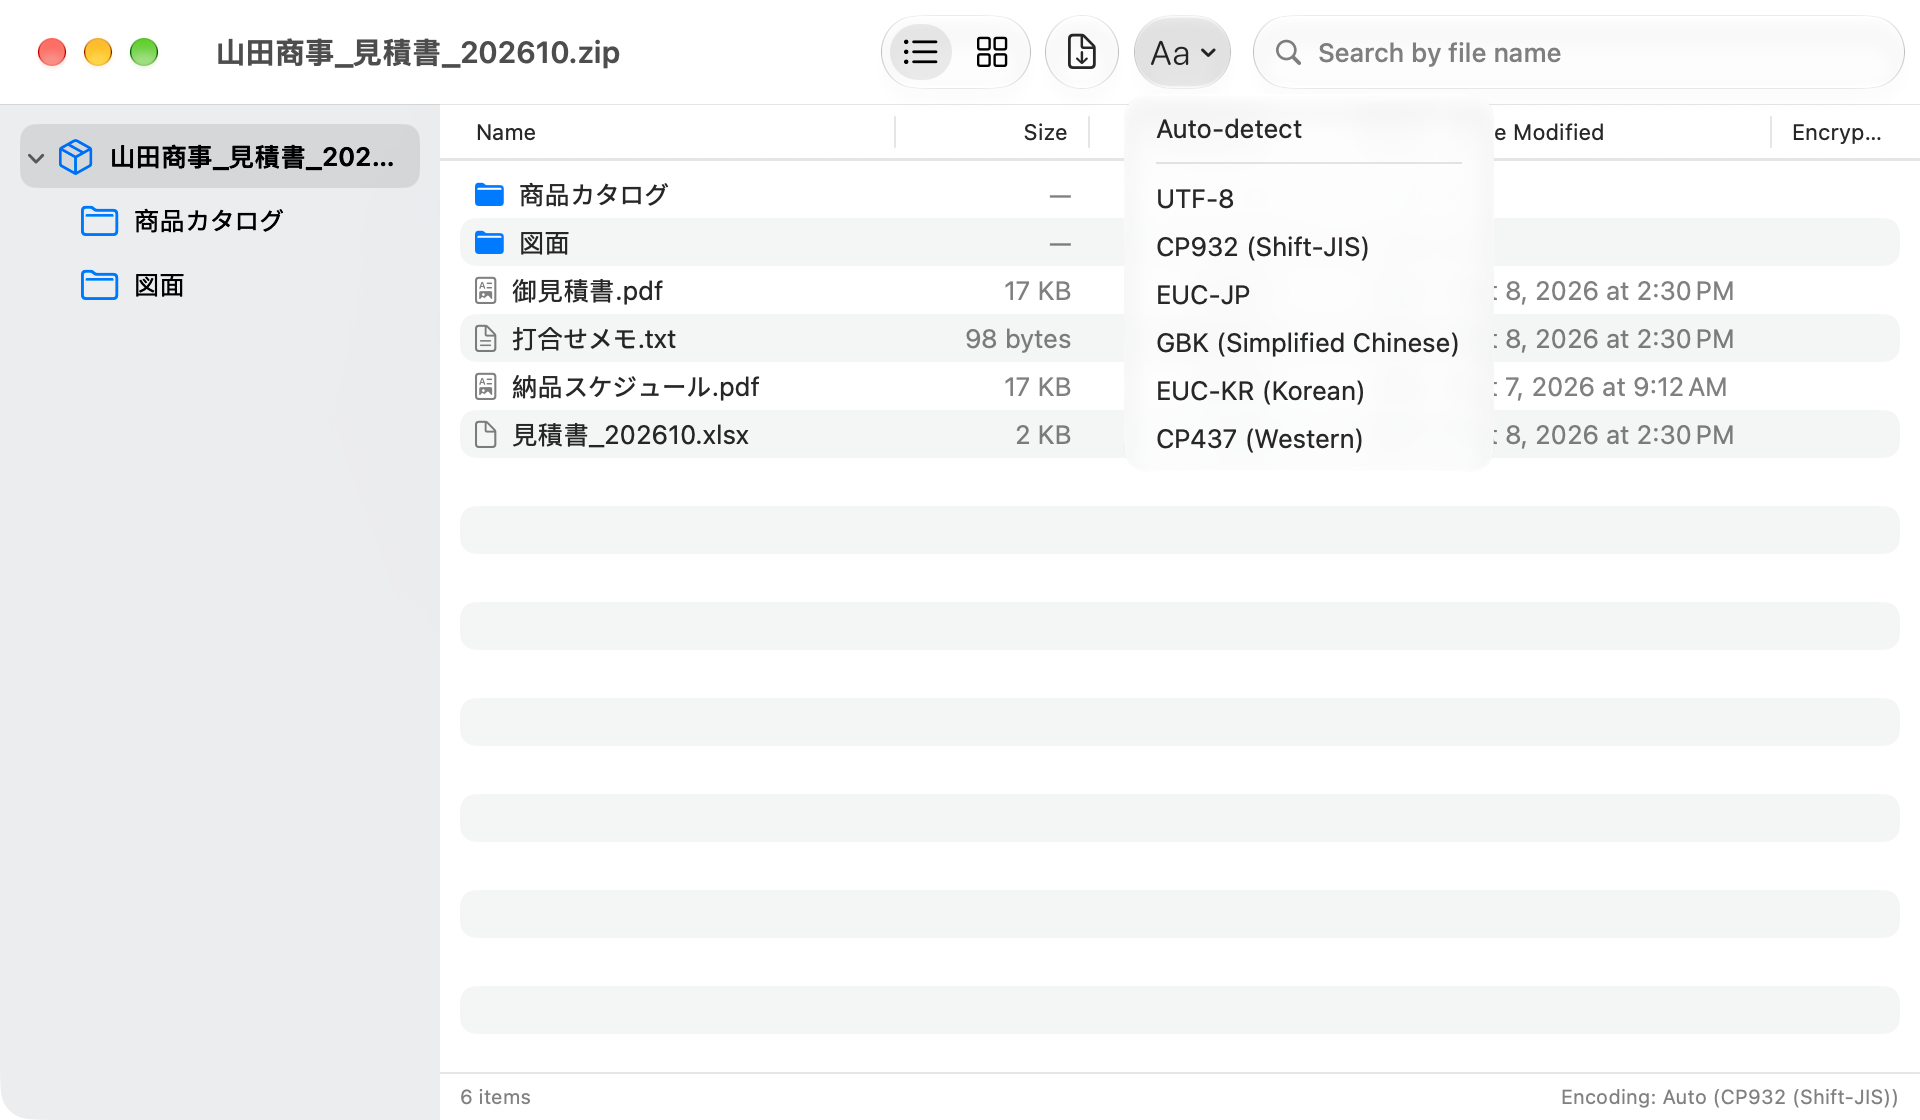
| Encoding | Switches the encoding used to read file names. Shown for ZIPs only (see Garbled File Names & Encoding). |
| Search by file name | Finds files whose names contain what you type, anywhere in the archive including subfolders (upper and lower case are treated the same). |
Folders and the list
🗂️ Folder tree
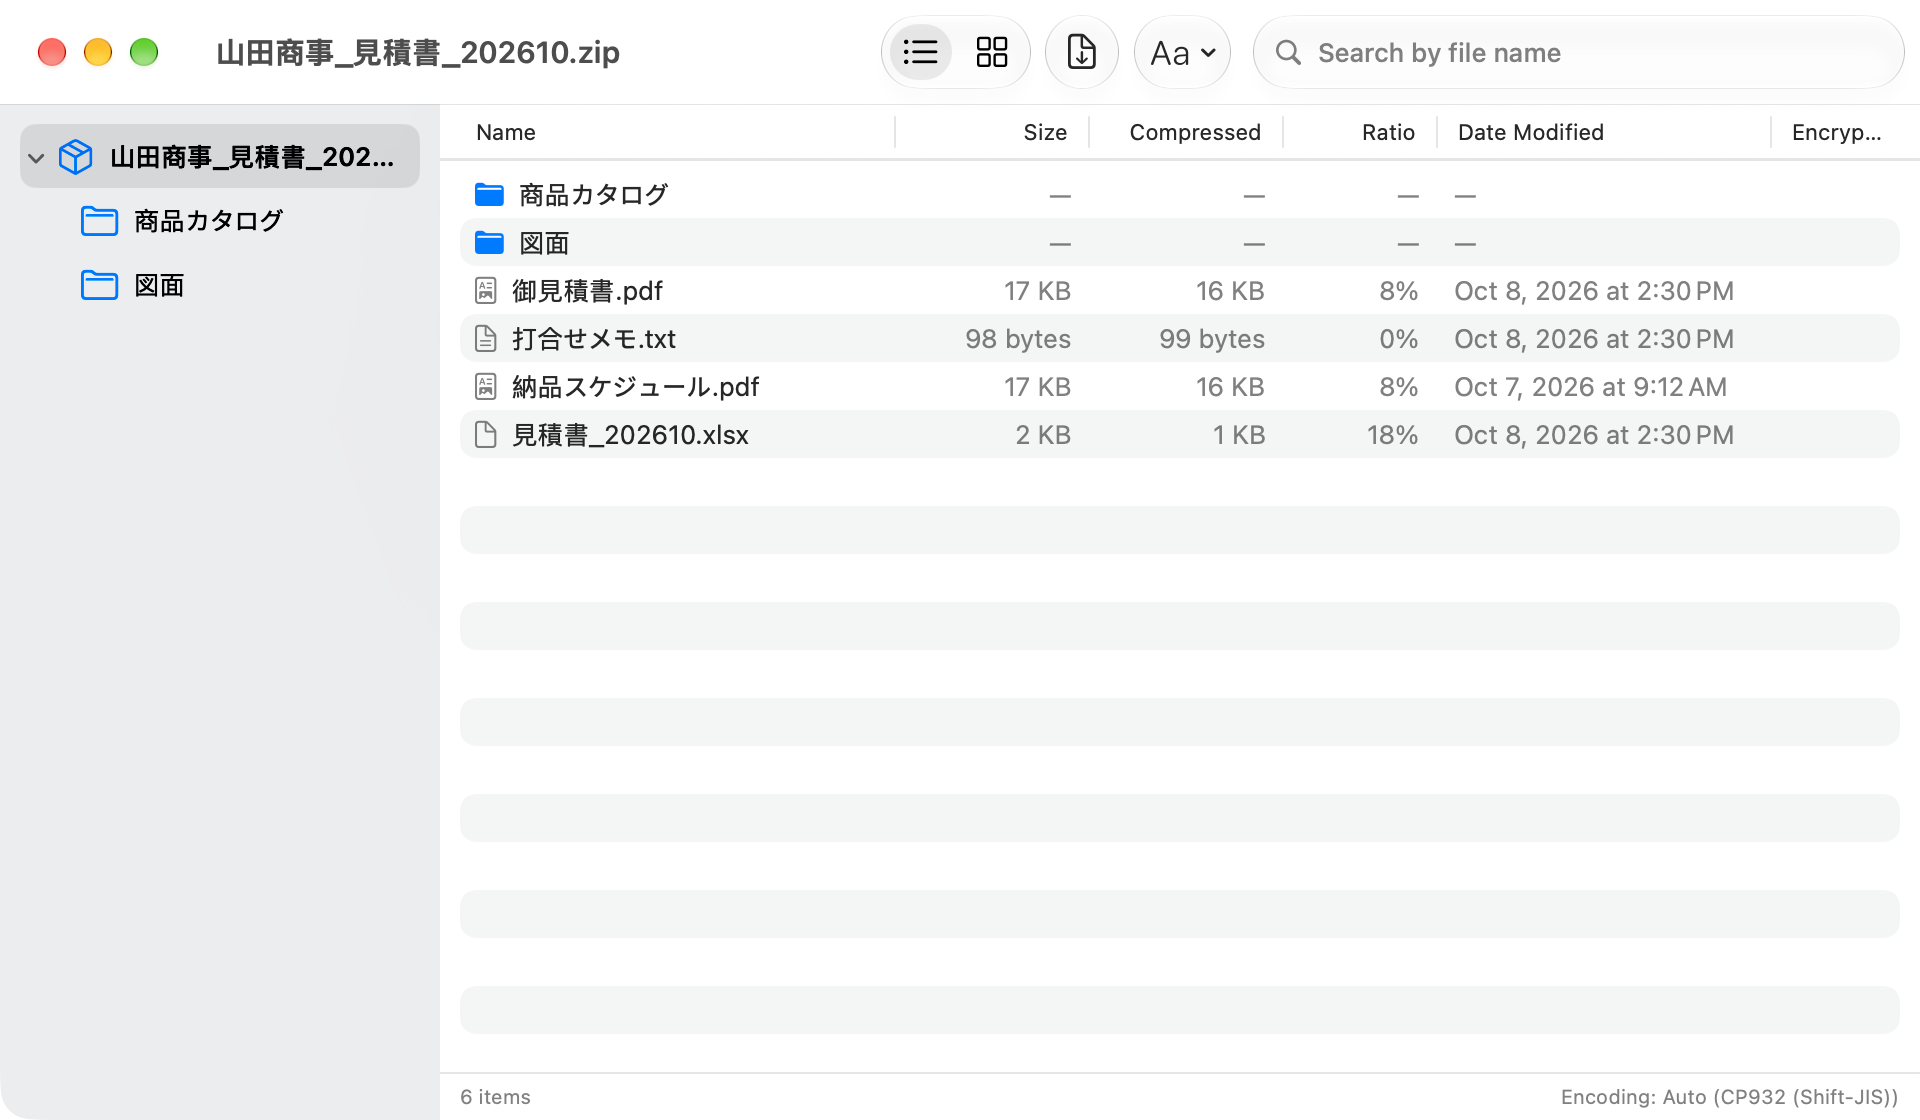
The sidebar on the left shows the folders inside the archive as a tree. Click a folder to show its contents. You can also double-click a folder in the list to open it, and press ⌘ + ↑ to go up one level.
📋 List view
Shows the Name, Size, Compressed, Ratio, Date Modified, and Encrypted columns. Encrypted files get a lock icon. Click a column header to sort.
🖼️ Grid view
Shows images, PDFs, and other files as thumbnails. Even in an archive full of photos, you can see which photos are inside before extracting anything.
📊 Status bar
The bottom of the window shows how many items are listed and, when something is selected, how many items are selected and how big they'll be when extracted, as in “(3 selected, 1.2 MB uncompressed)”. The file name encoding is shown on the right.
🧹 Mac-specific files hidden
.DS_Store, __MACOSX folders, and files starting with “._” aren't listed by default. To show them, turn off “Hide them in the browser” on the Extract tab of Settings (open browser windows update right away).
Checking and taking out files
👀 Quick Look
Select a file and press Space, or double-click it, to see it in Quick Look. If you selected several files, you can move between them in Quick Look.
📤 Drag out
Drag files or folders from the list to Finder or the desktop to take out just those items. Their modification dates are restored as recorded in the archive.
⬇️ Extract items
Click Extract in the toolbar, or choose “Extract…” in the right-click menu, to open the “Choose a folder to extract to” dialog. Items are written to the folder you choose, keeping their folder structure relative to the folder you're viewing. Files with the same name are handled as set in “If a file already exists” in Settings. When it's done, an “Extraction Complete” notification appears.
🔑 Encrypted files
To open encrypted files in Quick Look or extract them, enter the password. Once entered, you don't need to type it again until you close that window.
Selecting items and the right-click menu
Click an item to select it, and ⌘-click to add it to or remove it from the selection. Use the arrow keys to move the selection. Right-click an item to open this menu:
| Menu item | What it does |
|---|---|
| Quick Look | Shows the selected files in Quick Look. |
| Extract… | Writes the selected items to a folder you choose. |
| Delete from ZIP… | Deletes the selected items from the ZIP. Shown for ZIPs only. |
Adding and deleting files in a ZIP (ZIP only)
Drop files or folders from Finder onto the browser window to add them to the open ZIP. The compression level and Windows Compatibility options from the Compress tab of Settings are used. If the ZIP contains encrypted files, ZipScope asks first (“This ZIP Contains Encrypted Files”), and the files you add aren't encrypted. Select items and press ⌫, or choose “Delete from ZIP…”, and they're deleted from the ZIP after you confirm (“Delete 3 Items from the ZIP?”). Both rewrite the ZIP file itself, and deleting can't be undone. Archives in other formats, such as 7z and RAR, can't be edited.
🆓 In the free version
You can browse one archive at a time. If you open another archive while the browser is open, ZipScope tells you “Browsing Multiple Archives Is a Pro Feature”; click “Close and Open” to close the current one and open the new one. With Pro, each archive opens in its own window at the same time.
Garbled File Names & Encoding
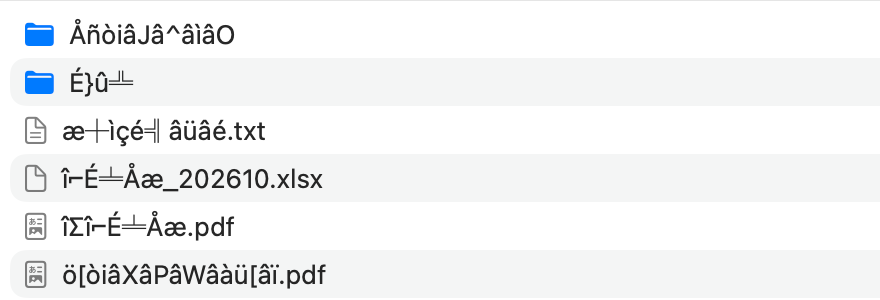
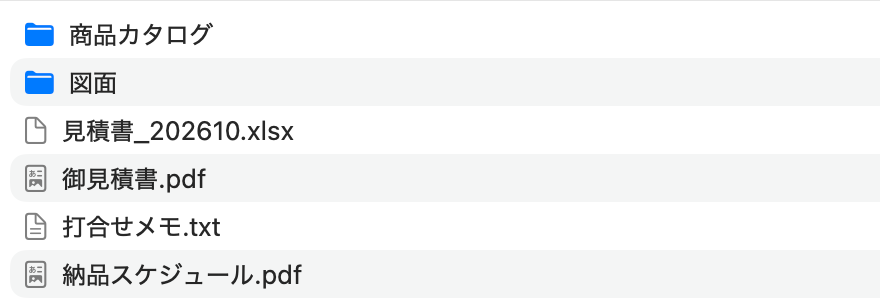
ZIPs made on Windows may store file names in Shift_JIS (CP932), which other apps show as garbage. ZipScope detects this automatically and shows and extracts the names correctly.
🔎 Automatic detection
When you open a ZIP, ZipScope detects the encoding of its file names. The result appears at the bottom right of the browser, as in “Encoding: Auto (CP932 (Shift-JIS))”. Extracting from the extract dialog or Finder's right-click menu uses the same detection.
🔣 Switching by hand
If names are still garbled, choose “UTF-8”, “CP932 (Shift-JIS)”, “EUC-JP”, “GBK (Simplified Chinese)”, “EUC-KR (Korean)”, or “CP437 (Western)” from Encoding in the browser toolbar. The list updates right away; choose “Auto-detect” to go back.
⬇️ Take files out with the new names
After switching the encoding, items you take out with Extract in the toolbar or by dragging are written with the names as now shown.
🔑 Japanese passwords
A ZIP protected on Windows with a Japanese password may encode the password differently from a Mac. ZipScope tries both UTF-8 and CP932 automatically, so “the password is right but it won't open” rarely happens.
📤 When you're the sender
When you send files from a Mac to someone on Windows, create the ZIP with ZipScope and the file names are stored explicitly as UTF-8 (see Creating ZIP Archives).
⚠️ Formats other than ZIP
Switching the encoding works for ZIPs only. For 7z, RAR, LZH, and the other formats, Encoding isn't shown in the toolbar.
Finder Integration
Use ZipScope from Finder's right-click menu, Services, double-click, and Quick Look.
Right-click menu
| Menu item | What it does |
|---|---|
| Compress with ZipScope | Opens the Create ZIP window with the selected files and folders. Shown when the selection includes anything that isn't an archive. |
| Extract with ZipScope | Extracts the selected archives right away to the destination set in Settings. Shown when every selected item is an archive (ZIP, 7z, RAR, LZH, tar, gz, bz2, xz, cpio, and so on). |
| View Contents with ZipScope | Opens the selected archives in the browser (see Viewing Contents Without Extracting). |
These items appear when you right-click items in your home folder or on an external disk. The first time you work with a folder, a dialog opens saying “ZipScope needs to work with files in “folder name”. Choose this folder to allow access (you won't be asked again).”; choose that folder to allow it. If the items don't appear, check that ZipScope's Finder extension is turned on in System Settings.
Services
Select items in Finder, right-click, and choose one of these from Services. If you can't find them, turn them on in System Settings > Keyboard > Keyboard Shortcuts > Services.
| Menu item | What it does |
|---|---|
| Browse with ZipScope | Opens the selected ZIPs in the browser. |
| Extract Here | Extracts the selected archives (ZIP, 7z, RAR, LZH, tar, gz, bz2, xz, and more) right away to the destination set in Settings. |
| Compress with ZipScope | Opens the Create ZIP window with the selected files and folders. |
| Create Password-Protected ZIP | Opens the Create ZIP window with “AES-256 (recommended)” already chosen (Pro). |
Double-click and the default app
On the Extract tab of Settings, click “Make Default App for ZIP”. ZipScope tells you “ZipScope Is Now the Default App for ZIP”, and double-clicking a ZIP opens ZipScope from then on. Choose what happens with “On double-click”. The “Open with "ZipScope"” button at the top right of Quick Look in Finder does the same. To open other formats with ZipScope too, select a file in Finder, choose ZipScope under Open With in Get Info, and click “Change All…”.
| Option | What it does |
|---|---|
| Show extract dialog | Lets you check the destination and how to handle files with the same name before extracting (the default; see Extracting & the Extract Dialog). |
| Open in browser | Opens the contents in the browser without extracting. |
| Extract immediately | Extracts right away to the destination set in Settings, without a dialog. |
Quick Look
Select a ZIP in Finder and press Space to see a list of its contents. The top shows the number of files and their size when extracted, the encoding when it isn't UTF-8, and “🔒 Encrypted” when there are encrypted files; the first few images appear as thumbnails. Mac-specific files such as .DS_Store are never shown in Quick Look. Quick Look works with ZIPs only.
The Menu Bar
ZipScope stays in the menu bar, and you can create a ZIP by dropping files on its icon (“Show in menu bar” in Settings, on by default).
📥 Drop to create
Drop files or folders on the menu bar icon to open the Create ZIP window. What happens when you drop several items is set with “When dropping multiple items” on the Menu Bar tab of Settings (the default, “Combine into one ZIP”, puts them all in one ZIP). If you drop only ZIPs, they open in the browser. While you drag, the icon turns into an open box.
🗃️ One archive per item
Set “When dropping multiple items” to “Create a ZIP for each”, and the Create ZIP window still opens just once when you drop several items; the File name row reads “Creates 3 archives, each named after its item” and can't be edited. Click Create, and ZipScope makes one archive per item with the window's settings (compression, encryption and password, Windows Compatibility options, and destination). Each archive is named after its item without the extension (Quote.pdf becomes Quote.zip, or Quote.7z for 7z), and Finder then shows all the new archives. If one fails or you cancel, the remaining archives aren't created. A single item always gets the usual editable file name.
🔑 Drop while holding ⌥ (Pro)
Hold ⌥ (Option) while dropping, and the Create ZIP window opens with “AES-256 (recommended)” already chosen, ready to create a password-protected ZIP.
⏳ While working
While ZipScope is extracting or creating an archive, the icon changes to rotating arrows.
🪟 No Dock icon
Turn on “Hide Dock icon (menu bar only)” on the Menu Bar tab of Settings, and dialogs and Settings open without a Dock icon. The Dock icon appears only while a browser window is open.
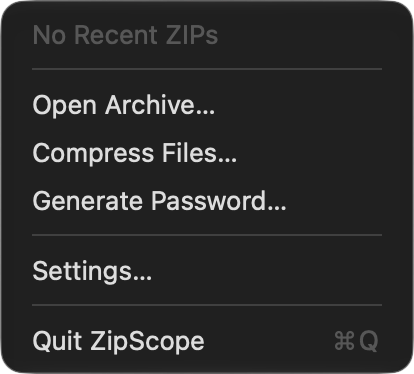
The icon's menu
Click the menu bar icon to open this menu:
| Menu item | What it does |
|---|---|
| Recently Created | Lists up to five recently created ZIP and 7z archives; click one to show it in Finder. Until you create one, it reads “No Recent ZIPs”. |
| Open Archive… | Choose a ZIP file to open it in the browser. |
| Compress Files… | Choose files or folders to open the Create ZIP window. |
| Generate Password… | Opens the Password Generator window (see Password Protection (Pro)). |
| Settings… | Opens the Settings window. |
| Quit ZipScope | Quits ZipScope completely, including the menu bar icon. |
Settings
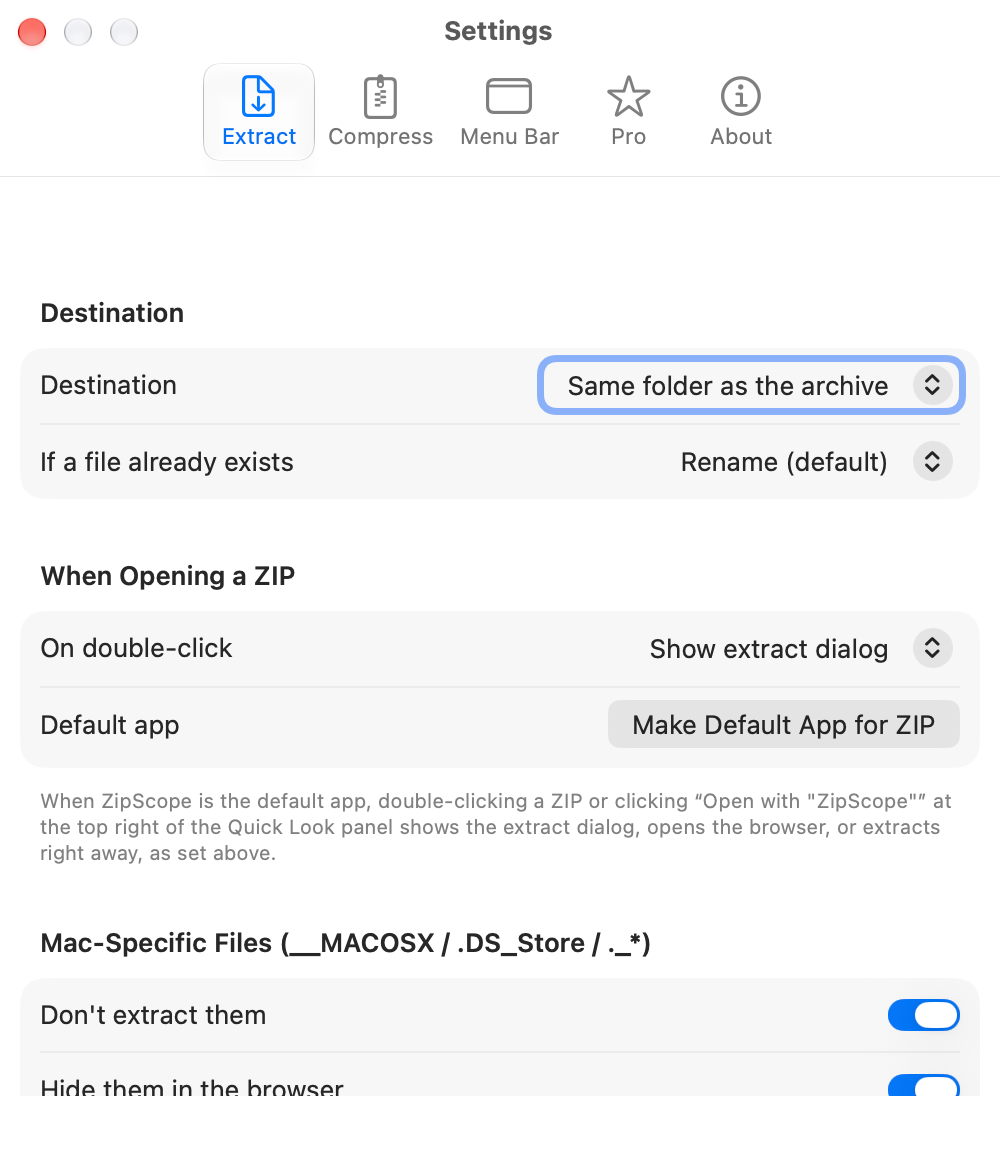
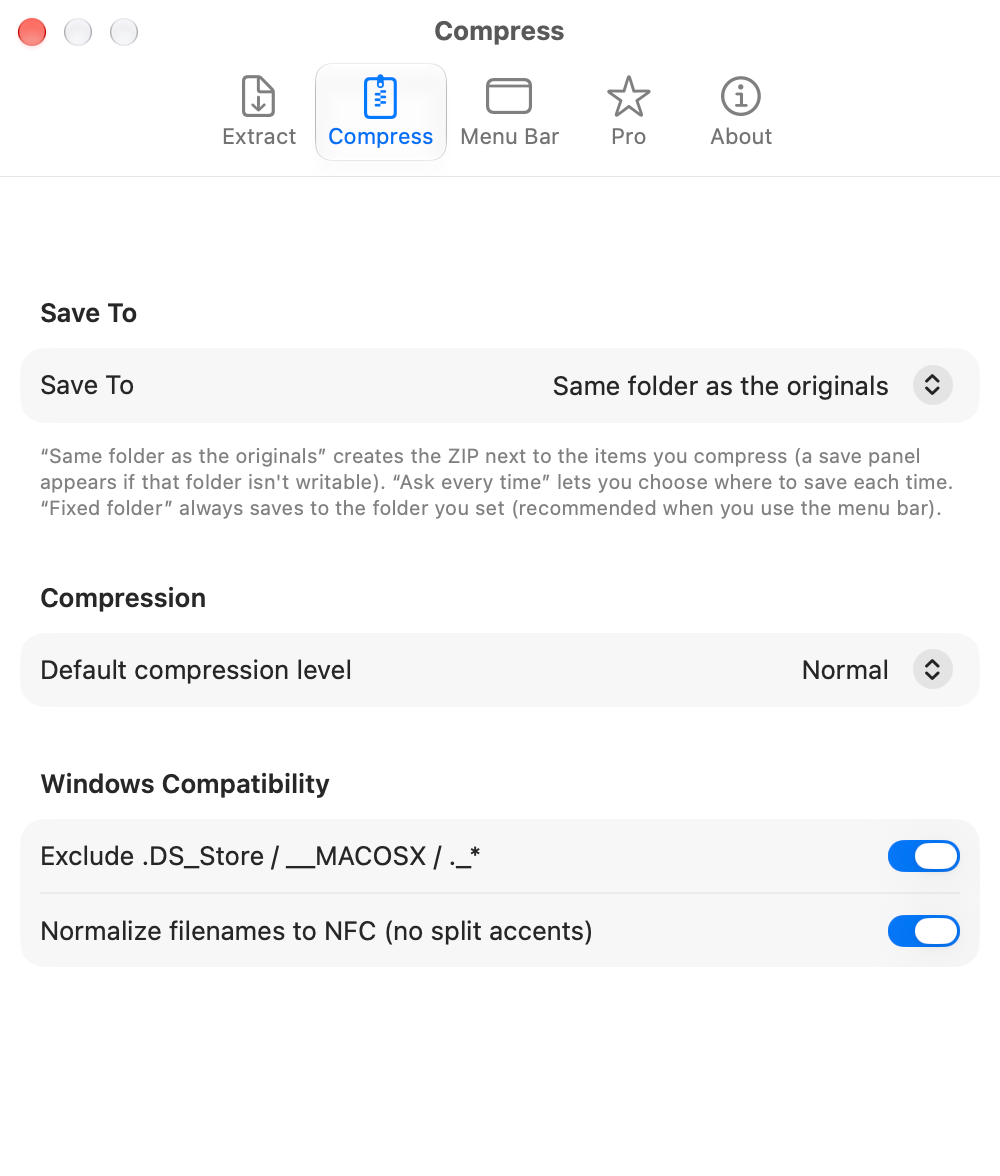
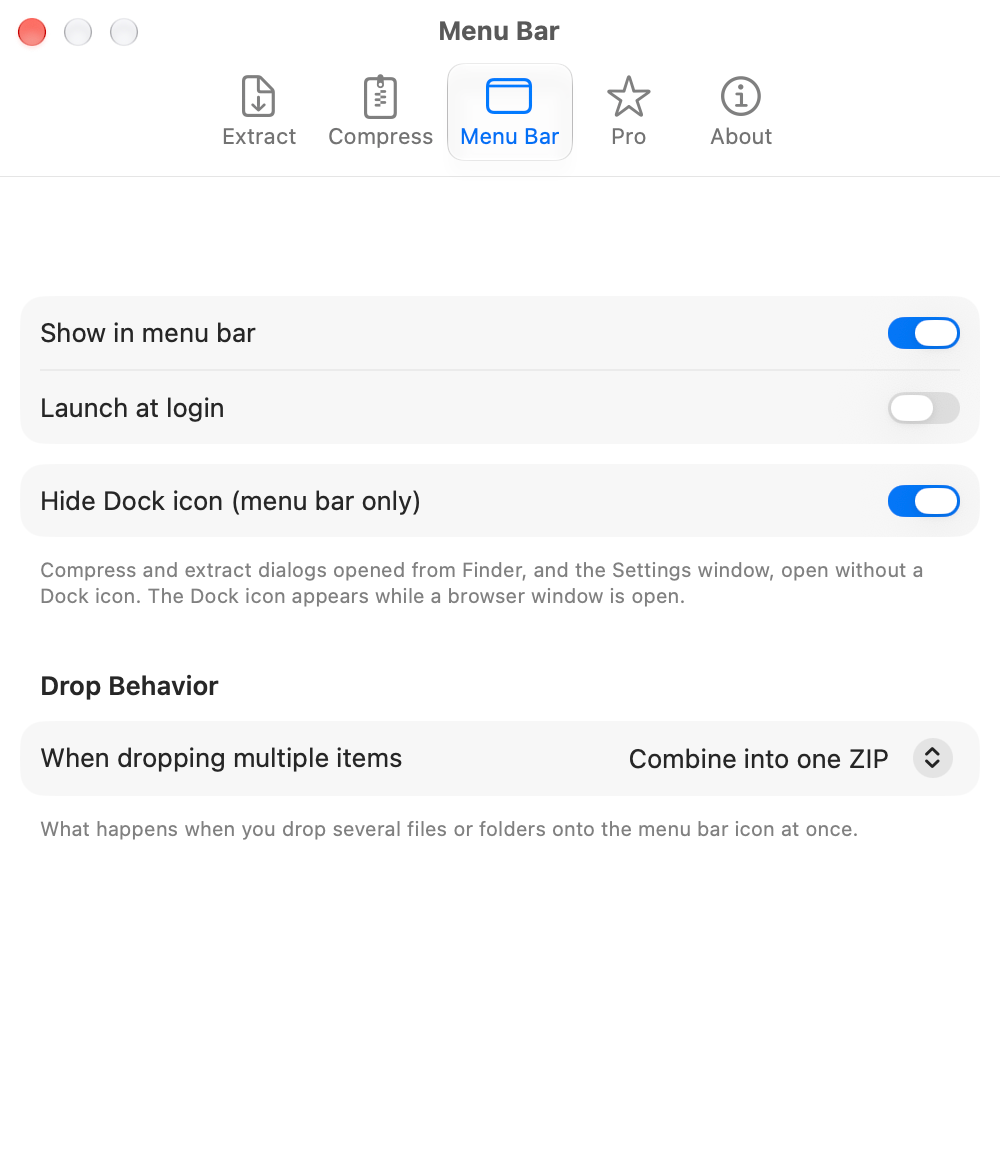
The Settings window (ZipScope > “Settings…” in the menu bar, ⌘ + ,) has five tabs: Extract, Compress, Menu Bar, Pro, and About. You can also open it from the menu bar icon's menu. Defaults are the values the app uses the first time you launch it.
| Setting | Default | Description |
|---|---|---|
| Destination | Same folder as the archive |
Choose “Same folder as the archive”, “Ask every time”, or “Fixed folder”. With “Fixed folder”, a Fixed folder row appears; click “Choose…” to pick the folder (it reads “Not set” until you do). |
| If a file already exists | Rename (default) |
Choose “Rename (default)”, “Replace”, or “Skip”. You can also change it each time in the extract dialog. |
| On double-click | Show extract dialog |
What happens when you open a ZIP: “Show extract dialog”, “Open in browser”, or “Extract immediately”. |
| Default app | — | Click “Make Default App for ZIP” so that double-clicking a ZIP opens ZipScope. |
| Don't extract them | On |
Under Mac-Specific Files (__MACOSX / .DS_Store / ._*). Leaves out .DS_Store and the like when extracting. |
| Hide them in the browser | On |
Doesn't list .DS_Store and the like in the browser. Quick Look never shows them, whatever this setting is. |
| Setting | Default | Description |
|---|---|---|
| Save To | Same folder as the originals |
“Same folder as the originals” creates the ZIP next to the files you compress (ZipScope asks for permission if it can't write there). “Ask every time” asks where to save each time, and “Fixed folder” always uses the folder you pick with “Choose…”. If you mostly work from the menu bar, “Fixed folder” is handy. |
| Default compression level | Normal |
The default for Compression in the Create ZIP window: “None (fastest)”, “Low (fast)”, “Normal”, or “Maximum (slow)”. |
| Exclude .DS_Store / __MACOSX / ._* | On |
Under Windows Compatibility. Used by the Create ZIP window and when you add files to a ZIP in the browser. |
| Normalize filenames to NFC (no split accents) | On |
Under Windows Compatibility. Used in the same places as the setting above. |
| Setting | Default | Description |
|---|---|---|
| Show in menu bar | On |
Shows the icon in the menu bar. While it's on, ZipScope keeps running when you close all its windows. |
| Launch at login | Off |
Opens ZipScope when you log in to your Mac. |
| Hide Dock icon (menu bar only) | Off |
Uses ZipScope without a Dock icon; the icon appears only while a browser window is open. Available when “Show in menu bar” is on. |
| When dropping multiple items | Combine into one ZIP |
Under Drop Behavior. Choose whether several items dropped on the menu bar icon together go into one ZIP (“Combine into one ZIP”) or get one archive each (“Create a ZIP for each”) (see The Menu Bar). |
⭐ Your version
The top shows “You're using the free version” or “You're using ZipScope Pro”, followed by a list under What Pro Adds.
💳 Buying and restoring
The price appears next to “Buy Pro”. If you've already bought Pro or use it on another Mac, click “Restore Purchase” (see Free Version & Upgrade).
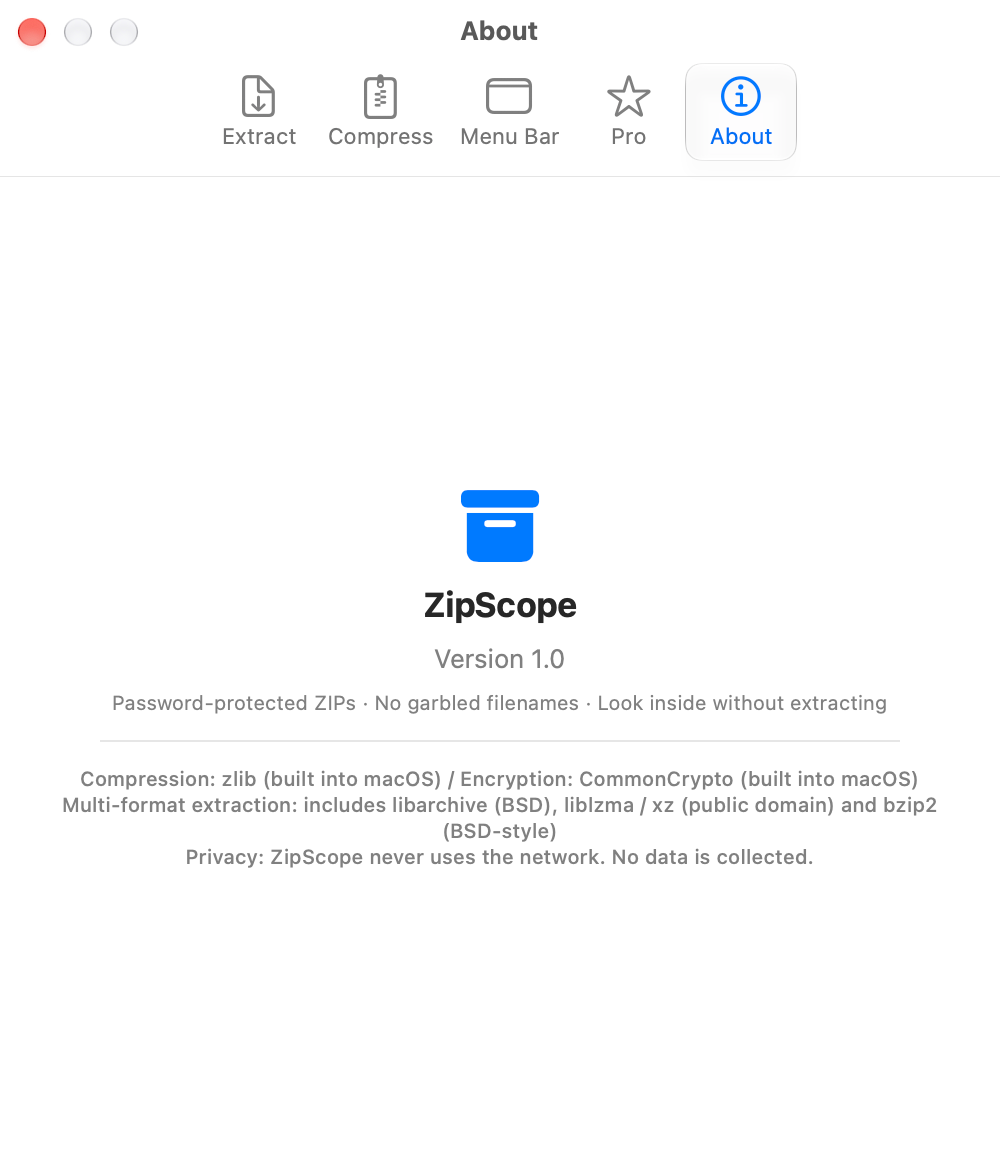
ℹ️ Version and technology
Shows the ZipScope version, the macOS components it uses for compression and encryption (zlib and CommonCrypto), and the libraries it includes to extract other formats (libarchive, liblzma, and bzip2). It also states that ZipScope doesn't use the network or collect data.
Free Version & Upgrade
ZipScope creates ZIPs without a password and extracts and browses every supported format for free. Upgrade to Pro, a one-time in-app purchase, to create password-protected archives and open several archives at once.
| Feature | Free version | After upgrading (Pro) |
|---|---|---|
| Creating ZIPs that open cleanly on Windows (no password) | ✓ | ✓ |
| Extracting and viewing contents without extracting (ZIP, 7z, RAR, LZH, tar.gz, and more, with the encoding fix) | ✓ | ✓ |
| Quick Look, dragging files out, grid view, search | ✓ | ✓ |
| Finder's right-click menu, the menu bar, the extract dialog | ✓ | ✓ |
| Password generator | ✓ | ✓ |
| Password-protected ZIPs (ZipCrypto / AES-256) | — | ✓ |
| Password-protected 7z (AES-256) | — | ✓ |
| Opening several archives at once | One at a time | ✓ |
| ⌥-dropping on the menu bar icon, and “Create Password-Protected ZIP” in Services | — | ✓ |
💳 How to upgrade
Click “Buy Pro” on the Pro tab of Settings. You can also open that tab with “About Pro…” in the Create ZIP window. Pro is a one-time purchase, not a subscription, and it's ready to use as soon as you buy it.
🔄 Restore purchases
Pro works on every Mac signed in with the same Apple Account. To use it on another Mac or after reinstalling, click “Restore Purchase” on the Pro tab.
Supported Formats
The formats ZipScope can extract and browse, and the ones it can create.
| Format | Extensions | Extract & browse | Create |
|---|---|---|---|
| ZIP | .zip |
✓ | ✓ (no compression to maximum compression; password protection with Pro) |
| 7z | .7z |
✓ | ✓ (AES-256 password-protected only; Pro) |
| RAR | .rar |
✓ | — |
| LZH | .lzh / .lha |
✓ | — |
| tar | .tar |
✓ | — |
| tar.gz / gzip | .tar.gz / .tgz / .gz |
✓ | — |
| bzip2 | .bz2 / .tar.bz2 / .tbz / .tbz2 |
✓ | — |
| xz | .xz / .tar.xz / .txz |
✓ | — |
| cpio | .cpio |
✓ | — |
⚠️ Not supported
Split archives (.001, .z01, and so on) can't be extracted. Password-protected 7z and RAR archives may not extract. RAR archives can't be created, and 7z archives can't be created without a password.
🧩 ZIP-only features
Switching the encoding, adding and deleting files in the browser, and the contents list in Finder's Quick Look work with ZIPs only.
Keyboard Shortcuts
Common actions are also available from the keyboard.
Menus
| Shortcut | Command | Description |
|---|---|---|
| ⌘ + O | Open Archive… | Choose a ZIP file to open it in the browser. |
| ⌘ + N | Compress Files… | Choose files or folders to open the Create ZIP window. |
| ⌘ + G | Generate Password… | Opens the Password Generator window. |
| ⌘ + , | Settings… | Opens the Settings window. |
| ⌘ + W | Close | Closes the front window. |
| ⌘ + Q | Quit ZipScope | Quits ZipScope. While it stays in the menu bar, this closes the windows and the Dock icon and keeps the menu bar icon. |
Browser
| Shortcut | Command | Description |
|---|---|---|
| Space | Quick Look | Shows the selected files in Quick Look. |
| ⌘ + ↑ | Enclosing folder | Goes up one folder (not while searching). |
| ↑ / ↓ / ← / → | Move the selection | Moves the selection (up and down in list view; in any direction in grid view). |
| ⌫ | Delete from ZIP… | Deletes the selected items from the ZIP after you confirm (ZIPs only). |
Dialogs
| Shortcut | Command | Description |
|---|---|---|
| return | Create / Extract | Same as clicking Create in the Create ZIP window, or Extract in the extract dialog. |
| esc | Cancel | Closes the window. |
Frequently Asked Questions
Answers to common questions about creating and extracting archives and the app's settings.
Q. Why do file names in ZIPs I make on a Mac look garbled on Windows?
ZIPs made on a Mac don't always tell Windows that their file names are UTF-8, and they may store characters such as Japanese voiced marks in split form. ZIPs made with ZipScope store file names explicitly as UTF-8 (with the UTF-8 flag) and in combined form (NFC), so recent versions of Windows open them correctly with the built-in tool. Very old unzip tools without UTF-8 support may still show wrong names.
Q. Can I keep .DS_Store and __MACOSX out of the ZIPs I send?
Yes. ZIPs made with ZipScope leave out .DS_Store, __MACOSX folders, and files starting with “._” by default (“Exclude .DS_Store / __MACOSX / ._*” in the Create ZIP window, on by default). These files are used only on a Mac, and on Windows they show up as useless files. When you extract ZIPs made on a Mac, these files aren't extracted by default either.
Q. Can I make a password-protected ZIP that opens on Windows?
Yes (Pro). Choose “ZipCrypto (most compatible)” under Encryption, and Windows' built-in tool can open it. If you choose the stronger “AES-256 (recommended)” or 7z, the other person needs 7-Zip or a similar app. Using only letters and numbers in the password avoids trouble with different apps on the other end (see Password Protection (Pro)).
Q. What should I do when a ZIP from Windows shows garbled file names?
ZipScope detects file names stored in Shift_JIS (CP932) in ZIPs made on Windows, and shows and extracts them correctly. If names are still garbled, open the ZIP in the browser, choose another encoding from Encoding in the toolbar, and take the files out with Extract in the toolbar (see Garbled File Names & Encoding).
Q. Can I see what's inside without extracting?
Yes. Choose “View Contents with ZipScope” in Finder's right-click menu, or click “View Contents…” in the extract dialog, to browse ZIP, 7z, RAR, LZH, tar.gz, and more without extracting. Press Space for Quick Look, and drag just the files you need to Finder. For a ZIP, you can also select it in Finder and press Space to see a list of its contents.
Q. Could my original files be overwritten or deleted?
Your original files stay as they are. If a file with the same name as the new ZIP already exists, a number is added, as in Documents 2.zip, and when extracting, the default “Rename (default)” also adds a number to files whose names already exist. Files at the destination are replaced only if you choose “Replace” under “If file exists”. Adding files to a ZIP in the browser or using “Delete from ZIP…” rewrites that ZIP file.
Q. Do I have to type the password every time I open a password-protected ZIP?
Turn on “Save in Keychain” when you enter the password, and ZipScope uses it for that file automatically from then on (off by default).
Q. Why does ZipScope ask me to allow writing to a folder?
Because ZipScope runs in the macOS sandbox, it needs your permission for each folder it hasn't written to before when extracting or saving a ZIP. Click “Allow This Folder…” and choose that folder in the dialog. You won't be asked again for a folder you've allowed or the folders inside it. If you use a working folder as the fixed folder, you won't be asked at all (see Settings).
Q. Why don't ZipScope's items appear in Finder's right-click menu?
“Compress with ZipScope” and the other items appear when you right-click items in your home folder or on an external disk. If they still don't appear, check that ZipScope's Finder extension is turned on in System Settings. You can also use “Compress with ZipScope”, “Extract Here”, and the other items from Services in the right-click menu (see Finder Integration).
Q. Why does the menu bar icon stay after I press ⌘Q?
While “Show in menu bar” is on (the default), ⌘ + Q or Quit in the Dock closes only the windows and the Dock icon, so ZipScope stays ready in the menu bar. To quit completely, click the menu bar icon and choose “Quit ZipScope”. If you don't want it to stay, turn off “Show in menu bar” on the Menu Bar tab of Settings.
Q. Can I create RAR or 7z archives?
RAR archives can be extracted and browsed but not created. ZipScope creates ZIP and 7z archives. 7z archives can only be created with a password (AES-256), which is available with Pro.
Q. Can I extract split ZIPs or password-protected RAR archives?
Split archives (.001, .z01, and so on) can't be extracted. Password-protected 7z and RAR archives may not extract (see Supported Formats).
Q. Are my files ever sent anywhere?
No. ZipScope never uses the network, and all compressing and extracting happens on your Mac. No data is collected.
Q. Can I use Pro on another Mac?
Yes. Pro is a one-time purchase that works on every Mac signed in with the same Apple Account. To use it on another Mac or after reinstalling, click “Restore Purchase” on the Pro tab of Settings.