How to Compare Two Photos on iPhone (3 Ways): Overlay or Side by Side
Published by @SoNiceInfo at 11/13/2026
What changed between a photo before and after editing, which of two similar shots to keep, how a subject changes little by little over time: there are plenty of reasons to compare two photos. Yet the Photos app has no way to put two photos on the same screen or overlay them. This article covers three ways: an app that overlays two photos so you can spot differences, flipping between them in the Photos app with no app to install, and a shortcut that makes a side-by-side image.
The three methods compared
| Method | What you see | Spotting differences | Setup |
|---|---|---|---|
| Image Compare (recommended) | Side by side, overlaid, or as a difference | Same spot, overlaid | Get it on the App Store |
| Flipping in Photos | One photo at a time | Large differences only | None |
| Combining with Shortcuts | One side-by-side image | Next to each other | Build it yourself |
RecommendedMethod 1: Overlay the photos with an app (Image Compare)
Image Compare lets you pick two photos on your iPhone or iPad and compare them four ways: side by side, with a slider, as an overlay, and as a difference image. The two photos you pick carry over to every way of comparing.
Pick the first photo
Tap “1 Select Image” at the top left and tap the photo you want to compare. The picker closes by itself.
Pick the second photo
Tap “2 Select Image” and pick the other photo.
Switch how you compare
Use the tabs at the bottom to switch between Concurrent (side by side), Slide (slider), Opacity (overlay), and Difference.
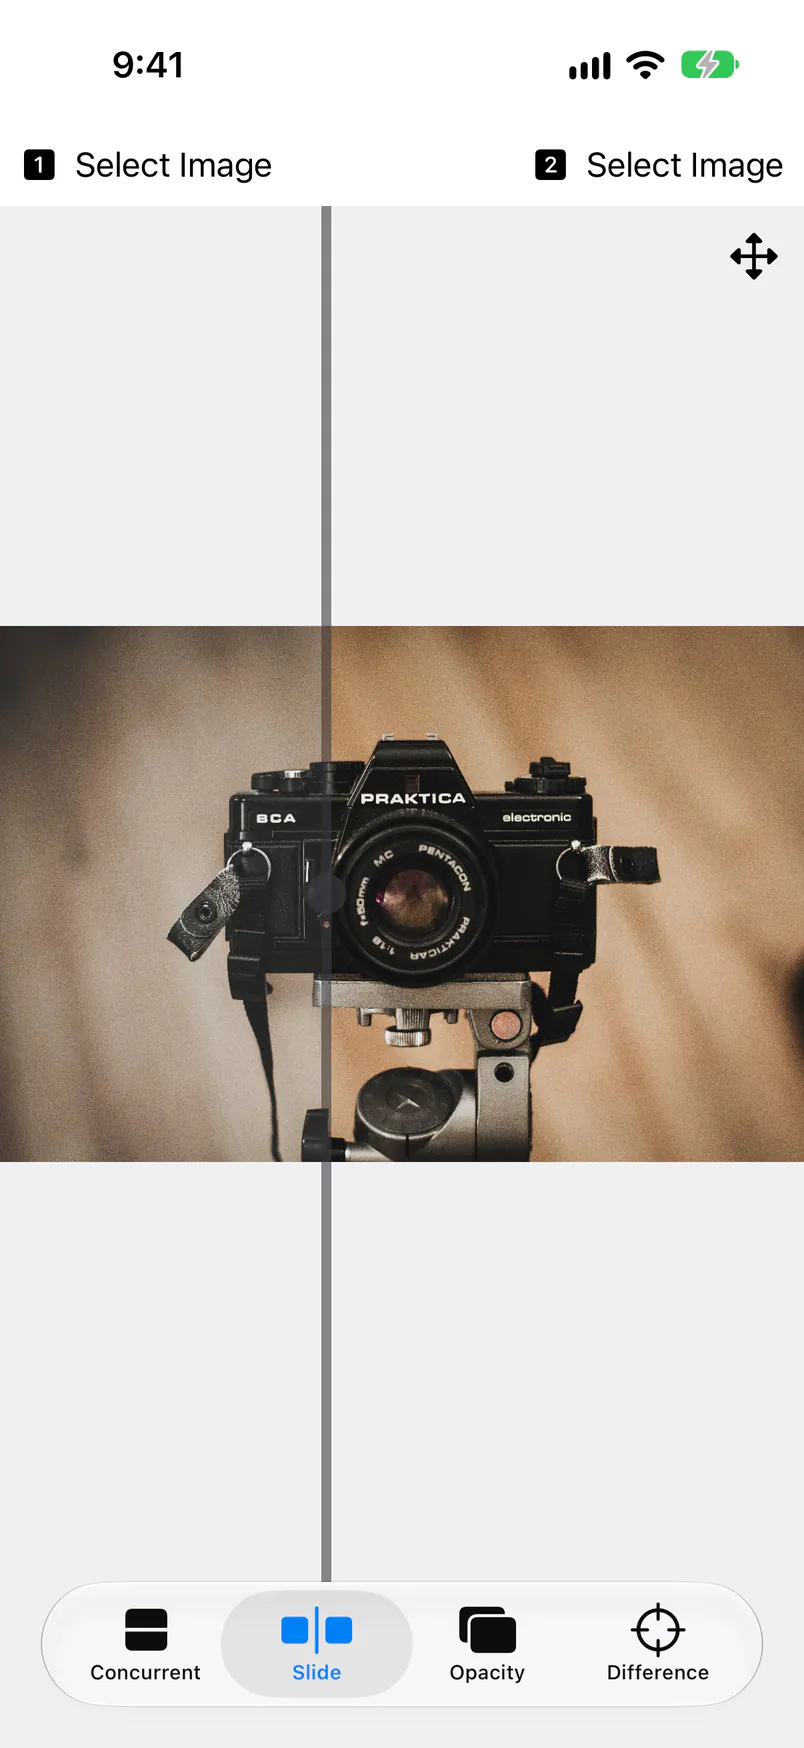
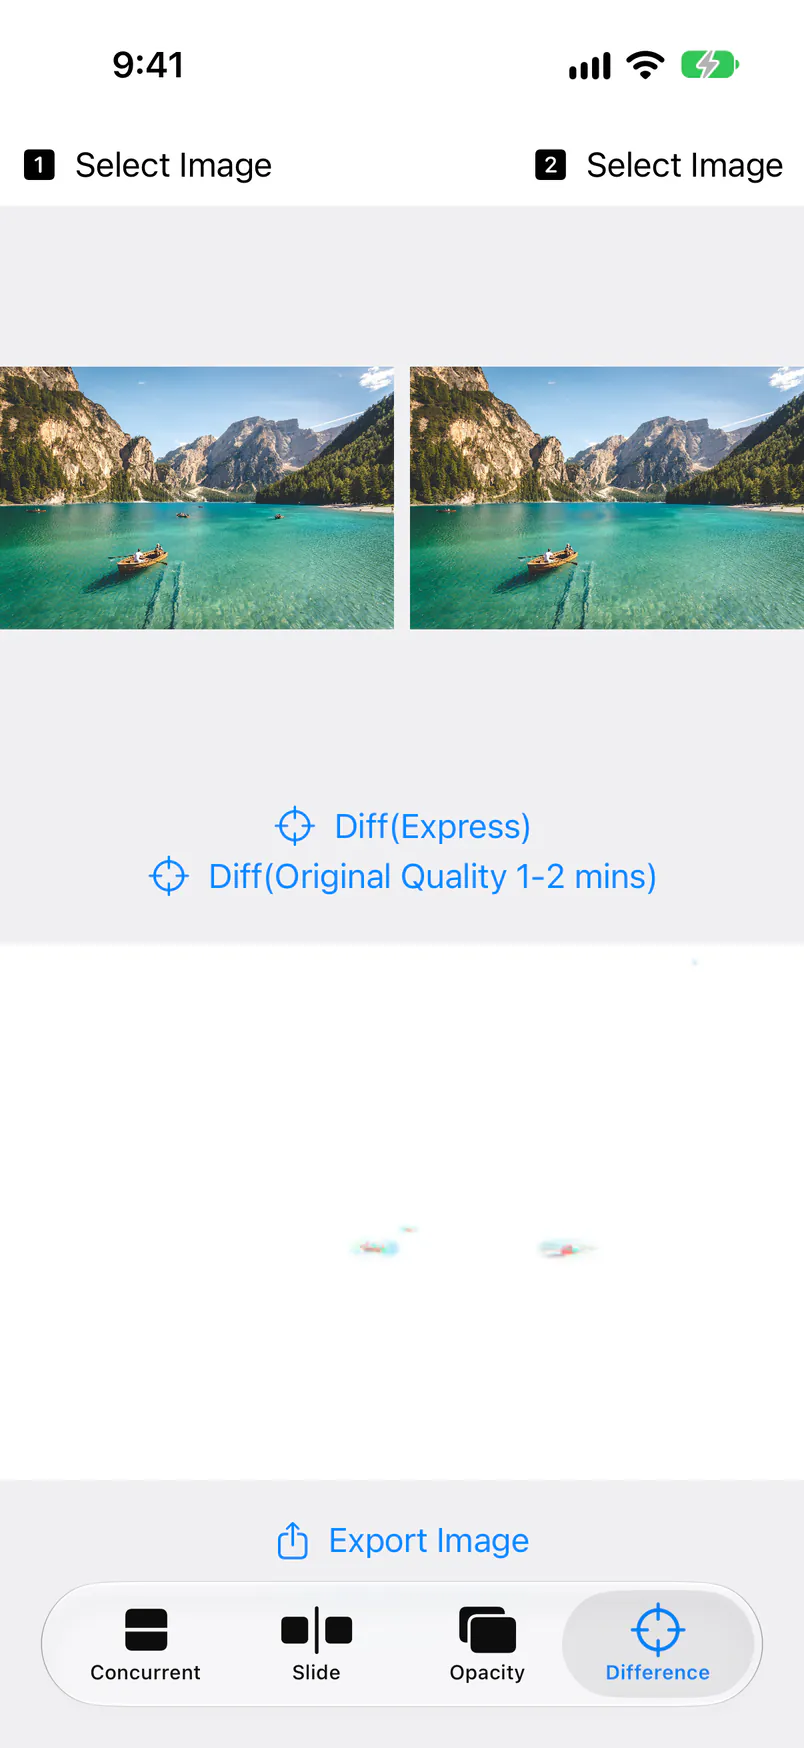
The pictures show the app in English, as it appears on an iPhone set to English. Here is when to use each of the four ways.
- Concurrent (side by side) — shows both photos at once. It picks the arrangement, stacked or left and right, that shows them larger for the shape of the images.
- Slide (slider) — overlays the two photos, with the first one left of the divider and the second one right of it. Drag the divider to see the same spot before and after an edit.
- Opacity (overlay) — puts the second photo over the first, half transparent. Change the opacity and shifts and small changes stand out.
- Difference — computes the difference pixel by pixel and makes an image that is white where the photos match and colored where they differ. You can save this image to Photos.
For two photos taken from slightly different positions, use position adjustment: move the second photo by dragging, pinching, and rotating with two fingers until it sits over the first, then compare. In Slide and Opacity you can pinch to zoom in and check the details.
All four ways to compare are free. The free version shows an ad at the bottom of the screen. The paid Image Compare+ has no ads and adds Blink, which shows the second photo only while you touch the screen, picking images from Files, and more. The Image Compare user manual explains every screen.
iPhone and iPad · Free (with ads) · Photos stay on the device
No extra appMethod 2: Flip between the photos in the Photos app
For a quick look, the Photos app is enough. Open one photo and swipe left or right to move to the neighboring photo, then go back and forth to compare.
- In Photos, open one of the two photos you want to compare.
- Swipe left or right to reach the other photo, and flip back and forth between them.
If the two photos are far apart in your library, put them in the same album so they sit next to each other and are easy to flip between. You can't put the two on the same screen or overlay them in the same position, though. You have to remember where to look each time you flip, so this is not suited to finding small differences.
For people who like to build itMethod 3: Make a side-by-side image with the Shortcuts app
With the Shortcuts app that comes with the iPhone, you can make one image with two photos side by side. The image is saved to Photos, so you can zoom in to compare or send it to someone as it is.
- Create a new shortcut in the Shortcuts app. If iOS 27 opens a “Describe a shortcut” screen, tap Edit at the top right.
- Search the actions and add “Select Photos”, “Combine Images”, and “Save to Photos”, in that order (on iOS 18 the last action is called “Save to Photo Album”). The three connect by themselves.
- Tap the arrow next to “Select Photos” and turn on “Select Multiple”.
- Run the shortcut and pick the two photos; the side-by-side image is saved to Photos.
Combine Images is set to Horizontally at first, and you can change it to Vertically or In a Grid. On iOS 18.0, a 4032 × 3024 px photo and a 3000 × 2002 px photo produced one 7032 × 3024 px image (the two widths added up, with the height of the taller photo). If the two photos differ in size, they come out at different sizes in the combined image. You also can't overlay the same spot, so when you need to check small differences, method 1 is the better fit.
Which method fits you
- What changed between before and after an edit or a retouch — Slide or Difference in Image Compare.
- Which of two similar shots to keep — Concurrent or Slide in Image Compare. For a quick look, flipping in Photos is enough.
- Progress photos taken from a fixed spot — align them with position adjustment in Image Compare, then use Opacity or Slide.
- A side-by-side image to send or post — Combine Images in the Shortcuts app.
- Smaller photos before you post — see how to resize photos on iPhone.
FAQ
Q. Can the built-in tools show two photos side by side?
The Photos app has no view that puts two photos on the same screen. You can swipe left and right to flip between neighboring photos, or use Combine Images in the Shortcuts app to make one image with the two photos side by side.
Q. How do I check what changed between a photo before and after editing?
The reliable way is to overlay the two photos in the same position. In Image Compare, Slide lets you move a divider and see the same spot before and after, and Difference makes an image that colors only the parts that differ, so changes that are hard to see by eye show up.
Q. Can I compare two photos taken from slightly different positions?
Yes. With position adjustment in Image Compare you move the second photo by dragging, pinching, and rotating with two fingers until it sits exactly over the first, then compare. The alignment is shared by Slide and Opacity.
Q. Do I have to upload my photos to compare them?
No. Image Compare only loads the photos you pick and displays and computes on the device; nothing is sent to a server, and your original photos don't change. Combine Images in the Shortcuts app also works on the iPhone itself.
Q. Can I keep the result as an image?
The difference image made in the Difference tab of Image Compare can be saved to Photos. To keep the two photos side by side as one image, make it with Combine Images in the Shortcuts app.
Q. Is it free?
Image Compare is free, with all four ways to compare: side by side, slider, overlay, and difference (an ad is shown at the bottom of the screen). The paid Image Compare+ has no ads and adds Blink, which shows the second photo only while you touch the screen, picking images from Files, and more. The Photos and Shortcuts apps come with the iPhone.
Summary
To see what differs between two photos, Image Compare is the most reliable way, because it overlays them in the same position. For a quick look, swipe left and right in the Photos app to flip between them. When you want the two photos side by side as one image, make it with Combine Images in the Shortcuts app. With every method your photos stay on your iPhone.